@Grace, yes I would agree but it’s all about community interest, and the underlying things can be included if there’s a tasty carrot. I consider the underlying foundational fixes to be as appetizing as cardboard to users, and the SVG image feature gets people excited (and has done so for many years) so it’s the carrot. This is the secret to successful fundraisers, finding the appropriate carrot.
I would contribute to this feature. I use the approach of coding the image name into the source code and re-compiling quite a bit!
I usually draft small scale patterns by hand and my poor brain is just having a hard time getting the hang of using the software to draft pieces.(That is all me not the software) being able to use a scan of my hand drawn stuff to scale up to people sizes would be awesome. I am starting to figure out how the formulas work but it’s very slow progress as I am always fighting my mind to stay on task! If this was a feature you had to pay a one off fee for I would be quite happy with that too.
Just picking up this topic… I made some major headway on implementing this feature pulling from my own fork.
Got most of the feature working… just need to address a missing (background) mage file when loading a pattern. Also I would like to add UNDO / REDO to importing/removing an image. It should be noted that this works with PNG’s, TIF’s, BMP’s, JPG’s, GIF’s, as well as SVG’s.
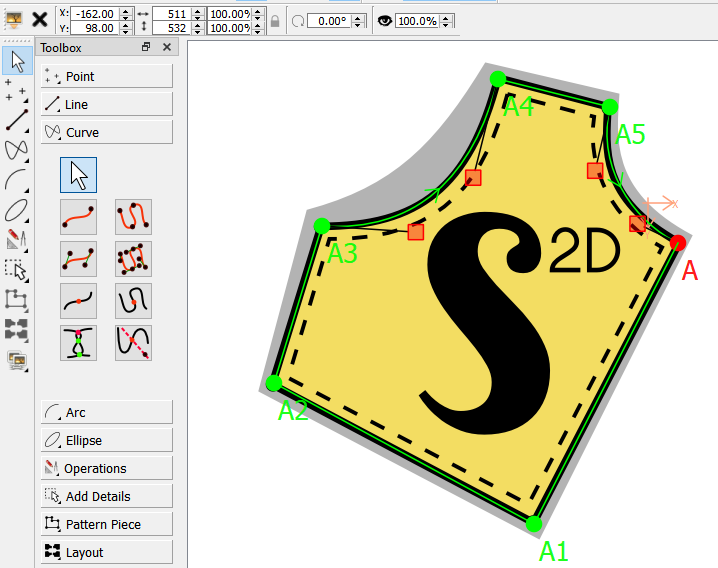
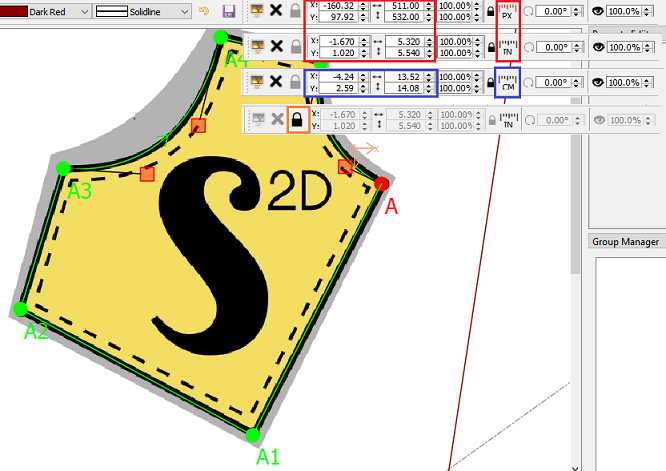
This pic shows the image toolbar with the tools to load, remove, move, resize, lock aspect, rotate, set visibility, and opacity. You may also note that I traced around the imported image. 
Oh, wow! This will be amazing!!! Thank you very much 


WOW, this was discussed so often, I really wish it had been implemented at the very beginning of this project. Thanks @Douglas!
Yeah… just another one of those things RT doesn’t seem to see value in.
Anyhow… here’s a look at the draft block element in a pattern file… you can load a background graphic for each daft block.
<background>
            <image fileName="C:/Users/rocke/seamly2d/graphics/Seamly2D_2D_img.svg" isVisible="true" lockAspect="true" opacity="100" rotationAngle="0" scaleXPercent="100" scaleYPercent="100" x="-160" y="98"/>
</background>
I’ve got it basically working… just need to fix a few minor things that broke as I rearranged the code for loading the images to account for a “missing” image file. I’ll push the changes for this issue after I fix those things and push the major changes for the dialog updates - which I’m just making sure I didn’t miss anything in resolving a bunch of conflicts between develop (which has all the point name changes) and my dialog update branch (which didn’t have the point name changes). Since I branched this issue of my dialog update branch, it should be committed after the dialog update branch to avoid yet more conflict resolving - which I found can be tedious when there’s a lot of changes.
After that we can look at ways to improve interacting with the background image(s)… like sub classing the QGraphicsPixmapItem that the images are using, so a user could interact with the image just like with the grainlines and labels to move, rotate resize an image.
I’m open to any ideas of ways to automate positioning a point on an image to the basepoint of a draft block and / or scaling an image to real world scale - which is really needed to be able to trace an image. if you note in the pic I attached I used the X:Y fields in the toolbar to position the basepoint A on the image. While not hard, it’s a trail and error thing.
Got all the parts working. Had to get the toolbars / menus in sync ,and to update the image(s) correctly. Yay.
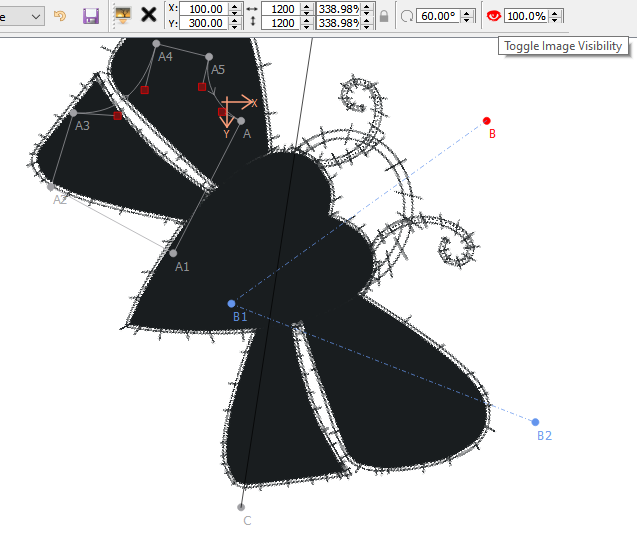
Made the Remove Image, Toggle Aspect Ratio, and Image Visibility tool buttons turn red on hover.
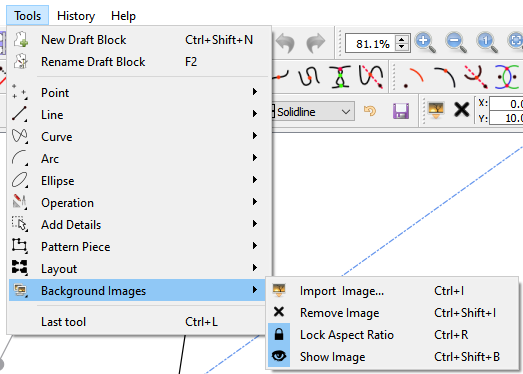
Besides the Image toolbar, images tools are also accessible in the Tools-Images menu:
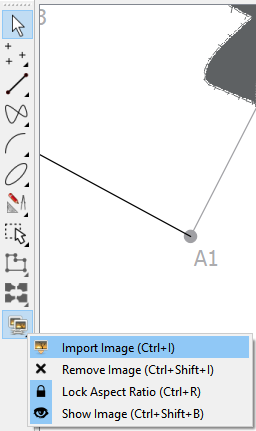
and the Toolbox Toolbar:
I’m thinking of adding a toggle to switch the XY pos and image size between pixels and the default measurement unit selected (mm, cm or inches). It may make it easier to move and position an image.
Oh, wow! This looks amazing. 

Actually made a major improvement code wise after I posted the last pics. I figured out how to recycle the QActions of the Tool Menu / toolbar toolbuttons to create the Toolbox Toolbar context menus. The context menus were additional (duplicate) code that mirrored the Tool menu items, but if you notice the shortcuts are not nicely aligned in a column like the menus are… that’s because I couldn’t add duplicate shortcuts or there would be a conflict. Normally when you add a menu item and include short cuts, it formats the text and shortcut in 2 columns. I couldn’t figure out a way to neatly format the text and short cut in one col, and it’s been driving me nuts for some time. I found out that there is an undocumented QMenu method that creates a menu item from an existing QAction. So, now not only are the shortcuts nicely aligned, I eliminated a whole bunch of code. Plus there might be a few more other context menu items I can eliminate some more code on. ![]()
Looking for some feedback. .
Does anyone think I should add an Images page tab to the Toolbox with at minimum the import and remove image tool buttons? Unless I can figure out interaction with the image and the ability to edit it’s properties in Properties Editor… you really need to use the Image Toolbar.
Heck… if I can figure out how to select an image on screen, I can add a right mouse button context menu - again recycling the existing image QActions. 
Another thing I’m debating is how / where to locate an image when it’s imported. Currently an image will locate to the XYorigin (0, 0). Since an image is associated to a given draft block I was thinking maybe it should import to the draft block’s basepoint?
Which brings up 2 options…
-
To locate it at the XY pos of the basepoint, that is the offset from the origin.
-
To map it relative to the basepoint… that is setting the image XY to 0, 0 puts it (centered) at the basepoint.
Doing #2 has the benefit of keeping the image in sync with the basepoint if you move the basepoint. With #1, if you change the basepoint position, you also have to change the image position. Even though it will take some more work, #2 seems the better way to go?
A third addition to the feature would be to “lock” the image so it can’t be edited / moved etc. ? Would become even more useful once the ability to interact with an image is implemented, as there would be an increased possibility of accidentally moving an image out of sync with the basepoint / draft block - after all the whole idea of a background image is to trace over, which is upset if the image moves.
![]() Me, personally? oh, yeah… but I think if you can add a right-click menu on the page, it would be enough, or add it to the options menu on the base point & other right-click menus.
Me, personally? oh, yeah… but I think if you can add a right-click menu on the page, it would be enough, or add it to the options menu on the base point & other right-click menus.
Would it be possible to move (drag) the image so that the base point is over a line at a desired place so start the lines & then lock it into place? And then, along with the menu above, one would be able to drag it to a different position later and (perhaps) drag it larger, if necessary?
I think a ‘lock’ for the image is a necessity, but I also think that one should be able to drag the picture around, resize it & perhaps rotate it. I don’t think that these need to be 100% correct according to dimensions, etc. but just a drag-type of action that one could tweak later, as well, would be great.
![]()
![]()
Yes it will be possible to drag, rotate, and resize an image… just like you can with the grainlines & labels. Once I am able to subclass the QGraphics pixmap item class the images are using to attach to the draft scene. Since I’ve become quite familar now with the QGraphic item classes, it shouldn’t be that hard to implement… which obviously will make it much easier to interact with an image - at least to get it near to where you need it, and then tweak the properties in the toolbar to be more exact.
BTW… I’ve already got 1/2 of the locking an image done… just need to add the actual part to disable the toolbar buttons.
My initial reaction would be that the toolbox should either have all the tools, or that it should be only the draft-manipulation tools. I see that you currently have it on the toolbars, & that may be enough, though context-menus, etc. would definitely be a plus.
If we assume that the toolbox should be optimized for people who are new to Seamly, I think enough interest has been expressed by newbies for the tool to be in the toolbox, though it might help people not to make assumptions about it if it is not there.
On the other hand, I believe it is inevitable that we will be getting, “Why won’t my imported background image render to the pattern piece?” as long as it is possible to do it, so that’s probably not worth taking into consideration.
Option 1 has the benefit of the position coordinates showing at the bottom of the screen, however, option 2 seems better in all other ways.
![]()
That was my thoughts. Like I said I’m thinking to place the image toolbutton in a new Image tab, as they don’t really fit any of the other tool groups… Operations would be the closest, but even there they don’t really fit. By adding another page tab I hope it won’t cause the dock to require a vertical scroll bar… mainly for anyone using the 125% screen size. I did redo the layouts in the toolbox to reduce the large margins so it may not be an issue
Or more likely…How can we add an image to the pattern pieces or label? Which I’ve already thought of… but one has to keep in mind that while a bitmap image can be printed, they’re not going to plot.
It would be a bit more (maybe a lot more) complex, but I could make it a preference choice which point to anchor an image to, the origin or the draft block base point. Realistically though I see the image coordinates being rather moot if we’re able to drag and move the image to place a given point on the image under a basepoint. Or better yet… if a user could click a point on an image that places it at the basepoint. In either case the position an image loads is not as critical. Centering it on the basepoint when loading would put you closer in the ballpark so to speak.
What about having the top-left corner of the image defaulting on the base point when originally loaded? That would be least likely to cross over other draft blocks. Obviously, something will still need to be moved most of the time, but it’s less likely to be both the image & the block, so maybe even approaching the infield?
Without getting too deep in the weeds… Actually by default a QGraphicsItem (and thus all the subclasses that inherit QGraphicsItem - such as QGraphicsPixmapItem which I’m using to add images to the draft scene) has it’s origin at the top left corner. You have to perform a transform translation to set the origin else where - such as the center - which I’m currently doing.
That being said, there’s no reason why we couldn’t make it a user choice where to anchor ie locate the origin point. It’s a standard practice in vector and CAD programs and I’ve wanted to add that functionality to the grainlines & labels anyhow.
The more I think of it, I am going to further subclass the QGraphicsPixmapItem, which will allow me to reimplement the event handlers to be able to interact with the image(s). It only makes sense to NOT leave the feature 1/2 done. It also means we can use that class in the future to add and handle images elsewhere - like placing a logo in a label. Also within that subclass there can be a method setAnchorPoint().
It was tricky getting all the enables and checked’s for the toolbar & menu correct, but I’ve added the properties to lock an image, and toggle between using Pixels or the default Unit for the image position and size. Also to note the unit toolbutton label will switch between PX and either IN, CM, or MM depending on the default Unit in use.
When locked, all other toolbuttons (and Image menu items) are disabled.
YES ![]() The future looks bright… gotta wear shades.
The future looks bright… gotta wear shades.