Thank you @aisyaastari !!! This is the information we’ve all been interested in.
As @Douglas pointed out, in the Layout mode even if there’s not a seam allowance it still exports the cutline on top of the seamline, which creates problems.
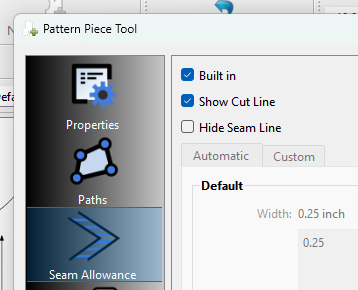
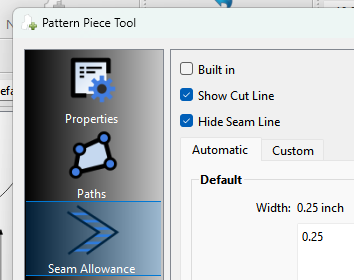
So one more parameter is needed: Check the Seamline ‘Built in’ option so that the seamline becomes the cutline with no seam allowance.
Summary to export to CLO3D:
In Seamly2D:
Set pattern piece seam allowance with checkbox ‘Built In’
Export as “DXF R10 AAMA”
In CLO3D:
Import with “Auto-trace as Internal Lines” and “Optimize All Curve Points”
And something for me to look into is improving the “Toggle Allowance” toolbutton to act as a global built-in SA in Piece and Layout mode vs just hiding the SA in the Piece mode display. That way a user can export all the pieces with or without the SA simply by toggling the toolbutton… OR maybe (also) adding an “Export with SA” option to the export? Or for that matter add a check list of what parts to include in an export… SA, Grainline, Labels, Notches, etc. This would probably make life easier for anyone exporting multiple sizes that they then make into a nest in another app like Inkscape. Hmmm.
So I spent some time and I have solved this problem for myself, and allow me to present the solution.
I have hacked together this python script which takes a seamly DXF export and turn it into another DXF which imports in such a way that clo3d respects the curve points and bundles them together. Instead of getting 15 points in a curve, you get the endpoints and it’s a lot easier to do sewing etc.
The key thing is the conversion of the AAMA DXF into a hacked up ASTM-DXF file. Basically the ASTM standard uses different layers to indicate which points are major corner points, and which ones are the poly-line points of the curve.
The python script assumes any point that is at an angle less than 120 is a corner point, and all other points are curve point lines. It works on my tshirt arcscye and sleeve piece. I haven’t tested extensively but I think you might find it useful.
This should be an easy hack to seamly2d itself. I would consider doing it, but QT is a 30GB install, so I don’t really have that much space to deal with that.
In Seamly curves are dealt with as a series of straight line segments… as the QGraphicsScene only deals with straight lines. Exports are simply exporting the graphic items so there is no curve data. If you reduce a curve to the end points your’e just going to have a straight line.
We don’t hack Seamly.
Anyhow - Script makes no sense to me. I don’t see how this could be used to produce a compatible DXF? Not to mention I have no clue where this pattern.api is suppose to come from?
Most of the file is dealing with DXF, but the magic is in write_clo_dxf, where the code duplicates points to layers 2 and 3. Without points in layers 2 and 3, clo3d doesn’t know which points are curve points, and which points are the ends of longer straight lines. Without this, the DXFs imported into clo3d are difficult to deal with, since you end up with like 100 little lines each requires individual manipulation, even for curves. With this change, Clo3D now sees curved segments as curves it can manipulate with curve tools, sewing segments is a lot easier, etc, etc.
Anyways I posted this here because google searches for this problem end up at this thread.
@RyanR I assume that pattern_api comes from CLO: API List — CLO API 0.1 documentation, but I can find write_clo_dxf neither in your submitted code, nor in CLO’s API list.
Yes that’s my auto tooling for assigning pattern pieces to avatar locations in an accelerated fashion. The UI for Clo3D can be inefficient for some workflows.