Lowest point of curve?

Yes this make sense… vertical measurements are marked off to provide horizontal lines, the bust point is located, etc… here the lowest point of the curve is located BEFORE the curve is drawn. Unlike the original post just wanting the lowest point of a curve.

1 Like

Yes, it’s a matter of pattern making methods. I think that in most methods for bra making, they’ve eliminated the need to draft the moulage and headed straight out into drafting the band first, angling it as if the darts have already been closed and with the under-curve already in place, which necessitates the finding of the lowest point on the curve.

Yes, that’s the way I would do it. It’s not absolutely accurate, but I’ll be OK with it (since it’s “just by hand”)

Lowest point (as @Grace wrote) is about design and notch, but it has to be there :smiley: This curve is a wireline, wire has been cut but I don’t know the original length/width, just the position in bra… It’s disappointing :smiley: If I knew the measurements, it would be easy (with a circle) :frowning: If I locate the point 2mm and more out of the lowest point, the bra will look odd. That’s a thing you find out only when bra is on the body… The notch marks a seam on cup going to bust point and without it I can’t even make the cup pattern :smiley:

If it’s not possible right now, I’d have to guess where the point is.

Thanks

2 Likes

Another way would be as @Pneumarian suggests… Establish where the bustpoint would normally be & use the same tool that I suggested at a 270° angle (downwards) and this should normally be the lowest point on the curve, since it’s normally the measured distance from bustpoint to low bust line.

Well… if you’re only concerned with one size, you could print out the pattern as it is now. You can now export a draft block in the latest ver… print & draft the point on paper… measure the distance along the curve from one end or the other, then go back in Seamly2D and add a point along the curve at that length. If you need to adjust to more than one size… I’d add a midpoint between B5_B3. Find the angle between the midpoint and the point on the curve you located, and create a new point from the midpoint and an axis at the angle intersecting the curve. That way the point will scale reasonably well.

1 Like

Hi! Thank you so much for the post. I think now only me really needed the point to be correct. It is really valuable.

2 Likes

Hello, @JuliaWo , and welcome to the Seamly2D forum.

The other option is to first determine where the lowest point is to go and to create the curve to pass through it, like here:

image

If you were creating the curve using the Arc tool, then you could use the Tangency Point of Arc and Tangent tool, but that would also need to have a line at the height of where the lowest point should be.

1 Like

Hi, Julia! Thanks so much, now we’re two! :smiley:

2 Likes

Hello folks,

I was looking for an advice about finding the lowest/the most protruding point on a curve and I found this topic. If I understand it properly, it actually can’t be done unless the curve is an arc, is that so? :frowning:

I am looking to solve this:

I need to find A3 on my pink curve (front armhole); A3 resides on a tangent of the armhole + the tangent goes through the point začátek_raglánu_PD. Sure, I can guess A3 without much harm but resizing the pattern than doesn’t scale nicely and I have to edit the A3 location after each resizing. I would be grateful if there would be a way to express A3 with formulas.

I am using the “Point - Intersect Curve and Axis” tool for finding A3 now.

Thanks!

2 Likes

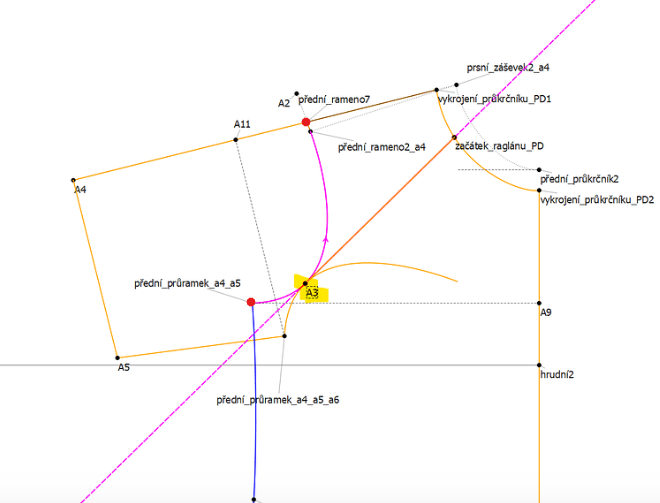
Ich denke, dass du bereits den Punkt A3 so setzen musst, dass er bei den verschieden Größen sich der Größe anpasst - in Anlehnung an die Brustweite und der Schulter. Das geht nur, wenn du für die Brustweite und deine Schulterlänge Formeln verwendest die auf die Maßveränderungen eingehen. Dann bleibt der Punkt A3 in der Relation und muss nicht bearbeitet werden. Du kannst dann deine Linie um Punkt A3 und začátek_raglánu_PD ziehen und darüber den Armausschnitt spiegeln.

image

2 Likes

@Scholli, how would you do this and which tool would you use? Can you explain it in a bit more detail, please? I’m a bit at sea.

1 Like

Ja, kann ich machen. Weiß nur nicht ob ich es heute schaffe :grimacing:

2 Likes

That’s the not the lowest point of the curve. As you’ve stated it’s the tangent point of the curve and a line from začátek_raglánu_PD - which we don’t have a tool for - yet.

That being said… if it were me, as it looks like the point A3 is the normal (front?) notch point - I would find the point A3 by creating an intersect 3/4" - 1" above the Line predni_pruramek_a4_a5 to A9. Then you can mirror your armhole curve around the line A3 to začátek_raglánu_PD.

If we had an Intersect - Curve and Tangent tool it would automatically resize, as the tool would always find the correct tangent point. Otherwise my solution would accomplish the same thing.

2 Likes

Yes, you are right, thanks!

Sorry, I don’t think I follow on this one. If you wouldn’t mind to draw it, it would be great.

1 Like

Sure. Create a new point 3/4-1" (1.9-2.54cm) above A9. Then using the Intersect Curve & Axis you locate point A3 using the new point as the Axis point. This creates the typical location of the notch point on the armhole. Now you can use A3 to začátek_raglánu_PD as the Line to mirror the armhole cruve around. In other words - since we can pretty much assume A3 is where the notch point is, and that is typically 3/4 - 1" above the breast line - I’m looking at it backwards… where we use A3 to find the tangent line, rather than the tangent line to find A3. Will A3 be exactly the Tangent point? Probably not, but it’s close enough, and like @Scholli has pointed out A3 needs to adjust with size changes, and since we have no Intersect Curve and Tangent tool, there’s no sensible way to eyeball the placement of A3, unless you did that every time you changed size.

raglan

4 Likes

Thank you, @douglas. That’s a great solution - I didn’t think of it this way. I guess the new point could be make to go higher or lower with size by giving it a formula to 1 fifth of the length of line vykrojeni_Prukrcniku_PD2 - A9.

1 Like

Here’s another example, where in one of my Jacket patterns the notch point is 1" above the breast line. In this case the Notch point is located BEFORE the curve is drawn… which is another option. You could locate A3 first, based on a proportional distance from CF, then 1 inch up. Then you create your armhole curve. For simplicty though the 3/4-1 above the breast line will put the notch point pretty close.

3 Likes

Ich sehe es genauso wie @Douglas. Habe jedoch einen anderen Aufbau:

image

Der Punkt A14 auf meinem Gerüst steht in Abhängigkeit meines Armlochdurchmessers. S1 - A15 und A-26 (hinterlegt mit gestrichelten Linien) sind die Rahmenbedingung für mein Armloch. Verändere ich jetzt meine Größe, verändert sich auch die Position von A14.

image

Ein Beispiel für Gr. 46 und Gr.38:

image image

Von A14 geht ein Punkt (A44) ins Armloch und bildet den vorderen Armausschnitt und macht die gleiche Veränderung mit wie A14.

image

image

Dieser Punkt ist ein Achsenpunkt, um den das Armloch gespiegelt werden kann.

image

4 Likes

Thanks a lot @Scholli and @Douglas for the explanation! I will use this approach, it seems promising :slight_smile:

2 Likes

Just for your info guys, thank you, it worked :slight_smile:

3 Likes