Hello guys, I am new to Seamly, I have had it for over a month now and have worked on it pretty much every day, I think I have been able to understand a good part of it by watching videos and reading posts here, but as many other people, I am now a little (very) frustrated as I think I have hit a place I can’t move forward from, I have read on this forum that I should NEVER freehand curves… oh well. I thought I didn’t, but it turns out I did hahaha. Anyway, long story short, I am looking for one of you amazing expert people to help me fix my issues, I am trying to create a pattern for a body suit, and I have reverse-engineered the pattern, so I understand what I am supposed to do, but I can’t get it done properly. I work as a teacher with students 12-18 years old) we do lots of plays where they wear a unitard and we project the images on them as part of the show, I have 29 students, so I need a pattern that will adjust on each one of their measurements, I have created the pieces already, but I need help with most curves as I have realized I didn’t do it properly, can anybody help me? I would be willing to take a few hours of your time to explain to me (i couldn’t find videos that I could follow properly and have searched for days) and of course, pay for it if necessary! I hope someone can help me!
@Maoa2121 I can help with the curves.
Hello & welcome to the Seamly forum, @Maoa2121
Your project sounds amazing. I hope you will share a photo or 2 of the show ![]()
Your range of sizes is quite large. However, I’m sure @leelakrishna will be able to help you with your curves.
I coul dassist you too. Maybe you could send some pictures to show us a bit more detailled what you need
I made 4 different types of curves which change simply based on the points in between.
Most of the time, these 4 curves should be sufficient, I can share the source file so you can adapt to your work
Hi Leelakrishna,
as one who is also on a steep learning ‘curve’ (haha), I think any instructional information that could be shared in this round, would be greatly appreciated. I think that additional instructional material made ‘public’ here would be beneficial to all N00bs, myself included.
Brgds, David D.
Hello @DavidDeb
I normally create all of my design elements first and do the curves last - for instance… the neck line curve needs to take the shoulder slope into consideration or the front neck curve needs to take the back neck curve into consideration so that the made up pattern will produce a smooth curve and not something that peaks anywhere.
With this in mind, the curves need to join somewhere, either at a 90° angle to a seam/curve or 180° angle to another curve, or both - normally both. So by baring this in mind, you will have the angles of the control handles sorted.
In a multi-point spline, the intermittent points will only be set by either the 1st control handle or the 2nd one, the other one will always be at 180° to the other, so (normally) it’s only the 1st one and the last one that will rely on a seam or another curve, while the intermittent points will rely on something or some formula in the pattern to determine their direction to ensure a smooth curve.
The length of the curve handles is a little more difficult to determine and this is why I use the distance between the 2 points divided by 3 (or 4). The points for the 1st control handle are the one before and connecting point and the 2nd control handle is the connecting point and the one after.
Using the points and lengths existing in the pattern, which will adjust according to the measurement file loaded, normally ensures that the curves will adjust smoothly between sizes.
I hope that this will help you a little further. ![]()
Hello Grace,
thanks for the response, I did learn the reasoning for the 90° / 180° transition from Cornelius Quiring’s YouTube presence and having made mistakes in that area, I have internalised this concept.
However, your explanation of the relationship of the ‘Control Handle’ angles / lengths, to (I take it) the matching seam curves of the mating garment piece, has left me in somewhat of a tiz.
Is there some way to explain this in a somewhat more ‘plastic’ fashion? Sometimes the most elegant explanation goes right over my head, but a few simple lines / dots etc. can nail it for me.
Regards,
David D.
Ok, Let’s see if I can explain this in pictures…
Here’s a basic bodice that I’m working on…
I’ve moved & rotated the back so that it meets with the front underarm seam. As you can see, the armhole curve continues through the back armhole and into the front armhole smoothly.
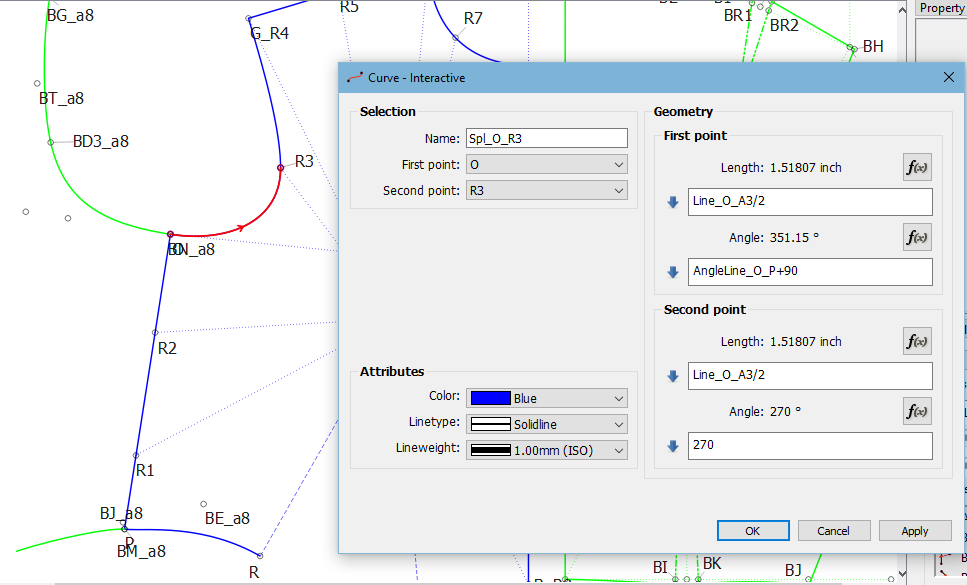
This is because I’ve used the underarm seam as the point of reference on both the front and the back, even if they are at different angles to each other. So on the front, I’ve said “take the angle of the front seam (Line O to P) and add 90° to it”. While on the back, I’ve said “take the angle of the back seam (Line BM to BN) and add 90° to it”.
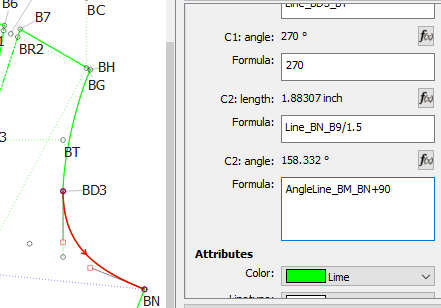
This way, that first control handle will always match the underarm side seam with a 180°, regardless of what size I make the garment or what the angles are of the side seam.
Here’s another example (same pattern) - waist line:
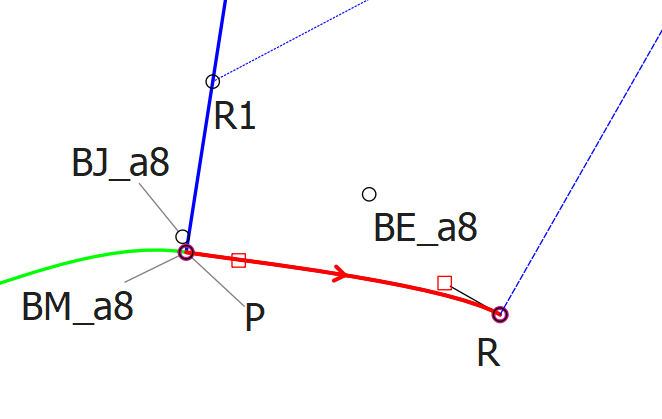
As you can see, I’ve used the same side seams to angle the 1st control handles, however, I’ve used the dart legs to angle the 2nd control handles. this way, when the dart is sewn closed and the side seams are joined, the curve will continue around the front and around the back.
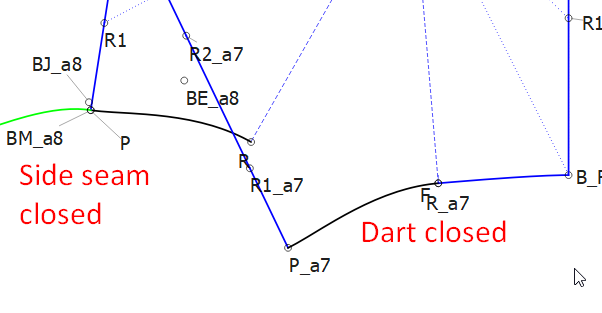
Does this ‘nail it’ for you? Let me know if it doesn’t, so that I can think of another way to explain it. ![]()
Hi @Grace ,
Thank you for your response. I think that your third graphic:
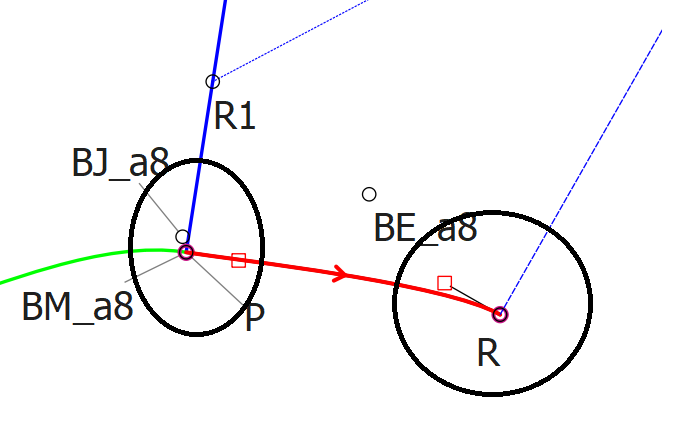
made the angles of the curve control tools, in relation to straight line elements of the piece (circled!), much clearer.
However other explanations for the other three diagrams, and the elements referenced, have confused me somewhat since I was initially unable to find some of the ‘points’ mentioned (e.g. O → P / BM → BN)
Repeated re-reads are making more sense each time, so let me stew for a while in your ‘Information Soup’ and I’ll get back to you.
Best regards,
David D.
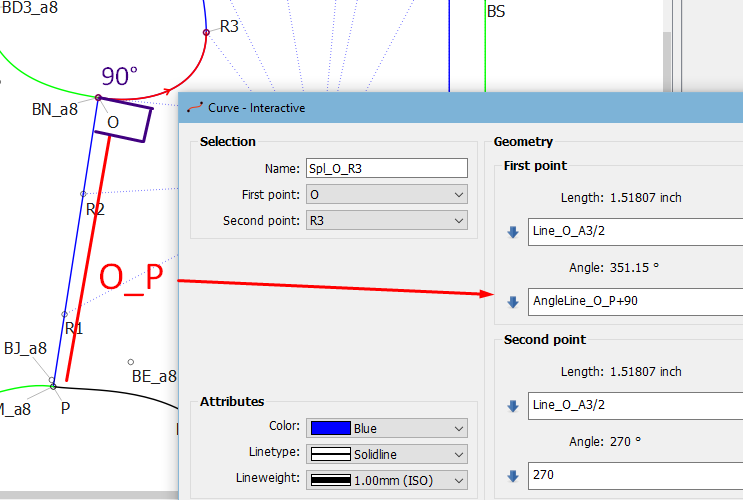
The line O_P
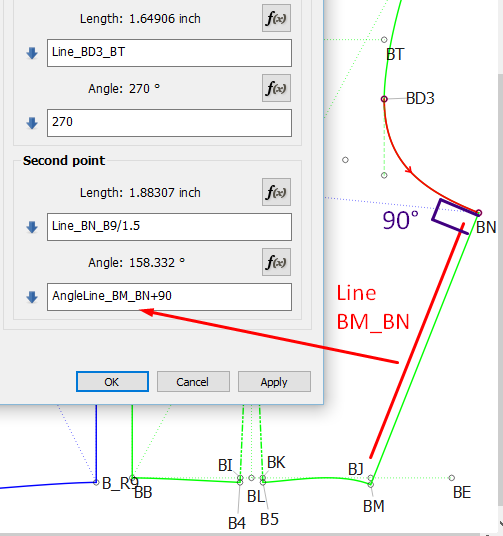
The line BM_BN
Perhaps these will help you to visualise.
![]() I’m so sorry. I don’t mean to. Everybody learns differently. I’m balanced - visual & reading, my daughter is more visual. So I always find a way to explain a thing in words & in pictures. I appreciate it if someone tells me they have a problem understanding so that I can try a different method of explaining.
I’m so sorry. I don’t mean to. Everybody learns differently. I’m balanced - visual & reading, my daughter is more visual. So I always find a way to explain a thing in words & in pictures. I appreciate it if someone tells me they have a problem understanding so that I can try a different method of explaining.
Noooo , that wasn’t mean THAT way, it’s just that I am sometime ‘Explanation Resistant’ !!
You havn’t and probably could not hurt my feelings … if I ask a question, I have to deal with how any answer is framed and intended - I’m pretty thick skinned though ![]()
![]()
Just a tip… Try to move & rotate your pieces to see if they fit on the areas where they meet (where possible). Like I did in the previous batch of images. This will always show you whether your curves are ‘true’.
Something that helped me years ago is that you must visualise the silhouette - just the outline - and then add the extra you will need to cover around the body and then add the darts. Once you can visualize this, then you’ll understand how patterns work. This worked for me, perhaps not in the way it was explained to me, but I can see where I need to add a little & where I need to take away a little and I can see in my mind what is needed in the pattern.
And then… Every question that is answered always brings in something that will cause another question, as one’s understanding increases, so don’t be afraid to ask. We all started somewhere.
I’m grateful for any constructive tips and criticism, and yours is very good. I have quite a good grasp of spatial concepts, technical etc. However, grasping topological surface concepts (Here: “garment construction”) is quite new for me. I find it challenging and very refreshing!
