Excited to join this community. I am a designer and also do pattern-making and sample machinist. Firstly I would like to thank the developers and all those involved in creating this software. I have just started to learn it and I am thoroughly enjoying it. Finally, I can move away from manual pattern making.
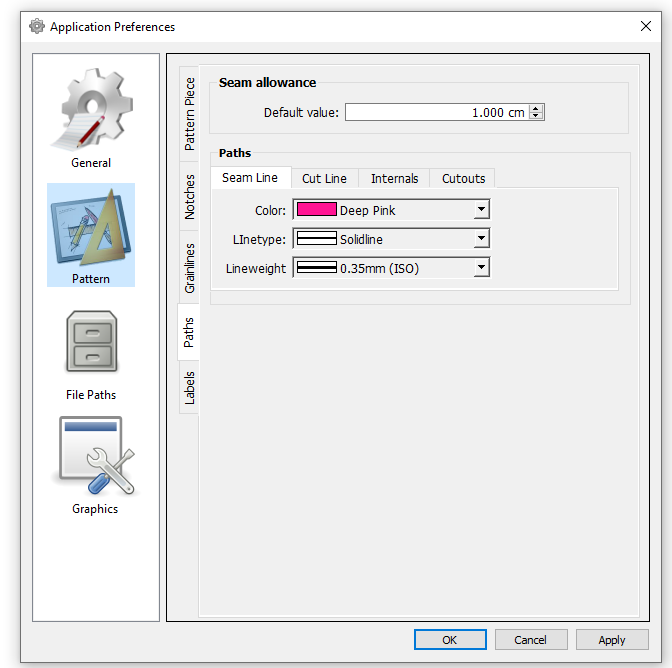
I have setup the path attributes in the application preferences for drawing the pattern (colour, line type, weight). However when I started creating the pattern, these settings dont appy. I have to keep changing the path attributes. Looking forward to your suggestions.
The path line attribute settings only apply in Piece or Layout mode. If you haven’t created any pattern pieces yet, you will not see the effect of these prefs.
The line attributes in Draft mode are set in each tools dialog. In the near future I will finish the Group line attributes where a tool can also be included in a group and set to the group attributes.
Hi Douglas
Thanks. I have created pattern pieces. I did notice that seamline (Deep Pink) does not show as deep pink in Piece mode but shows correctly in Layout mode. It shows as green in Piece.
Just upgraded to latest version. Saw the pen preset tools. Thanks for this.
I took a quick look… and there are few issues I will have to address. The issues are not really a Preferences issue, but rather how the Pattern Piece tool handles the graphic items in Piece mode - which is different than how they are handled in Layout mode.
Without trying to get too far in the weeds… Graphic items in a scene have 2 attributes… a Pen - which is the “path” or outline, and the Brush - which is the “style” or fill… both of which have a Color. In Layout mode the graphic items are simply made up of a outline with no fill - which is why there is no issue with the preferred colors displaying for the seam & cut lines. In Piece mode however a Pattern Piece graphic item is normally made up of the seam path (which is what was traced in Draft mode) and the calculated cutline path, which is what’s added outside the seamline path. Those paths are then used to make up 2 graphic items… think of a doughnut, where the seamline path and Piece fill make up the hole or Piece, and the cutline path, the seamline path, and the space between make up the seam allowance.
One of the issues that arises is that the seam allowance item has 2 paths the cutline and the seamline, and a fill. Bothpaths use the same pen - the cutline pen. Another issue is that the seam allowance item appears on top of the seamline item - so it’s pen is covered over and not visible… unless you make the seamline wider than the cutline, but that’s another whole issue. The reason why the items have to be doughnut in nature, instead of one item laid over the other, is that then you will see the fill of both items unless the Piece fill type is set to Solid.
When I looked at the code I instantly had the Aha moment, and realized I know what the solution is… add a 3rd graphic item - the cutline path where it just has just a pen, no brush, where the seam allowance part will have no Pen, just the brush, and then the seamline path will have a pen and a brush. So now there would not be 2 seamline paths with one on top of the other. There would be a cutline, the SA fill, the seam line and the piece fill.