I’ve been learning and using Seamly2D for a little bit, my goal is to create a basic tshirt “design” that reasonably scales with a number of different measurement files. A “template” if you will basically.
I’ve gotten a lot of things working so far, but one area that may always need manual tweaking is the sleevecap. Basically the goal is to set the sleevecap curve to the same length within an error to the armscye.
The challenge is that after the pattern has been synced with a new measurement file, there are some extra elements that might need tweaking based on the results of the first iteration of the sleevecap. I’m uncertain if this can be solved with conditional logic, or if it needs an iterative approach (like how freesewing does it).
Thinking out loud, I wonder what an iterative pattern solving module might look like. It would probably have to be an optional add on feature, and it would need some kind of programatic hook into the variables so things can be adjusted at the end with all the post-facto knowledge of a completed pattern.
There should be no need to iterate. You have to either use fixed curves or formulize the control points. When you do that the curves remain in proportion to a change in measurements.
Ich arbeite nur mit solche Vorlagen, die ich mir angelegt habe.
Jede Kurve verwendet in Länge und Winkel bestimmte Formeln, die auf das Gerüst zurück zu führen ist. Ändern sich die Maße des Gerüstes, ändert sich auch proportional die Kurve.
So my control points are all formualized off of adjacent lengths, but I have not ended up with something that scales properly.
To be ultra specific here, I am finding the lengths of the armscye curves arent close enough match to the sleeve curves after I loaded a new measurement set. I suspect this happens because I have had to set the bottom of the sleevecap width based on something not fully related to the armscye length.
Maybe the answer is to do that, base the sleevecap bottom length based on the armscye length. Right now it’s based on the bicep size.
The sleeve cap base width should always start with the size of the bicep, to which you add ease according to the use of the garment. In the case of a T-Shirt, it should be quite loose, so the ease will be quite a bit.
HOWEVER… the sleeve cap curve needs to fit the armhole curve, so if you’re making a formal shirt, the sleeve cap will be quite high while the width will be quite narrow. So for each additional length of ease in the width, you will need to deduct from the sleeve cap height to maintain the balance and to keep the sleeve curves approximately the same lenth.
It’s a very delicate balance, but if you can understand the above, and you use formulas for the curve handles’ lengths and angles, it is possible to get this balance correct within a few millimeters.
In the case of a T-Shirt, normally the armscye has quite a gentle curve and the length is longer compared to a formal shirt. The sleeve sleeve cap is considerably lower and the width is considerably wider and the curve is also considerably gentler than the formal shirt base pattern.
However, that is according to your design of the T-Shirt, so if your armhole curve is more pronounced and the armscye is shorter, then the sleeve curve will be more pronounced, the height will be higher and the width will be narrower but never so narrow that it doesn’t fit the biceps (unless you’re using stretch knit and you want a tight-fit, in which case, you’ll be using a negative ease).
This makes sense to me, I had redone my formula and placement to use pythagorean to get the length of the base - btw seamly needs a square or power function!
Regarding tshirts, for my design style approach the goal is to have form fitting arms. So my sleeve cap is taller than what might normally be used. This works well because knits are inherently stretchy, and my target fabric is knits with reasonable stretch.
My next stop after this is adding negative grading/ease to work for 4-way stretch knits!
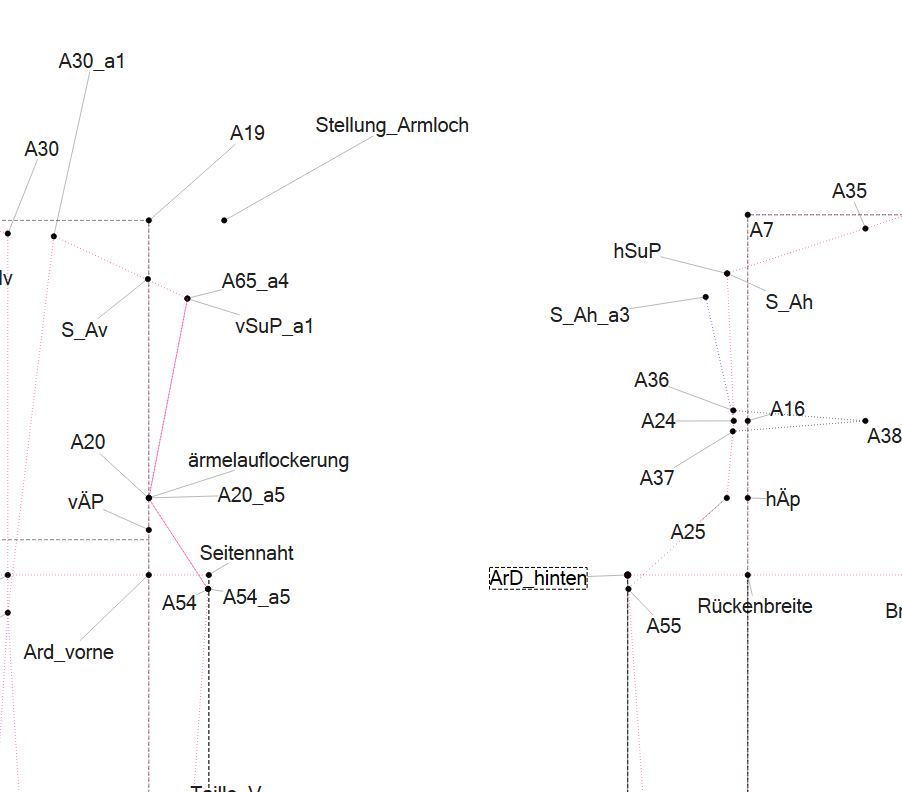
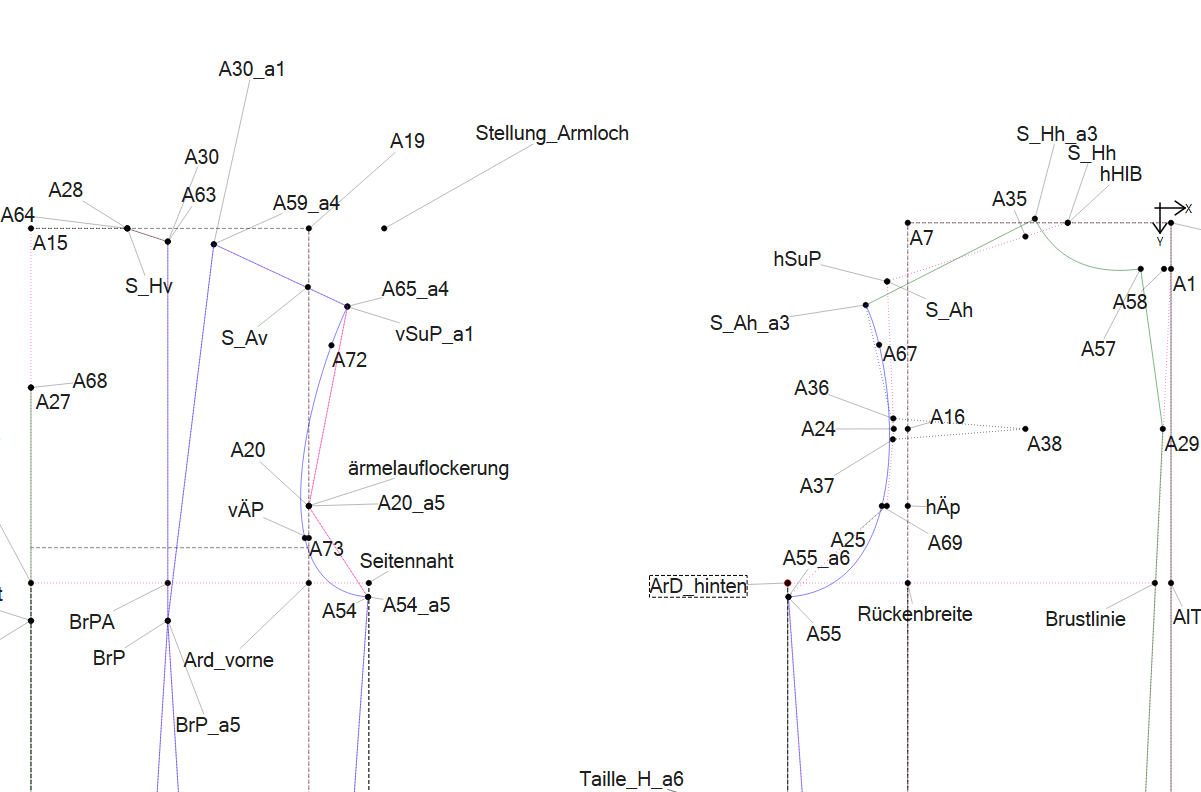
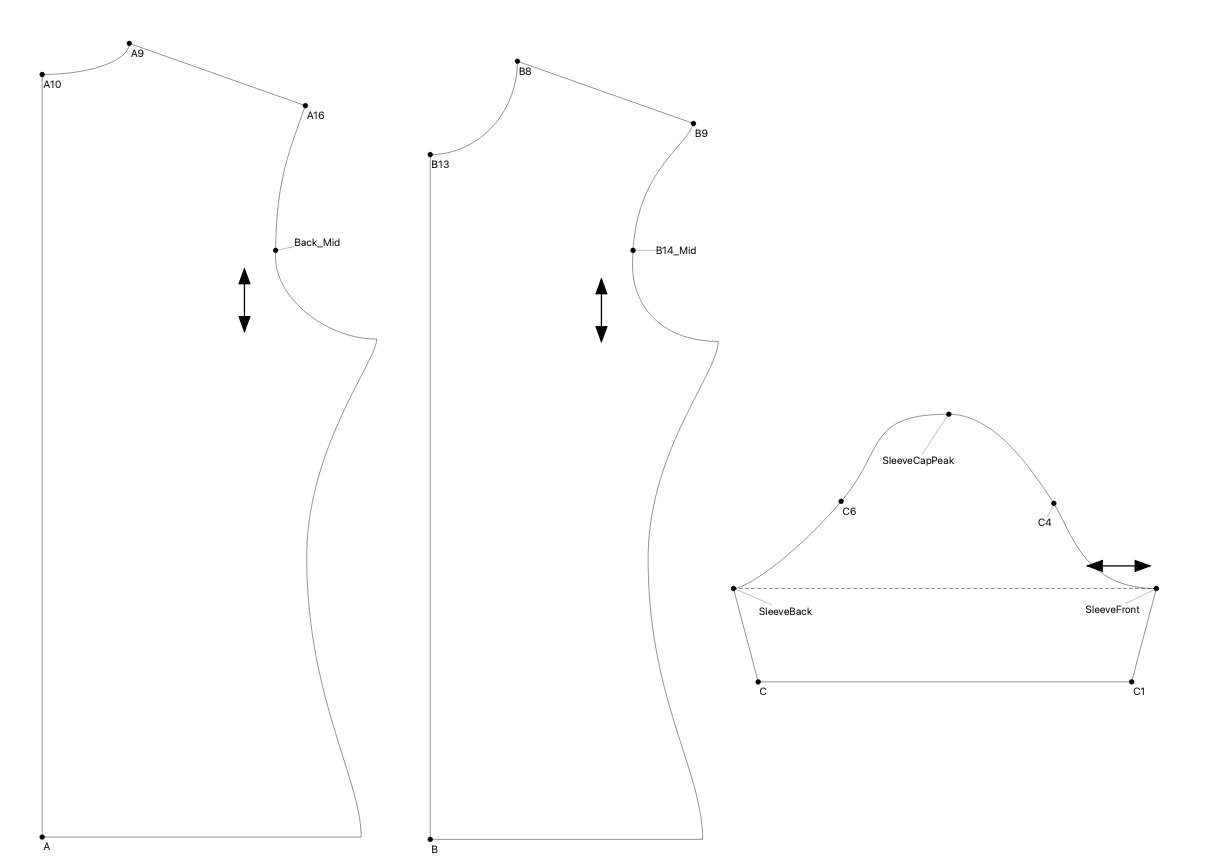
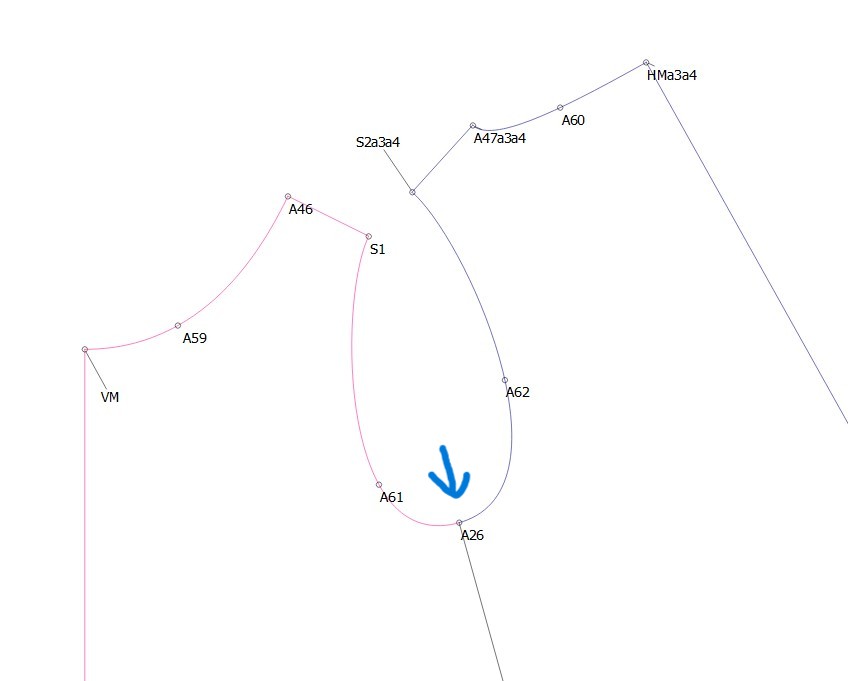
Here is an example of a pattern I am reasonably satisfied with.
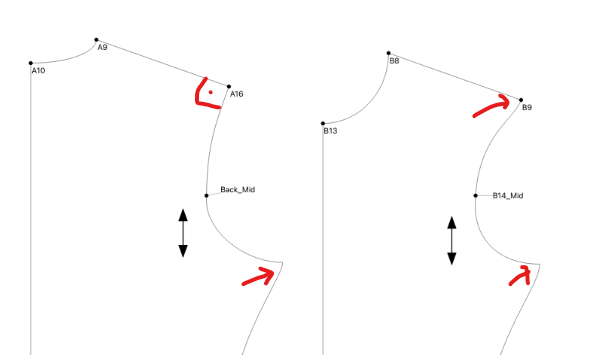
Der Punkt B9 und A16 kommen aufeinander. Diese Stelle wird meiner Meinung nach nicht gut aussehen. Wenn du dir diesen Punkt am Menschen anschaust, wirst du feststellen, auch wenn der Ärmel eng sein soll, dass die Linien relativ senkrecht am Vorderteil sowie am Rückenteil nach unten gehen und man an dieser Stelle mit einem rechten Winkel zur Schulternaht arbeiten sollte. Genau das gleiche gilt für den Pinkt am Armloch/Seitennaht.
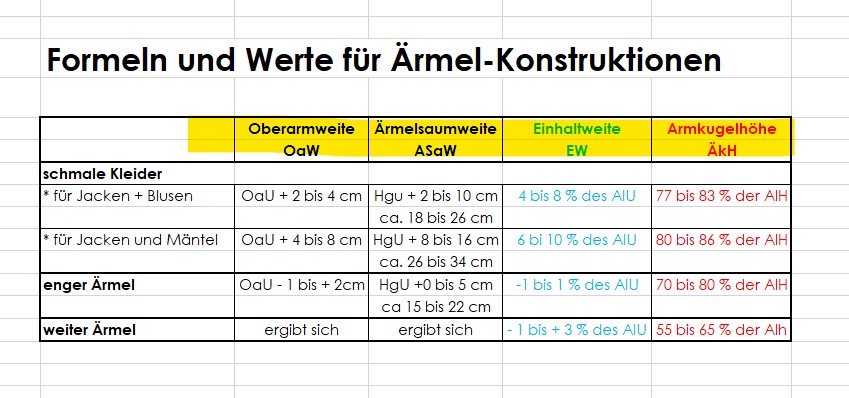
Du liegst richtig, dass du bei dehnbaren Stoffen die Armkugelhöhe höher legen kannst und zwar 70 bis 80% der Armlochhöhe. Je höher deine Armkugelhöhe ist umso enger wird auch der Ärmel im Bereich des Oberarmes.
Don’t need a power function. The parser supports all the C++ operators. Asking for a power function is like asking for a multiplication function when you can just use the * operator.
In this pattern, the curve terminating at A16/B9 has the control points set 90 degrees to the shoulder line. Sounds like a sharper angle at these points is in order?
shrug - exponentiation isn’t really a common operator in programming languages anymore, also ^ is bitwise xor in C++ for integers anyways. Asking for a power function is totally reasonable, although unnecessary since the parser redefines ^ to be power/exponentiation. I’d contend is it not like asking for a multiplication function, since ^ isn’t exp/pow in C++ anyways!
Only if it creates a straight line after the shoulder seams are joined together. Once again, it’s all about the type of fit and design of your garment.
Wenn ich mir die drei Schnittteile anschaue, Vorderteil, Rückenteil und der Ärmel dazu, kann ich mir nicht vorstellen das der Schulterbreich am Kunden gut ausschaut. Das gleiche gilt für den Bereich Seitennaht und Armloch. Da bildet sich auf Grund der spitzen Winkel ein Dreieck. Dort müsste im Nachgang die Linie des Armloches begradigt werden. Würde man an diesen Punkten immer im rechten Winkel zur Ausgangslinie ( hier Schulter und Seitennaht) arbeite, bekommt man einen harmonischen Nahtverlauf.
Eine andere Möglichkeit wäre die Schultern aneinander zu legen und dann kann man die Kurven so gestalten, dass sie harmoinsch weiterlaufen und vielleicht nicht im rechten Winkel zur Schulter liegen. Dann würde das Armloch aber schräg über das Vorderteil und Rückenteil laufen.
Deswegen hatte ich gefragt, ob der Schnitt schon mal genäht wurde.
Pardon if I’m asking obtuse questions, I’m relying on auto-translate, it says something about working the lines at a right angle to the starting line, in this case the shoulder and the side seam, then the seam would look better. In the shoulder case, the angle looks fairly close to 90 degrees. In the case of the armpit intersection, I see the angle is more acute than 90 degrees, something to be adjusted, I will try doing that!