Para separar en un básico de blusa femenina, el delantero y la espalda, moví la espalda con la herramienta “Mover”.
Ahora necesito corregir el ancho de espalda en la pieza de la espalda y Seamly2D no me lo permite y tampoco puedo borrar la pieza de patrón movida (la que queda con subíndices en cada punto como A1_a1).
Para eliminar la pieza desplazada, primero debe eliminar cualquier pieza de patrón que haya creado a partir de ella. A continuación, elimine las líneas, curvas o nodos que haya añadido a la pieza desplazada. Sólo entonces podrá borrar la pieza desplazada.
To delete the moved piece, you first need to delete any pattern pieces that you have created from it. Then you need to delete any lines, curves or nodes that you added to the moved piece. Only then will you be able to delete the moved piece.
No es necesario separar la parte delantera de la trasera. Simplemente pon las 2 partes en grupos separados. Entonces usted puede cerrar el ojo en el frente mientras que usted agrega a la pieza trasera y agrega los nuevos pedacitos al grupo para la parte posterior y hace igual al frente (cierre el grupo para la parte posterior mientras que usted trabaja en el frente).
There is no need to separate the front from the back. Just put the 2 parts into separate groups. Then you can close the eye on the front while you add to the back piece and add the new bits to the group for the back and do the same to the front (close the group for the back while you work on the front).
Si necesita corregir la anchura de la pieza trasera, puede extender la línea existente, ya sea hacia el centro o hacia la costura lateral, o puede utilizar la herramienta de movimiento para alejar una mitad del diseño de la otra mitad a modo de “cortar y extender”.
If you need to correct the width of the back piece, then you can extend the existing line, either towards the centre or towards the side seam, or you can use the move tool to move one half of the design away from the other half in the “slash & spread” way.
Buenas tardes. Mil gracias eres lo máximo. Apenas pueda sigo los pasos que me indicas y cualquier duda te vuelvo a molestar. Diosito o el Universo te siga multiplicando en bendiciones.
Por favor, ¿Cómo creo grupos, para poder hacer una prueba de lo que me indicas?
Porque sé hacerlo al momento de escoger las piezas del patrón para imprimir, pero en el paso de dibujar el molde no sé cómo crear esos grupos, para en el caso que tengo por resolver, poder dejar el delantero de la blusa en un grupo y la espalda del delantero en otro grupo.
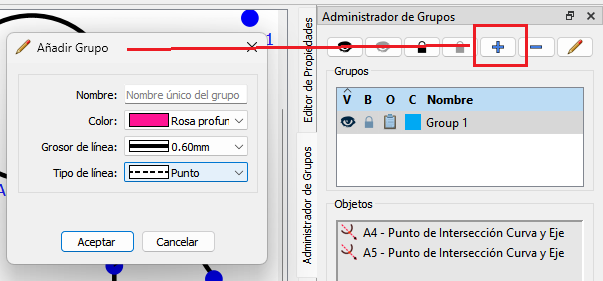
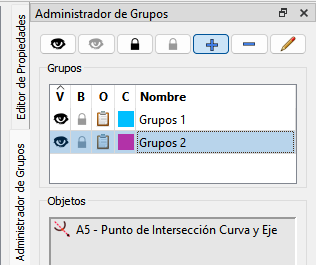
The easiest way is by clicking the + to add a group in the Group Manager. You can then name the group and assign it a color, line type, and line weight.
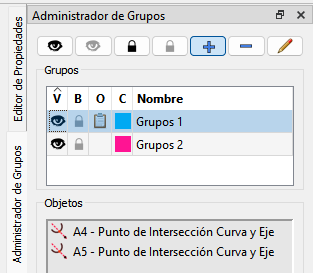
You can later delete or edit a Group by selecting it, and clicking on the delete or edit icon in the Group toolbar or by using the group item context menu.
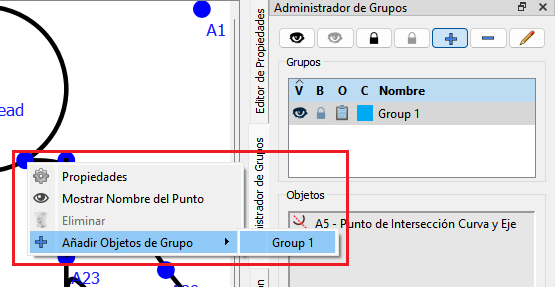
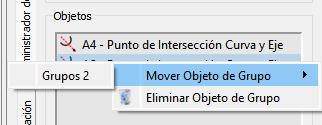
Then by using the right mouse button context menu on the object you want to add, you can select which group to add it to.
You can then show / hide a group by clicking on the eye icon, or you can show / hide all groups by clicking the icons on the Groups toolbar. You can also lock / unlock groups. If a group is locked you can not edit, add to , or delete from.
Also of note… if you are zoomed way in and want to find an object easily, you can double click on the object item in the Objects window… the view will zoom out and center the view on the object.
Buenas tardes Douglas: Muchísimas gracias. Que pena mi respuesta tardía, pero me entretuve explorando antes de que me respondieras, lo logré y entonces procedí con mi trabajo. Muy valiosa como siempre tu ayuda.