I started by drafting the start of a circular skirt style, but want to have the hem at the knee no wider than 20 inches. I got stuck on how to convert the length of arc (currently 5 inches for a 20 inch hem-circle (which is hopeless unrealistic given other measures, but I was testing), back into a straight line measure. The ‘length of curve’ options didn’t produce what to me seemed sensible or relateable values.
I have run out of time for the moment, but here is a pattern I just started that is close using a different approach. Hint, the circumference of your waist is known. The radius of ANY circle is r=C divided by pi times 2 Or in the formula I used in this pattern r=waist_circ/(_pi*2)
I don’t know if you had or remember basic geometry (don’t worry, I had to look it up) but C=pi * 2 * r. That is just a given. pi is a constant and is available for use in formulas in Seamly2D as “_pi” C stands for the circumference of a circle. “r” stands for the radius of the circle.
This can be a starting point. I started a detail piece which is a half to be cut on the fold. I have not yet finished including the waist circle in the detail piece. If you want to add to this pattern or do your own, my next step would be to add a point directly opposite the existing point on waist circumference point so that I can include the waist semicircle on the detail piece.
Here is a simple explanation of the drawing objects in the file so far circle-skirt.pdf (35.2 KB)
pi IS a built in function. You access it by using the underscore symbol followed by the letters p i. That is what I attempted to explain above and what you will see if you look at the pattern I uploaded
an aside, making a circle skirt is simple to do even without a pattern. see this tutorial How to Make a Circle Skirt: 13 Steps (with Pictures) - wikiHow or do a search for “make a circle skirt”. I have made many and usually fold the fabric into eighths so that I can freehand cut it without introducing too much error
Yes… I was trying to draft it so I could tweak it because when I’ve worn circle skirts for myself, they tend to need more length in the back,so what I think I’m creating is an “elipitical” skirt that has a longer back. (Note to self… If I find my waist-line is larger in front then in behind (too many cookies ) then I need to rethink my approaches again.)
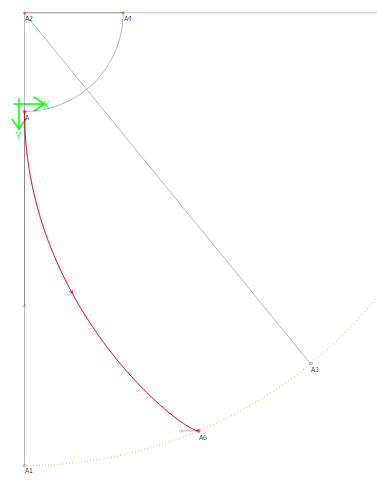
Firstly, I’d go for an 8 panel skirt so that the waist, the full circle effect and the tapering to the kneed gets evenly distributed around the width of the skirt and then I’d curve the outer edges of each panel - something like this:
You will be able to do 4 back panels that are narrow and 4 wider front panels (to accommodate the tum) and if you use the same formulas in the curve handles for each panel, they should turn out to be the same length, as well.
In the above picture, I used the ‘perfect circle’ formula (Length of line * .55) at the top to get it past the hips, but you can make it longer, if you wish. At the bottom, I kept it to the bare minimum so that it sort of ‘eases’ into the hem. Once again it’s a matter of judging with your eye because only you will know what you really picture in your mind
 ) then I need to rethink my approaches again.)