Hi All,
Just really started getting into Seamly last night and loving it so far.
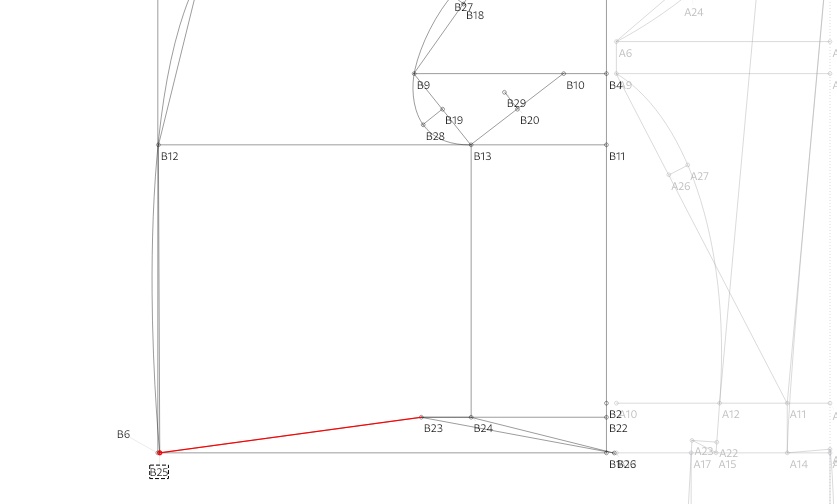
I’ve run into a small problem that I’m not sure how to solve. The red line from B23 - B25 indicates the waistline and is based on a persons actual waist measurement divided by 4. If I adjust the waist measurement, the point at B25 no longer lands on that horizontal construction line (B1 - B6). Is there some sort of formula I could use to ensure that the B25 point always lands on that line regardless of the length?
Don’t mind manually fixing it each time but it’d be great to figure this one out.
Thank you,
James
2 Likes
Hi @historicaltailoring Welcome to Seamly! I’m not completely sure what you’re doing here, so hopefully this answer is pertinent! If it’s not, it might help to upload your files so one of us can poke at what you’re trying for.
I think you are wanting to use:
Point - Intersect Arc and Line. Keys: PC
Default Appearance: A point, no additional line.
Set a point at X distance from a point, on a ray defined by two other points. Select the base point of the ray, select the angle point of the ray, then select the base point of the arc. This tool places the point at the first point that an imaginary circle crosses the ray.
Your ray will be defined by, I think it’s B1 (the one hiding behind B26, yes?) to B6, B23 will be the center point of the imaginary arc, & the arc’s radius will be waist_circ/4
unfortunately, it’s impossible to just change the tool making the point,
- (well, probably by editing the XML, if you’re comfortable navigating that labyrinth,) so
- I’ll recommend that the easiest method would be to delete & re-draft everything after B24. However, if that’s a herculean feat,
- Time travel! if option 2 is too much @Grace will be willing to tell you how to use the History window. Or you could search up one of the plethora of other times she has expounded upon its mysteries.
Whatever your choice, be sure to Save As first! here there be dragons!
Happy drafting!

2 Likes
Hi James… Welcome.
Yeah, if you want to post your pattern we might be able to give you a better answer. We should be able to figure out how to make it adjust to the measurements - within reason.
BTW… I can’t help but notice your screen name - it’s right up my alley. I owned a costume shop for 42+ years - where one of our main focuses was producing historical mens costumes.
3 Likes
Thank you, that works perfectly! Just made a little sample to figure it all out. I think I’ll end up just redoing the pattern from scratch because I learned a few things in the process that would make things easier in the future.
2 Likes
Thanks Douglas!
Got it all figured out. I’m actually a professional historical tailor, usually stick to completely custom 19th century clothing. I think it’s been about 15 years now. Anyway, getting into offering a pattern line so having some fun figuring this program out.
2 Likes
Yay! glad to have been able to help here!
Oh yeah, I just remembered another hard option: you could use Trig to make the point stay in line. I did that once before learning of that tool. 
2 Likes
I was so hoping I would not have to use trigonometry or something haha. I hate math.
2 Likes
Without seeing the pattern or what system you’re using, not sure what you’re trying to do, can’t say I’ve ever needed trig to draft a garment pattern. The trig functions are there though for use in formulas.
3 Likes