I have patterns kids leggings size 104 cm. How i use mutisize? I want sizes: 92 cm, 116 cm, 128 cm, 140 cm. How i move them Inkscape?
Howe i get the kids/baby table Measurement diagram?
Have some videos, pictures and help? Thanks
I have patterns kids leggings size 104 cm. How i use mutisize? I want sizes: 92 cm, 116 cm, 128 cm, 140 cm. How i move them Inkscape?
Howe i get the kids/baby table Measurement diagram?
Have some videos, pictures and help? Thanks
Hi, I can’t really help you to move them to Inkscape, and I’m thinking of doing a step-by-step tutorial to create multisize tables, since I actually enjoy working with them when I’m drafting patterns to check that the curves resize nicely.
Here are the multisize files for drafting patterns from the Winifred Aldrich book. Unfortunately, I’ve only done the ones for babies and boys, so I hope they will help you:
Aldrich Baby - Birth to 6 Months.vst (1.3 KB)
Aldrich Boys - 3 to 6 Years.vst (1.9 KB)
Aldrich Boys - 7 to 12 Years.vst (1.9 KB)
I made these over a year ago, so I’m hoping they’re usable 
I have that book too : Winifred aldrich. Metric pattern cutting for children`s wear and babywear. Thanks for the step-by-step tutorial.
Thaks they`re usable, but i need girls too. How to use multisaiz? When can i got more info? Thanks.
Ahhh… It suddenly struck me that I did something for the wiki ![]() UserManual:Tape measurements Tutorial - Seamly2D
UserManual:Tape measurements Tutorial - Seamly2D
And then you can download the ‘Quick Start Guide’ here: https://wiki.seamly.net/wiki/UserManual:SeamlyMe_Quick_Start_Guide
A small tip… Don’'t bother with the ‘In Heights’ option, do all your measurements in the ‘In Sizes’ unless you really all there is to know about pattern making and measurements.
I hope this helps ![]()
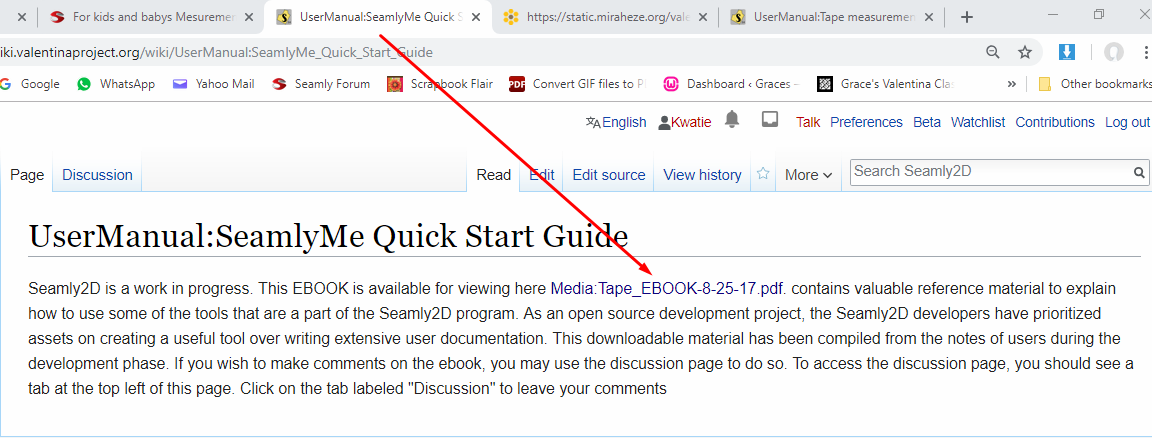
The link to the Quick Start Guide does not contain any Guide, unfortunately. Maybe the link is not correct?
It is correct, there’s a link to a PDF file in the paragraph.
And here is the direct link to the PDF:
I try to direct people to the wiki because there’s a lot of information on there that can really help them. ![]()
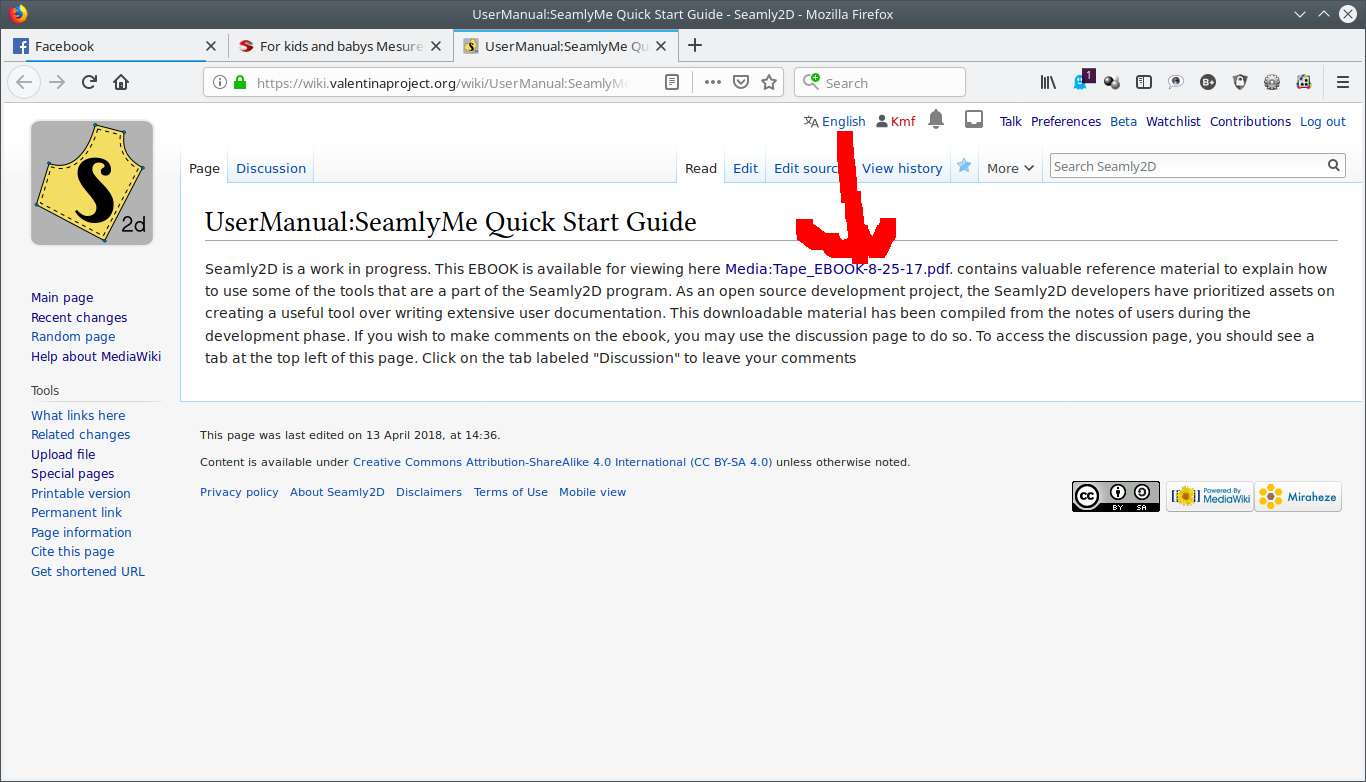
@Berit this is a screenshot of what I see when I follow the link to the quick start guide:
. I have added a red arrow pointing to the specific link inside that wiki page which should, indeed, bring up the quick start guide that @Grace wrote. Please try again. Follow the link to the wiki page, then follow the link to the guide. Depending on your browser it may behave differently. The link indicated by the red arrow is to a pdf document of the guide. My browser brings the pdf document up so that I can read it. Some browsers may instead allow you to download the pdf document and view or print it offline. Please ask again if this does not work for youHaha, @kmf, I guess I should say ‘Snap’
Thanks. I was a bit too quick and did not explore that pdf-link.
I could give you a list of all the similar mistakes I have made, but the list would be too long.
Hi Grace, is this still valid for children’s multisizes? I “ignore” the in height tap? Thank you!
Yes normally the Children’s sizes are the child’s height, but the measurement chart shows increments in size according to the height of the child. If you wish, you can use only the height but then the increments of the height is in 6cm increments, which is rather a big step in size.
Thank you so much for your time!
I did this, a multsize chart for children, in height, for different size groups.
I worked on a bodice block in size 98, and the other sizes within this size group looks okay.
I tried another multisize and the block looks totally out of control.
However when I use your multisizes, you made available to download, it works and even my curves with your multisize chart looks even better! ![]()
So I assume something is wrong with my multisizes, just can’t figure it out what exactly!
Ok, curves need to have existing parts in the formulae, otherwise they don’t resize very well. I’m so used to doing this that it’s 2nd nature to me.
Other than that, I’d suggest double checking all the base size and increment values. It’s really easy to make a mistake when entering them, and a small mistake can be a huge problem in the pattern. Also check the increment calculations in your existing size chart that you used to create the multisize chart in SeamlyME.
It is a bit of work, but once you’re certain it’s correct, you never need to open it again, you just load it into every pattern that you start, so it’s worth it to spend a bit of time on it. ![]()
![]()
Thank you for your feedback, I will check that.
Yes, I read about it and the curves are writen as formulae. The curves look great with your multisize chart but not with mine. So like you said, I will check the numbers again, something must be wrong with my multisize chart!
Thanks Grace, I appreciate it!
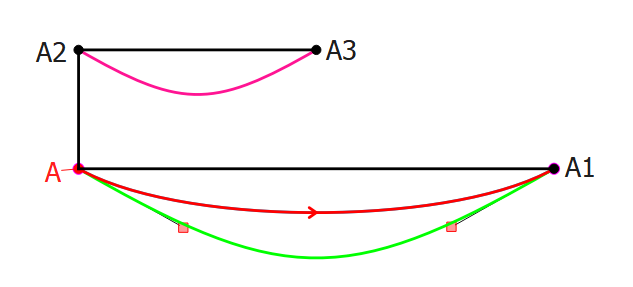
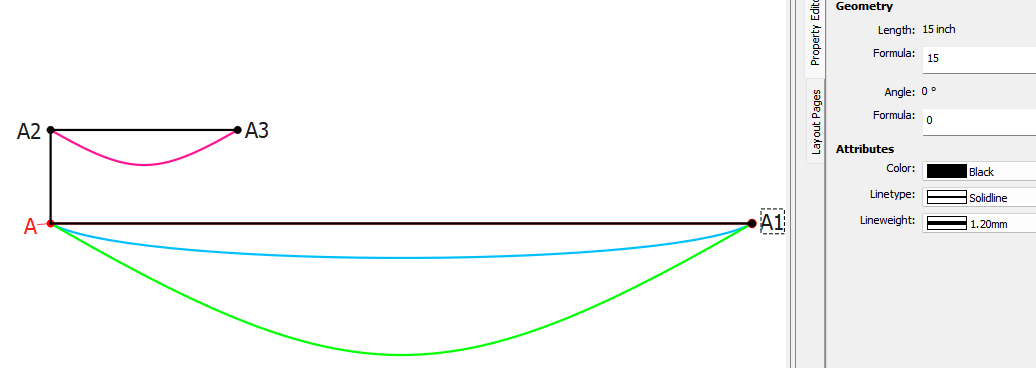
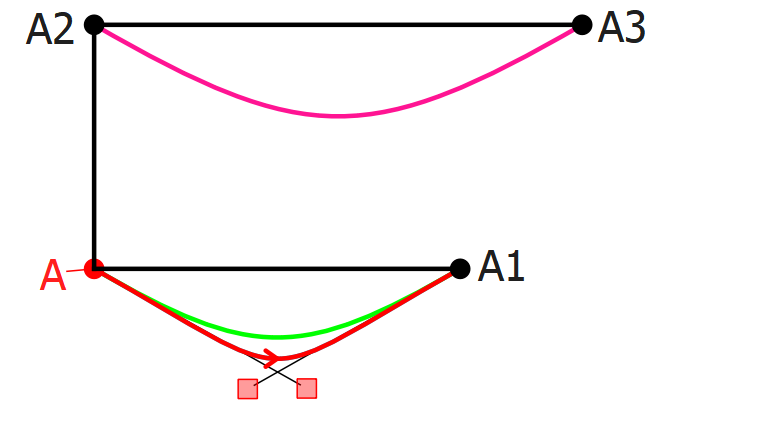
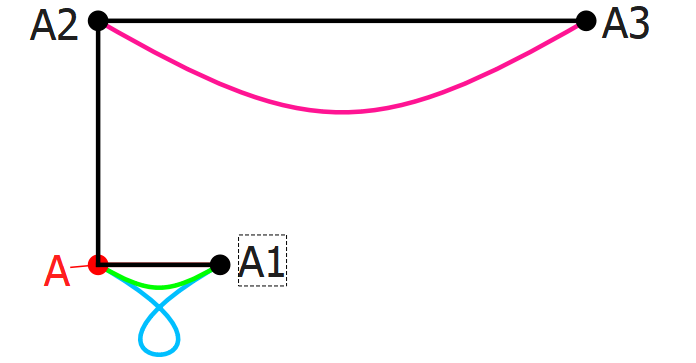
What this means is that when using interactive curves / splines you need to formulize the control points so the curves adjust to the measurements. To illustrate I made up 3 curves… Spl_A2_A3 (pink), Spl_A_A1 (blue) , and Spl_A_A1 (green). A-A1 is twice as long as A2-A3. The blue curve uses the same angles and fixed lengths as the pink curve for the control points… but as you should see it’s not proportional to the pink curve.
In order to be proportional the CP lengths need to be twice as long as in the green curve:
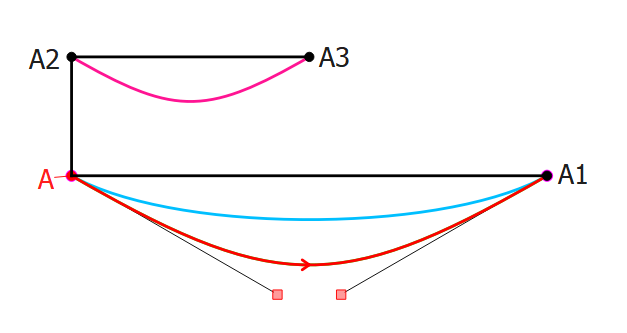
Instead of making the CP lengths fixed, I made the CP length formulas based on the length of Line_A_A1.
Now when the length of Line_A_A1 changes (like when changing measurement size), so does the CP lengths, and the curve stays proportional:
and notice what happens if the length Line_A_A1 gets shorter… the fixed length CP’s now overlap and the curve is distorted… but the green curve is still in proportion.
And if we make it really short the blue curve actually loops… where the green curve is still in proportion. ![]()
Hope this helps.
Thank you Douglas, I appreciate it!
I will have to redue and douple check my block, because I thought I did exactly that what you mentioned. Not sure what went wrong.
Still learning ![]()
Thanks again everyone! Would anyone be willing taking a look at my bodice block?
Lieb_V7_98block_sem_Ald40_pattern.sm2d (18.0 KB)
C_92-116_Boy_ M.Müller_Base98_measurements B.smms (2.2 KB) Lieb_V7_98block_sem_Ald40_pattern B.sm2d (17.1 KB)
I’ve done what I can with the curve formulas and a few other changes. I’ve made the neck facing distance from the neck line to adjust to the distance used at the centre back distance, so that if you change this value, the others will change accordingly.
I found a screaming error in the measurements file with the neck circ. This was set to 6cm increment with each height change, so I made it 1cm increment - you’ll need to check it and adjust the increment, since I don’t have your measurements chart - and please check the others, I suspect there may be a few others, but they’re not screaming, so I can’t see them.
ooo0ooo
The theory of using heights and sizes is this…
Size measurements are the circumference measurements (or portions of the circumference). These increments always go into the Size increments because they don’t change according to the height of the person.
Height is a direct measurement taken from 1 point to another on a straight line, like the total height of a person is measured against a wall, the wall is measured from the floor to the mark made at the top of the head. So this is a very “flat” measurement.
When you start measuring distances on a person, the “flat” measurement no longer applies because the tape measure needs to travel over the curves, so while the “flat” distance is perhaps 15cm, the tape measure may indicate 15.5cm, taking into account the extra bulk distance. so this 0.5cm increment will be entered into the Size increment for the vertical measurement and the increment of the “flat” measurement will be entered into the Height increment.
So… if the direct measurement for the neck to waist =15cm and it increases by 1 cm for each 6cm of the person’s height and the Size increment increases by 0.5cm for each size of the person, then the these values will be entered into the appropriate places.
The magic of this is that you can then adjust the Height of the person and the Size of the person to get a pattern that will fit (almost) perfectly, no matter if the person is normal-weight, under-weight or over-weight, whatever their build.
This is the theory in a nutshell. I don’t think that it has been researched for children, but the Russians have it beautifully researched for adults.
This is also why I choose to use only the Sizes increments and tell everyone to choose the sizes available to represent your In-House sizes and ignore the Heights - just keep a note that says which number represents which size.