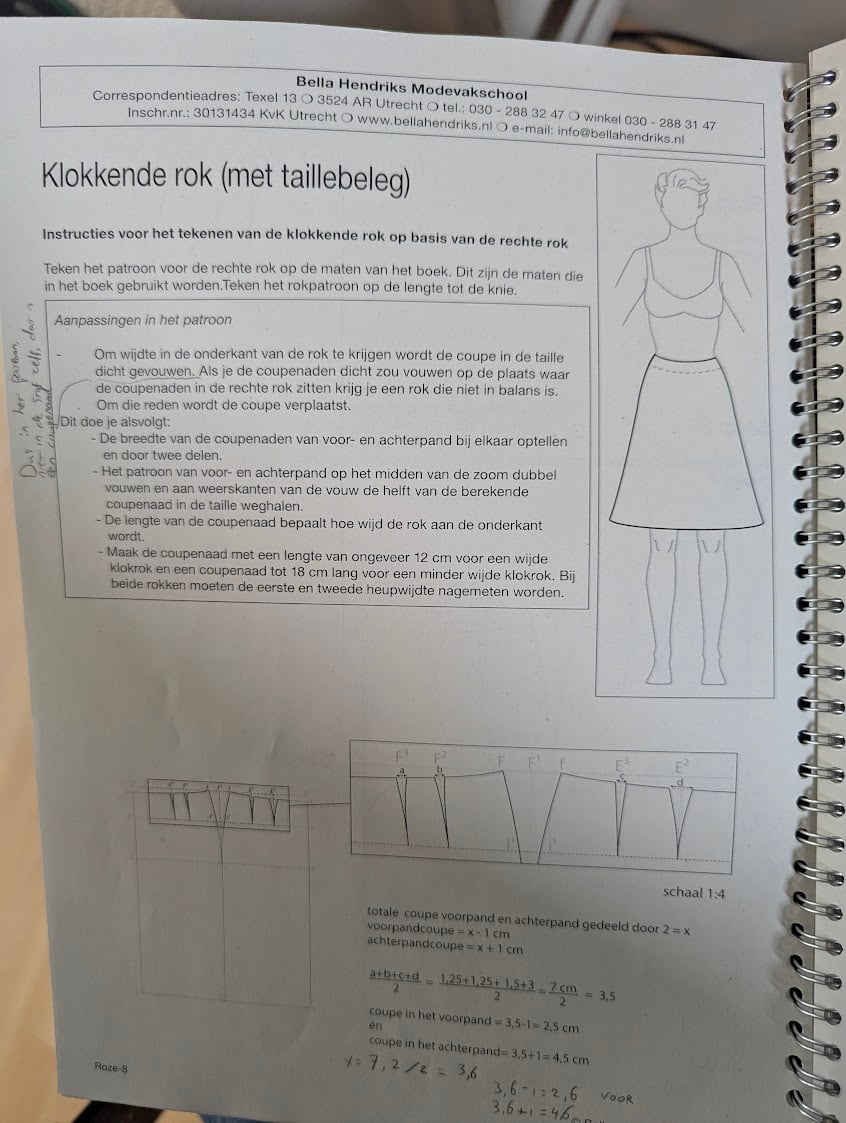
I’m working on an assignment for a seamstress class, and I have to adjust this short skirt pattern to make it flared (I think that would be the translation).
I don’t want you to make my homework for me, of course, but how would you go about this in Seamly? What would be the best strategy, so to say?
You don’t need to learn Dutch to understand these instructions, I guess. You draw in new darts, cut the pattern open at the bottom and position the pieces to have the skirt flare open at the bottom. Then you draw in a new line on the bottom to make it one pattern piece again.
As per the instructions this is basic dart manipluation. You’re basically just moving the darts to the hem line.
Create the darts and the points on the hem and hip line down from the darts. Then using the Rotate tool you can select all the points that make up one half of either side of the new dart … them rotate around the point created on the hipline until you close the points on the waistline that make up the new darts. Since lines are not graphic objects they do not appear in operation tools so you might want to connect the outline of the rotated part with lines. You can then true up the hem line using a curve.
An easier way to do this is to just slash each piece in half and rotate at the waistline. and spead at the hem . Again this can be done with the Rotate tool. This will producee a skirt that is slightly fuller at the hips and retain the darts. But then this is not following the lesson in the book. If it were me I’d do it both ways and see if you get extra credit.
Next, pick up the Rotation tool, select the rotation point A1 and select the points F4, curve, F, curve, I & L while holding the Ctrl key and then hit Enter. Enter the formula: AngleLine_A1_F5-AngleLine_A1_F4 into the angle box and hit OK.
Draw in the new line from I_a4 to L_a4 and put in a curved hemline from L_a4 to J.
Where you have 2 darts, you will need to do this twice… once for each dart. The 2nd dart will be done on the 1st dart’s rotation.
I normally do the rotation to the side seam and keep the centre lines intact, so the rotation formula will be right leg of the dart minus the left leg of the dart, and I always draw my lines in from the dart point to the opening of the dart so that I don’t need to adjust the directions in the formulas.
Tip: if you use the angles of the dart legs in the curve formula (+ or - 90°) then the curves will flow very nicely into each other when you close the darts like this.
That’s a 3rd method… but also is not what the lesson is about. I assume the lesson is more about removing the darts from the waist. The title is "“Flared skirt (with waist facing)”. Waist facing meaning no waist band, and you don’t want darts in the facing… thus moving the dart to the hem with the idea that the hem dart will not be stitched to leave the flare.
Ah, thank you! This is not completely what the assignment calls for—I had to take the “rechte rok” pattern I made in an earlier assignment, which is the file I shared:
Then I had to basically remove the existing darts and create two new ones (“Stap 3” in the instruction images). But you are working from the existing darts now, right?
Still, I can absolutely use your approach to do what I need to do, I think!
@Douglas Yes, well, the lesson at this point is mostly just drawing all these skirt variations and understanding them. I already drew this one physically with pencil and paper, but I want to teach myself doing it in Seamly too.
The whole waist facing part honestly is still a bit too complicated for me at the moment I still have much to learn!
Well that why I made the point that I believe the assigment was really about moving the darts resulting in a dartless waist and flared skirt)… not making a fuller skirt.
The concept of moving darts is a very basic principle that one has to grasp to really understand pattern making. Darts exist to give a pattern shape so a gartment fits. The fullness a dart creates can exist most anywhere on a piece, and it’s just a matter of undersanding where and how to rotate a piece to move a dart elsewhere. For ex: A typical women’s bodice will have a side and waist dart. By manipulating the pattern you can move the side dart to the shoulder… then connect it to the waist dart (with a curve) , cut into 2 pieces, and you now have a Princess line bodice. Same fit (more or less) but a completely different style.
Well, working on it! The terms themselves are sometimes a bit of a challenge, I find. Especially since I’ve mostly been teaching myself with English videos, and now there’s pretty complicated Dutch terms all of a sudden. I am Dutch, but Dutch sewing terms might as well be Japanese sometimes
I’m trying to do this now, but how would I slash pieces in half in this case? I haven’t really created multiple pattern pieces in Seamly before and I’m having a bit of trouble finding how that works.
Do whatever works, & use Groups to hide the gears! I really need to take the time to play with darts, so my two cents isn’t worth any more than that here at this time.
Well technically in Draft mode we refer to ‘Draft Blocks’. From a draft block you can create any number of ‘Pattern Pieces’ used in Piece mode. You can cut up a draft block into sections and using the Operation tools move, mirror and rotate sections to produce the outline you need to connect t epoints & curves to make a piece. As a side note I would advise to do this in Draft mode and avoid using the Union tool in Piece mode which has issues. Something we also need to implement is a way to smap one point of a section t a point om another section. As it is right now you have to eyeball if the 2 points match.
But this is the part I feel like I don’t completely understand—how does one cut up a draft block? Just on top of what is already on the screen, so you end up with this messy collection of points? I understand you can control the mess somewhat with groups, but that doesn’t really feel as organised as separating the things on the screen.
What I mean is—how do I create multiple draft blocks that are separated on the screen? Like, I created this rectangle by just making a new point without a line to the left:
But that way the first point is still connected to the main draft block on the right. Is that the cleanest way to do this in Seamly2d? This is probably quite a basic question
Draft Blocks are to create your points and curves… Pattern Pieces are simply connectting points and curves to create the outline or ‘path’ for the piece:
I see! I had already understood how Piece mode was for actually organising the pieces you create, but I wasn’t sure about how to organise the Draft mode screen.
But okay, through groups then! Good to double-check, because just doing everything on top of all other stuff and then hiding what you don’t need is not how I expected it to be. But this really helped me understand the workflow in Seamly. Using groups should work out fine, then.
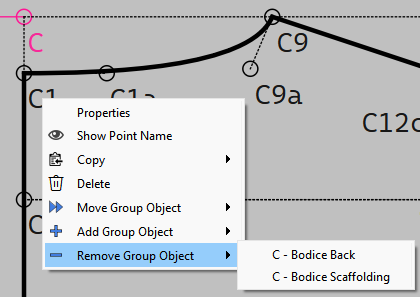
I’m experimenting a bit with groups at the moment, and is it correct that I can’t select multiple points (holding ctrl), right click them and add them to a group all at the same time? Or is there a better way to do that?
Currently you can only move or remove 1 object at a time.
At some point when I can resolve the issue of the group color with an object being in multiple groups… I will implement a feature where you will be able to assign a tool’s “Group” and color “By Group” in the dialog when a tool is created. Since the issue has been discussed in depth in other topics I’m not going to rehash what I will call “Schrodinger’s Color”. Unlike Schrodinger’s cat which is dead AND alive… a tool can only be for ex: red OR blue… it can’t be red AND blue.


 I still have much to learn!