How To Fix The Look Of A Curve Created With A Spline Interactive Tool?

I draw

Trial May 17th.sm2d (8.7 KB) TShirt.smis (1.3 KB) a spline with spline interactive tool. (Goes through the guide nodes A19, X6, X7, X4, X9, A20)

Now the curve look like discrete rather than a smooth continous one piece curve. (Because of the guide nodes.)

Question 1) When I click a curve segment between the nodes I can see

A) Length B) Angle

Parameters to modify?

But how should I modify to make It to look a single smooth continuous one piece curve. (Which goes through the nodes A19, X6, X7, X4, X9, A20) (There still will be guide notes there.)

Question 2) I can not see the formula line like in the image you shared on the other post?

It says;

C2 Length C2 Formula

Mine does not have this???

Question 3) I could not draw a curve with the spline fixed tool today also.

I clicked X1, Y2, X5, X5 in order. And a red curve with an arrow on It is created. (Just for trial)

However when I go to another tool. The Curve gets lost.

???

1 Like

I can’t see your pattern file because you didn’t send a measurements file with it.

BCH1:

I can’t see what you’ve done because you didn’t send the measurements file but I can see that you didn’t follow the instructions that I carefully wrote out, with pictures.

Print out the instructions and follow them step-by-step. It’s the only way to get know the tools.

2 Likes

It works with the pervious tshirt.smis

1 Like

Thank you, @Douglas

@optimusprime93, on your pattern, I dragged the control handles around manually to achieve the result that you see in black on the picture above.

Then I add some violet points and a curve using my method and get pretty much the same result, except that mine will resize if you change the measurements.

1 Like

You shouldn’t. In this case you only need 3 nodes… A19, X4, and A20 for a Spline - Interactive.

It should be noted that you can’t edit the control points for a Spline - Interactive in the Property Editor - you have to use the tool’s (context menu) Properties dialog as shown above. It’s outside the scope of the topic for the reason why.

1 Like

Sorry there was a problem while sharing the file.

Question 3.2) I do not follow the methods here you had told.

Including

  • Creating perpendicular lines to the sewing lines
  • Creating guide points

But I think I did what the Curve Fixed Tool requires. Like clicking the guide nodes. And double click the last guide node.

Question 4) As you see on the screenshot video of mine. There is no Property Editor including Formula section.?

Question 5) Neither of your curves follow through the guide nodes?

Spline Interactive Tool has to go through the nodes.

Question 6) Which Tools did you use on the lines

A) Purple One : Spline Fixed B) Pink One : Spline Interactive

?

Video Links :

+ Property Editor

+ Spline Fixed Tool Does Not Work Video

+ Measurement File :

TShirt.smis (1.3 KB)

Right… because a Spline - Fixed requires more than 4 points. Again… Follow the tooltip in the status bar:

image

A Curve - Fixed only requires 4 points.

But I did note a place where I need to change the old text “Curve path” to “Tool: Spline - Fixed”

2 Likes

There are 2 ways to produce a perpendicular line.

  1. Point - Length and Angle… where you use the angle of the line ± 90 degs in the angle formula:

+90

-90

  1. Point on Perpendicular… which does not require an existing line as abov, and also allows and additinal rotation of the perpendicular.

image

No rotation:

-45 deg rotation:

180 deg rotation:

You’re calling the, “guide” nodes… they are the control point (handles). The curve does not go through the control points. Control points simply control a length and angle AT each node to determine the shape of the (bezier) curve. In some cases a control point might be the same as a node point of the curve, but the curve is not going through the control point… it’s starting, ending, or going through the node points.

The curves in Seamly are no different than any other Vector program like Inkscape, Illustator, Corel Draw… it’s just that in Seamly we can assign a formula to the control points (handles) - which may include a person’s measurements - to allow curves to adapt to a change in measurements. If you don’t formulize the control points, a pattern will not adapt to a change in measurements and curves will not be smooth.

With a Fixed curve or Spline you’re establishing the control point formulas by some other tool points, where as with the Interactive tools you have to define the control point formulas in the Curve or Spline tool.

2 Likes

Trial May 17th.sm2d (9.1 KB)

Sorry, my day job has my head in a twist. I forgot to add it.

1 Like

I can’t see the videos.

In this topic, I posted a PDF tutorial for the Interactive Curves along with the sample pattern file that I’ve been using:

I also think that you should read through the User Manual in the Wiki to acquaint yourself with the tools and how they work. It will save you a lot of time and frustration later, in your pattern making journey, if you have an idea of what tools are available to be used and how to use them.

There’s also a very short, from start to finish pattern tutorial that you can follow that will teach you very nicely how to draft a pattern and to print it when you’re done.

Question 1) @Douglas

What do you mean you need only 3 nodes?

Spline - Fixed I can use minimum 5 nodes

But on the Spline - Interactive can I use max 3 nodes?

Question 2) So Can’t I create 4-5 or 6 nodes.

And draw a curve which go through those nodes.

and grade without problem?

If so how can I fix my discrete curve with formulas.

Question 3) @Grace

“on your pattern”

But you did It manually. (Without formulas)

So It won’t adapt Itself after grading.

1 Like

The formulas are all there. If I had a measurement file attached to it, it would still work:

I see the formula field in your videos just fine. I will note that in both videos you are looking at the control points relating to the last point of the curve. There is no control point on the second side of the last point because the curve ends at the last point. From the field on the left choose whichever point you want to be editing the control points of.

:unicorn:

1 Like

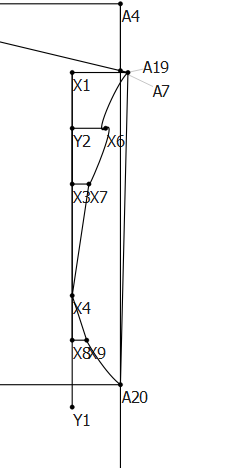
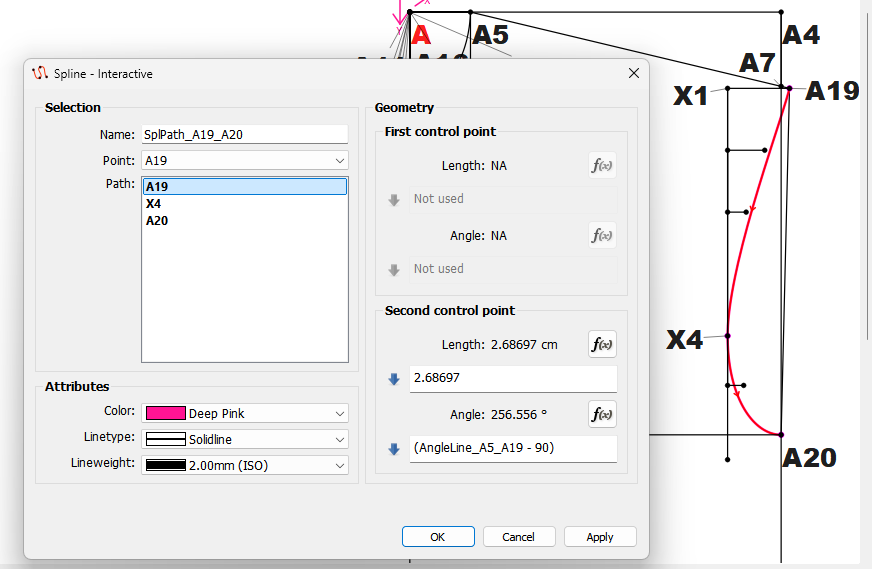
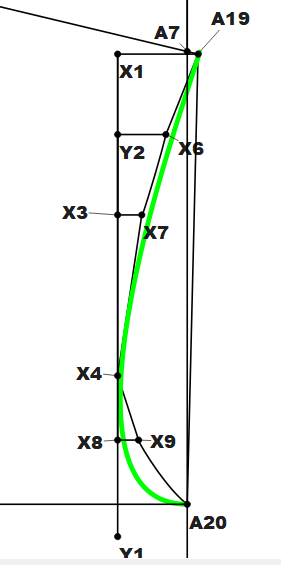
To draw a armhole curve you only need 3 “node” points. The start point at the shoulder (A19), the point that establishes the minimum width across the front / back (X4). and the endpoint at the sideseam (A20). All the other points X6, X7, and X9 you included are not needed. In fact if there was no need to resize to different measurements you only need 2 points with a Curve - Interactive where you just eyeball the curve so it doesn’t go past the Line_X1_Y1.

No. With the Spline - Interactive you can use as many nodes as you want, but it needs a min of 3.

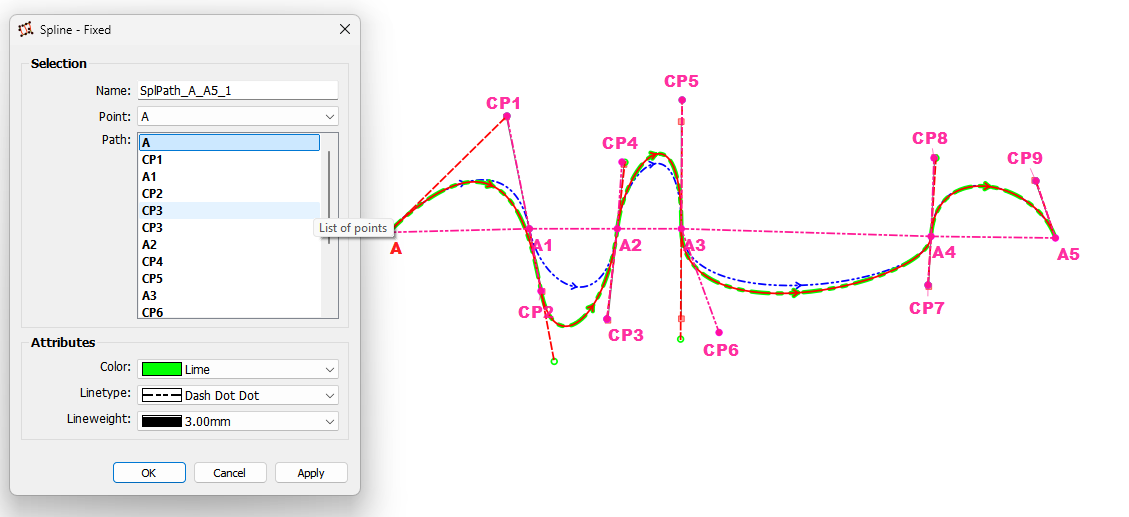
For ex: Below is a Spline - Interactive with the 6 Node points of A, A1, A2, a3, A4, and A5. the “square” point are the Control Points (CP) for each node. The start and end node only have 1 CP, while the other nodes have 2 CP’s -each one 180 degs apart tpmaintain a smooth curve. The dialog is showing the CP geometry for Node point A4.

Yes… With the Spline - Interactive as I did above.

Now with the Spline - Fixed using the same Node points, but with the ADDITIONAL Control Points CP1-CP9 we get this (green) curve:

I intentially made the CP’s somewhat different from the sqaure CP’s of the (Blue) curve just to illustrate the difference. Had they been at the same spot as the squares the 2 curves would have been the same.

But if you look at the path it’s now A, CP1, A1, CP2, CP3, CP3, A2, CP4, CP5… CP9, A6.

It’s also why the labels are “Path:” as they are not just "Node Points’, but in the case of the Spline - Fixed the path also contains the “Control Points”.

So does this make sense seeing the dialogs side by side? With the Spline - Interactive the CP’s are defined IN the spline tool, while with the Spline - Fixed the CP’s are defined by other tools outside the spline tool.

And with the Spline - Fixed you need to “click” on at least 7 points, 3 Node points, and 4 CP’s.

image

Also the Spline tools are simply a series of Curves one after the other… with the one contraint is that with the Spline - Interactive tool, the angle of the CP’s of nodes in the middle are fixed at 180 degs apart. I don’t know what else I can add that I haven’t already.

2 Likes

Sorry If I look not being caring so much about the subject. I push myself hard to understand how It works. Thanks for the detailed answers again.

Probably My last question about the curve is;

A) With the Spline Interactive Tool you draw the curve using these Control Points : A19, X4, X20 After that you manually drag the Curve Handles (Contol Points) to give It final shape. (Which go through or closer to the other Guide Nodes you did NOT use on the Spline Interactive Tool.)

The final shape of the curve is great.

So does It adapt itself after Grading?

Or

B) After applying the option A should I redraw the curve with Spline Fixed tool over the curve created with Spline Interactive Tool.

Adding Control Points (Guide Nodes) to the places where Curve Handles of the Spline Interactive Tool.

Like you did above.

1 Like

Then I’ll apply the method B above? (Like you did while giving the comparison example between Spline Fixed and Spline Interactive)

1 Like