Is there any method or possibilty / ‘hack’ to manually rearrange a ‘Piece’ or ‘Pieces’ as they appear in a new ‘Layout’? I have a ‘Piece’ that would fit perfectly into an A3 PDF, but the layouter insists on placing the item either at an angle or right across margins, requiring at least 4 A4 tiles, and with additional ‘Pieces’, which one could fit into 4 A4 tiles I have had up to 8 tiles with ‘Pieces’ straddling margins everywhere.
This most frustrating and a total waste of time, cutting up numerous sheets of paper and then taping the bits back together again … Or am I missing something (not impossible!) here?
Greetz,
David D.
PS: I posted this just now, but when I detected an error and I found that one can no longer correct the posting, I deleted it.
… OK, I dislike answering my own posts, but, I have been advised to try exporting pieces individually to .SVG format files and then create a PDF with Inkscape.
I can manually place and orient objects via this method.
I am still open to any other ideas that would keep the workflow within Seamly2D
That’s the preferred method by many. What you can also do is create a rectangle in a draft block the size of a layout… like say 30" x 3yards… 30" for 60" fabric folded in half, then create a "fabric"pattern piece from that rectangle. You can then maually move and arrange your pattern pieces within the fabric piece… much like the layout does - but poorly. The only disadvantage exporting pieces is we can’t rotate or flip them yet. Of course you could always do this in Inkscape.
Note: If you’re looking to nest pattern pieces of various sizes, you can toggle off the labels and grainline while exxporting for all but 1 size so you’re not having to delete the extra ones in Inkscape.
Thanks for the confirmation and your alternative suggestion. I’m not sure that I get this entirely, could you please provide some simple explanatory pattern files as examples?
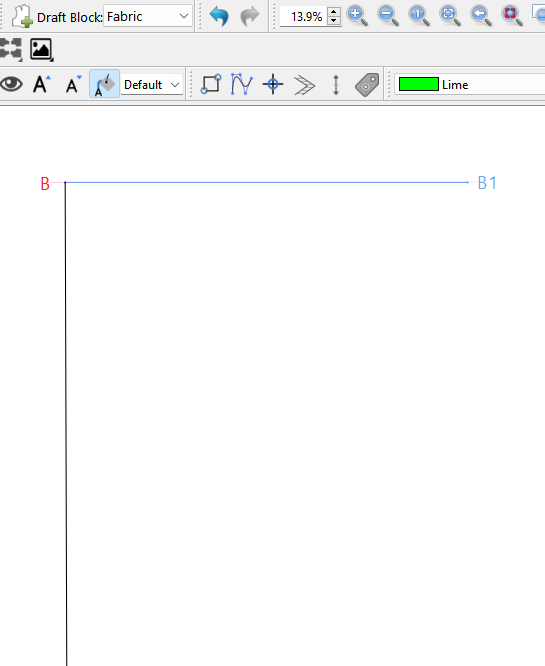
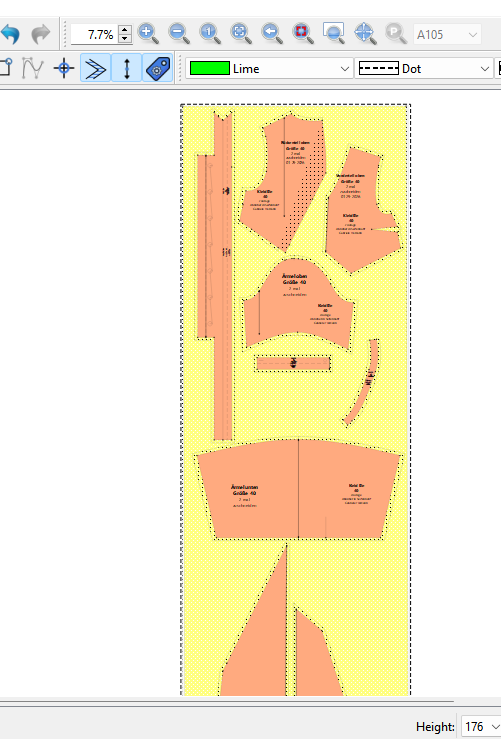
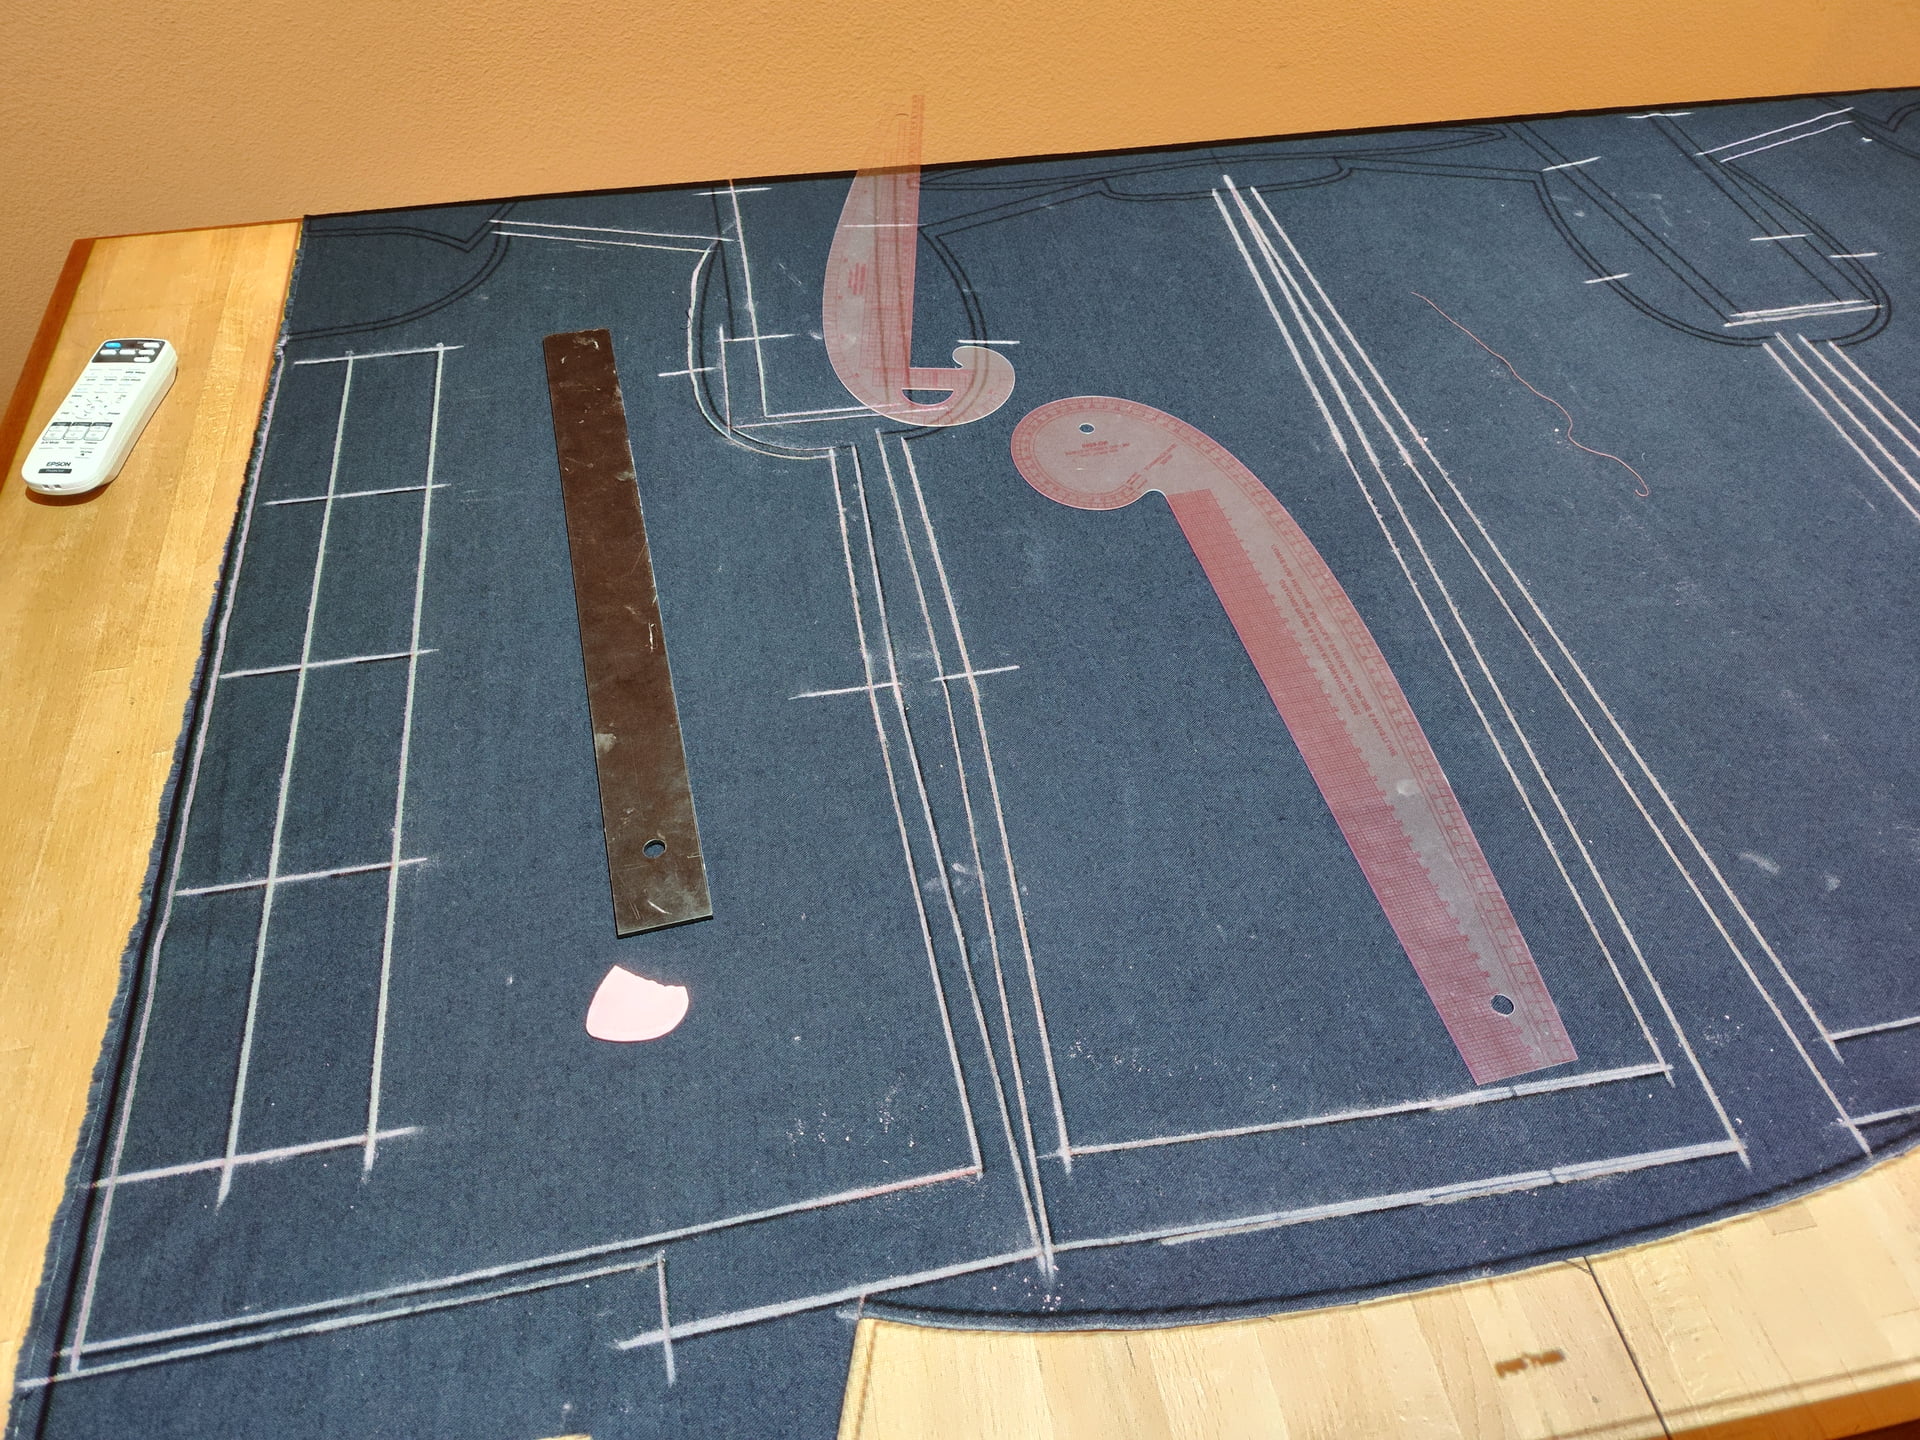
Here I created a Draft block “Fabric”. For the block a drafted a rect B B1, B2 B3.. the rect is 76.2cm x 275cm… obviously it doesn’t fully fit on the screen and zooming out makes it hard to see:
When you export you don’t include the fabric piece. Now the pieces are exported in a layout that fits the fabric on grain. Of course one would have to adjust the length or yardage depending on the pattern.
Of course you could also create a tiled “paper” size made up of multiples of standard printer paper - like A4… and do the same thing. Then tile print from software that does that. For me I can use Corel draw. There’s a way to simulate poster printing in Inkscape, but it’s not as easy as just checking a Tile box in the Corel print dialog. Adobe Acrobat does support poster priting PDF’s/
Ich habe mich dazu entschlossen in A4 ausdrucken und bei guter Musik oder Podcast den Schnitt zusammen zu kleben. Ich habe für jede Größe eine andere Papierfarbe, damit ich die Größen einfacher auseinanderhalten kann.
It just happened to be at the top of the last used list from debugging the pattern.
I’m a big proponent of color coding. I use to spray paint the top of the hangers that my patterns hung on at the shop based on what size it is. Small = Orange, Medium = White, Large = Yellow, XLarge = Red, 2XL = Blue, 3XL = Green. Since the patterns were seperated by style or show using these:
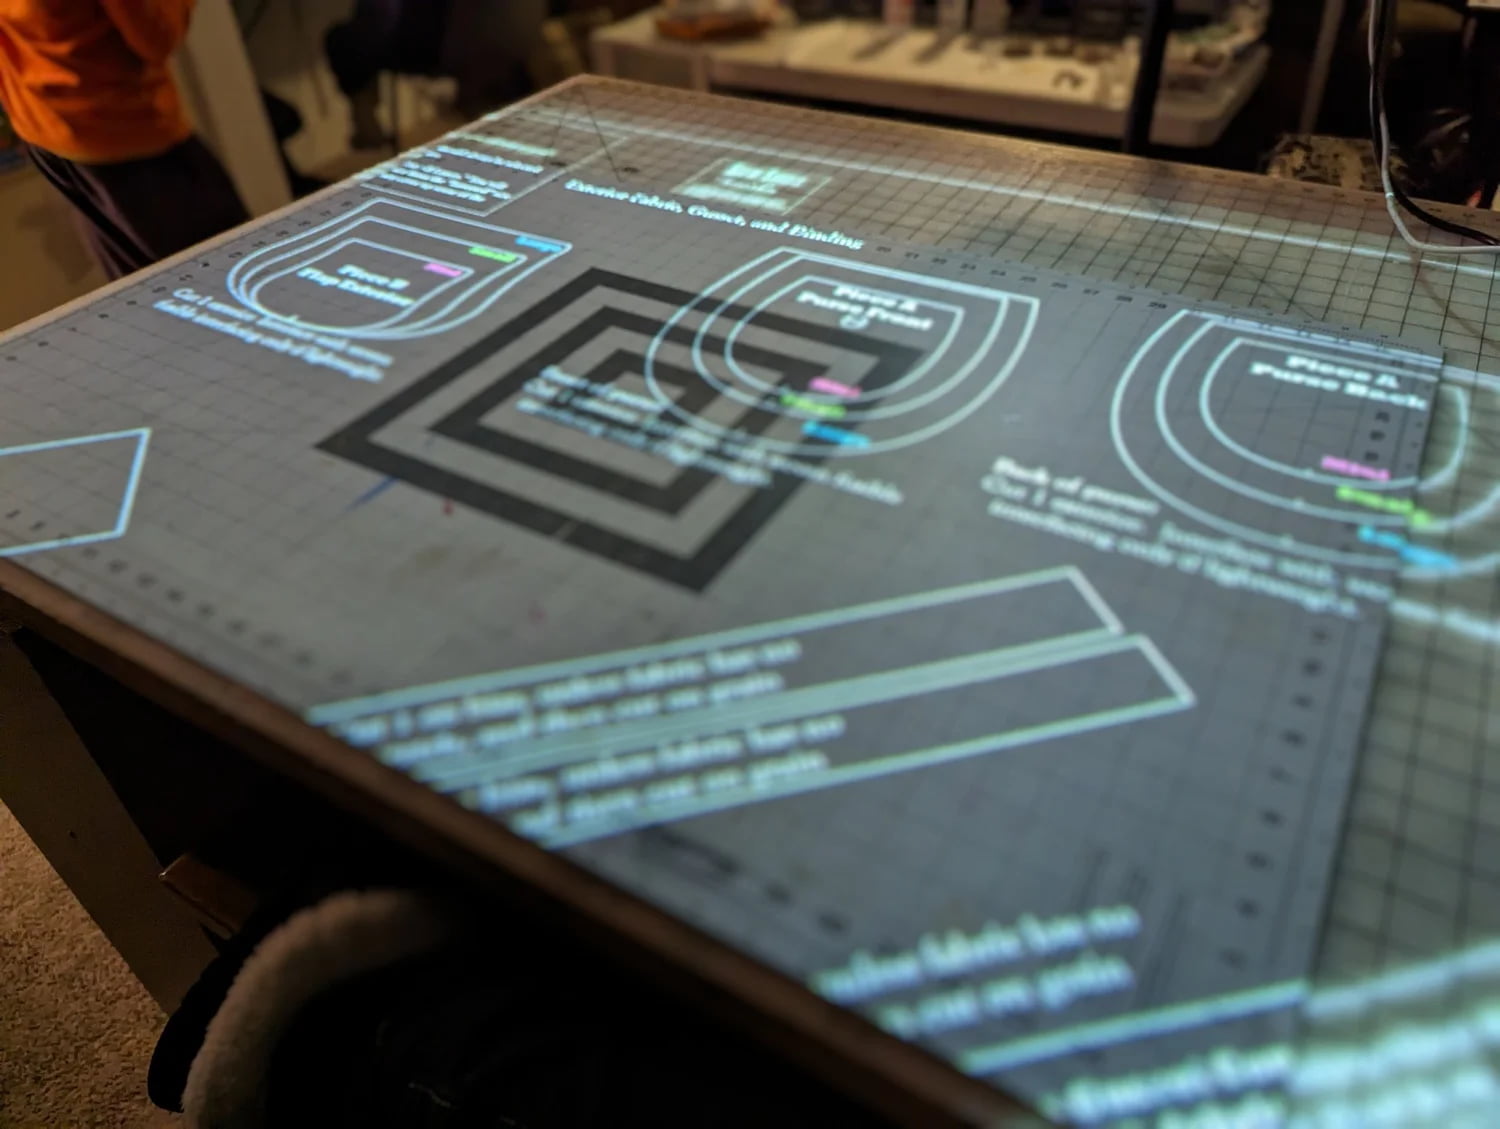
A lot of people are now investing in projectors and cutting mats which is ideally suited to Seamly and eliminates the need to print, glue & cut out sewing patterns:
There are some very resonably priced projectors on the market, now days, that can do the job. The only drawback is that some of the globes expire after a certain period of time, but the savings in time, ink and paper more than cover this.
Does anyone in this forum have any experience and possibly recommendations for such devices, and any ideas about the sizes that can be accurately projected?
I admire @Scholli‘s dedication to her handcraft, but I also think I would rather use the time for other tasks (Coffee for example )
@Scholli is an amazing patternmaker and actually has her own boutique. You can most certainly take some tips from her.
I can think of 2 or 3 that use a projector and I’ve been “thinking about it”, did a bit of research, however, time is a bit scarce for sewing at the moment.
Depending on space, you’ll also need an extension rod that clips to a table or an extendable ceiling mount and a marked cutting mat to assist with calibration. There are some opensource or free software to assist with the calibration. And then, it’ll need to connect to your laptop via bluetooth or wifi to your computer/laptop (just for convenience).
Depending on your actual needs, you’ll need one with enough lumins to show the cutting lines during the day in full light otherwise you could get away with one with less lumins but you’ll need to cut out in a dimly lit room. So keep an eye on the lumins.
That’s about all that I can suggest. Perhaps others can add their advice & experience?
I had one for a while, but when it suddenly stopped projecting, (the light was still visible shining through the joints, but not out the lens,) I gave up on it. I still intend to eventually open it up & see if I can see anything, but assume that I won’t find anything I can act on.
My advice is this:
Make sure that it will project at sufficient dimensions at the cast length which you will be using. If it will project the right size at three meters, but you only have half that distance available, it won’t project at the right size for you.
Ensure that the cooling fan won’t be unpleasantly loud. Those two reasons are why I’m in no hurry to see about fixing my projector.
What Grace said. Make sure it will be bright enough for the conditions you will be wanting to use it in.
Try before you buy. Make sure you won’t have too much trouble navigating the cutting lines. Your cutting device will throw shade on the fabric, & be prone to making it shift.
I had/ve a Vivimage Explore 2 projector. If I didn’t have the space, I’d put more effort into getting a projector that better fits my needs, but as is I have been quite satisfied with getting a cheap cutter/plotter instead.
I am using one and i am very happy with it. Yes, the throw (cast size to distance) and brightness is a thing. I bought a cheap second hand Epson, that doesn’t match any more new standards for a movie watching but it’s more than enough for pattern making. Lamp service life is at least around 5.000 hours, for one pattern you need ca 1-2 hours maximum. It’s bright enough to project during the day or when the lights are on.
I have a very straightforward process where the size of the layout = maximum size of projected image = size of my working table. So, I calibrated only once and I never doubt about any mismatch.
I have all files synchronise through the cloud, I am drawing on PC and big screen and projecting through the phone. I can correct mistakes immediately etc. I cannot imagine
Pros: Saves space by not having to keep paper patterns.
Cons: Cost. Does not adapt well to real world use when using multiple width fabrics, stripes, plaids, printed patterns. You would have to create a layout to match each fabric. Unlike high end pattern systems, Seamly does not have the functionality to layout to a specific strip, plaid or pattern.
Note: After years of experience I’ve learned NEVER trust the stated width of fabric. It can vary from what it’s supposed to be… and it can even vary along the same roll - especially with wools. So if you’ve created a layout for 60" fabric and it turns out the fabric you recieve measures 58"… you have to redo your projection layout. Using paper patterns you can simply adjust on the fly as you arrange the patten pieces.
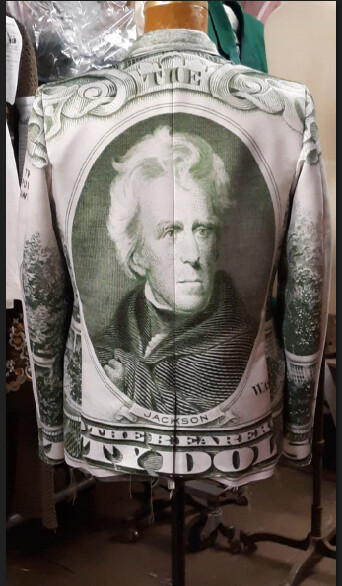
The same issue applies when you have to adapt the layout to fit a given stripe, plaid or patterned fabric. For ex: When our shop made the money jackets for “Catch Me if You Can”, it required unique and precise marking and cutting of each piece thst you would never achieve with projection.
Conclusion: Using a projector depends on one’s workflow and the type of fabrics one works with. If one if OK with using a stock layout with no regard to matching fabric pieces, and doesn’t have the space to store a lot of patterns - projectors are a valid option. If you’re making high end garments, need to use a pattern with a wide array of fabrics, and need to match stripes.plaids or patterns… paper patterns are probably a better option. Of course you may also find a hyrid work flow of projection and paper will meet your needs.
So subtract between two inches & a decimeter from your nominal fabric width when laying out on the computer. The extra fabric at the edges is worth not having to entirely rework your layout due to a thumb’s width lack of fabric.
Fair enough… but what if you deal with 45" fabric? 48" fabric? 36¨ fabric" 56¨ fabric? And that does not address creating a layout that deals with a specific stripe, plaid, or pattern. Even with commercial tissue patterns you can move or fudge the pieces on the fabric to fit. A projection layout is fixed… you can’t move the pieces without creating a whole new layout. It just would never have worked for me.
Not in a commercial setting, and not when your customer is sending you $36/ yd Melton wool shipped from the UK. I would cringe at wasting that much fabric.
Right. I forgot about that bit between starting to write my post, & finishing it. Some of that can be mitigated by using a dynamic framework, such as manually moving the pieces around in a drawing program while it’s projecting on the fabric, but that’s still not great for commercial settings.