I started my adventure with seamly and am trying to follow the Aldrich ‘The Bodice Block’ instructions as my first project.
Now on my second attempt at doing this in Seamly since starting yesterday, as partway through I realised that there is a ‘point along line’ tool, which has kept the drafting cleaner.
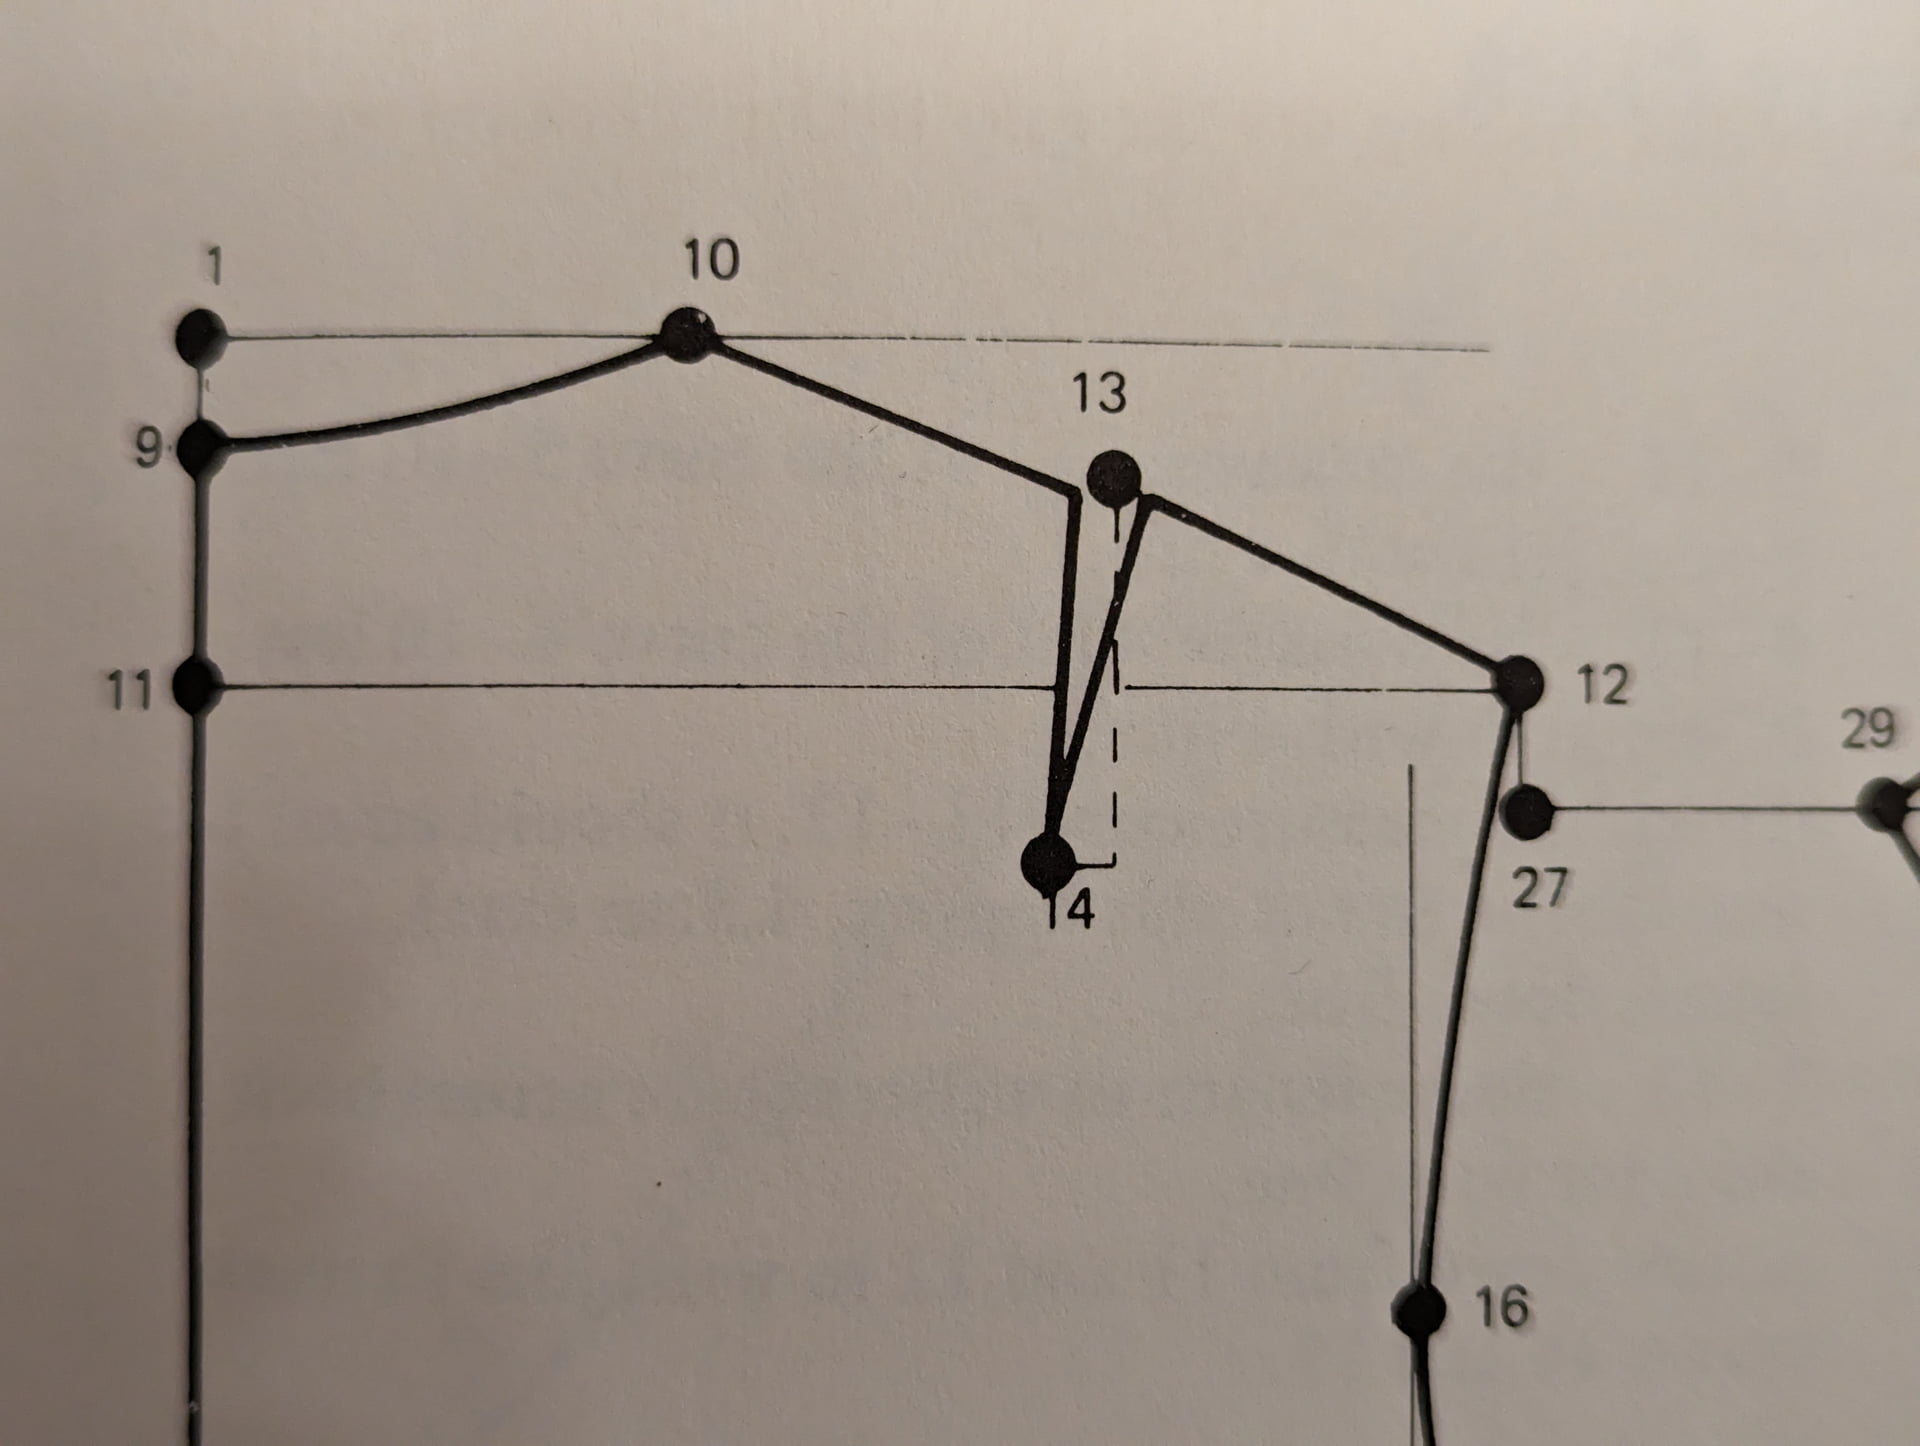
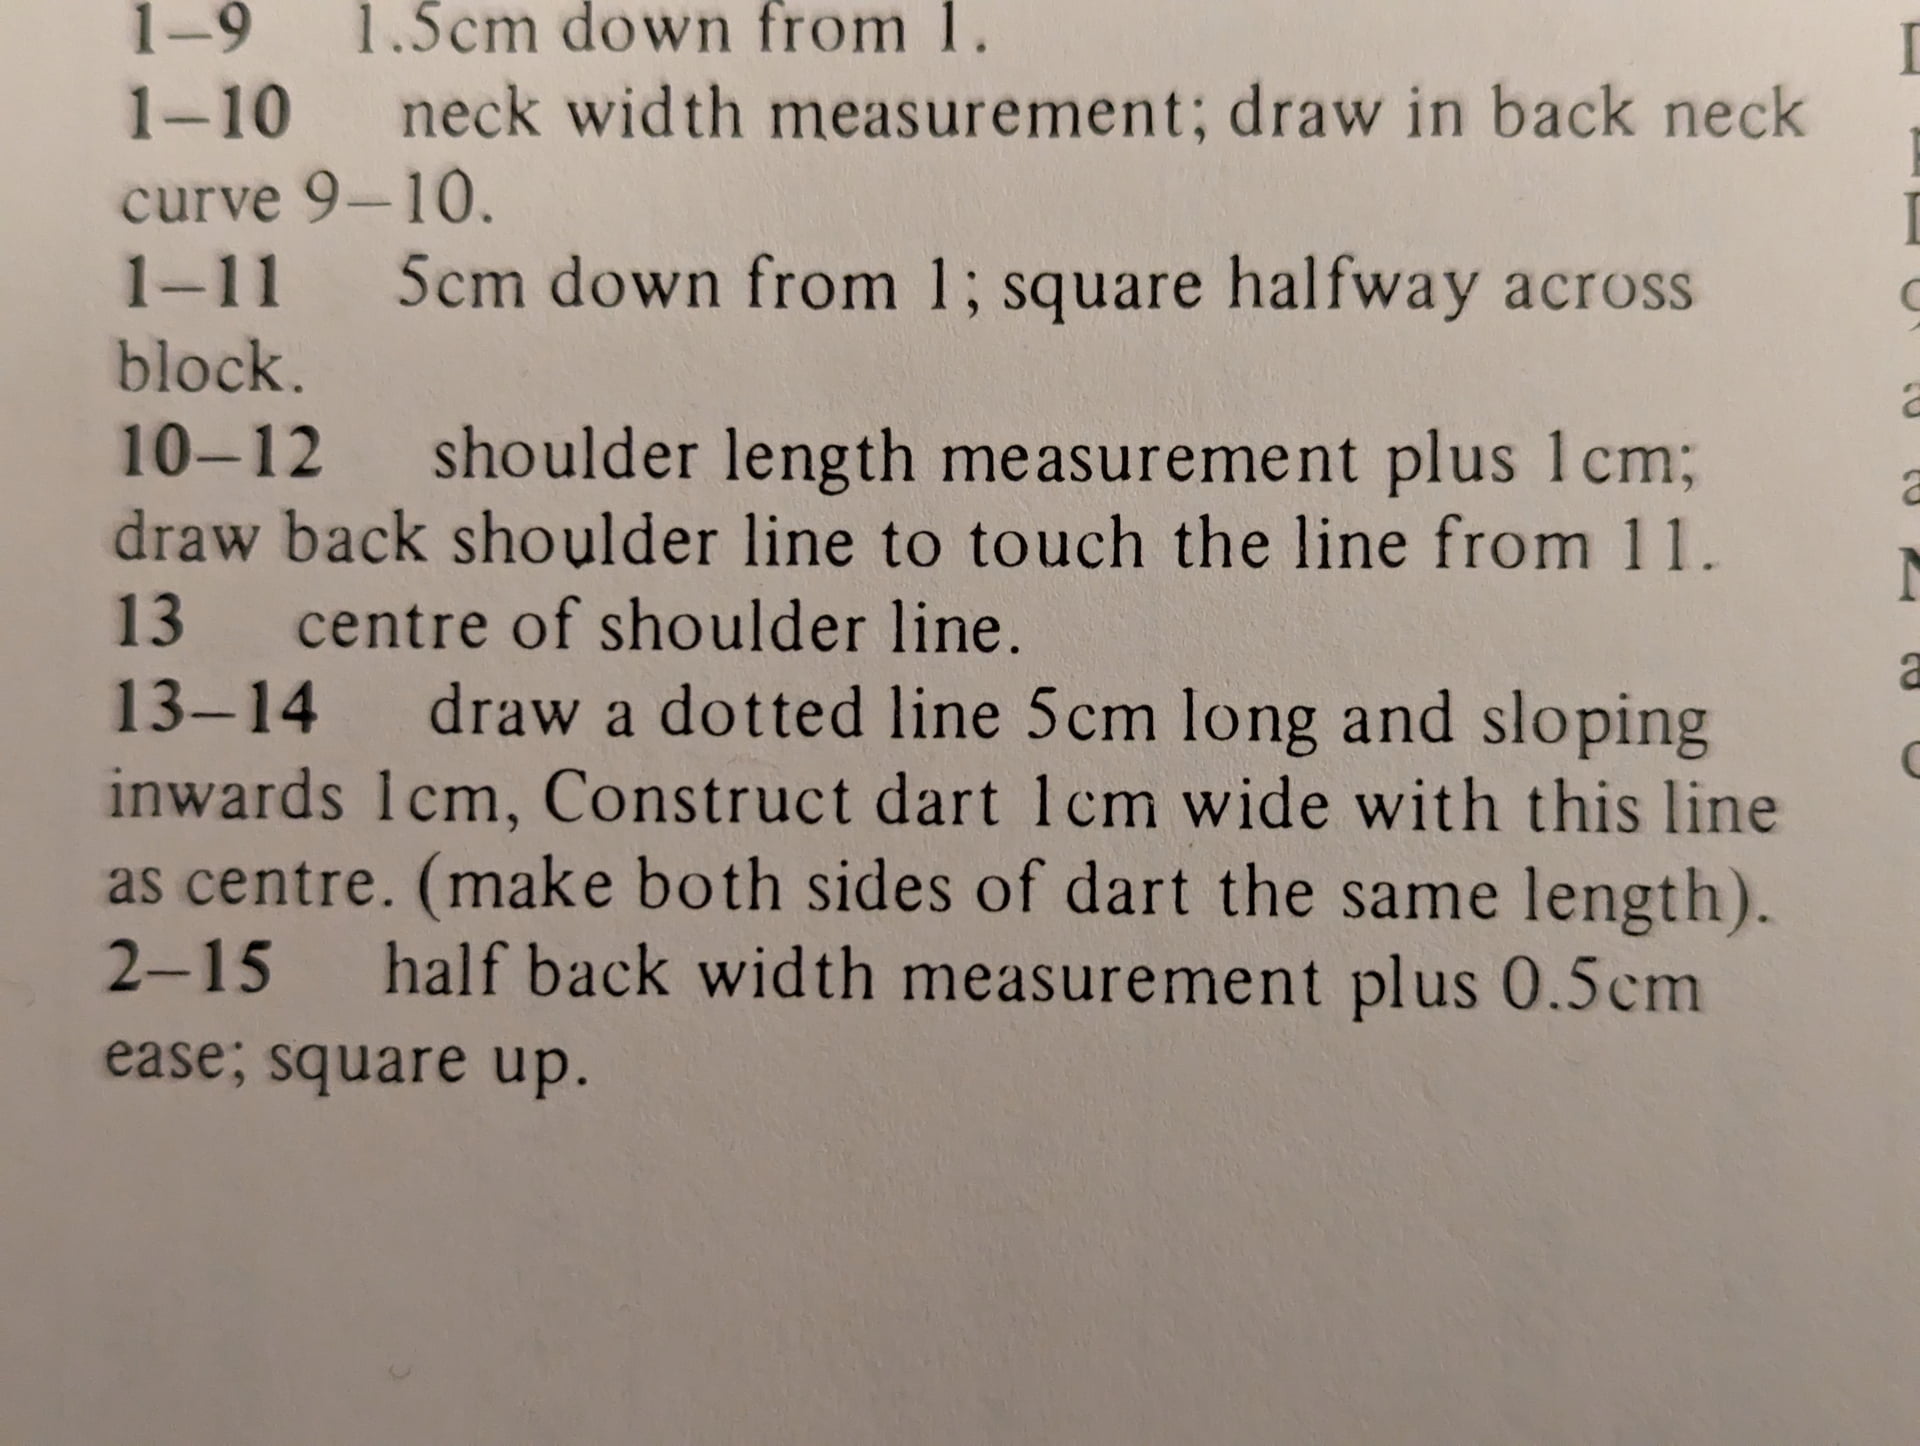
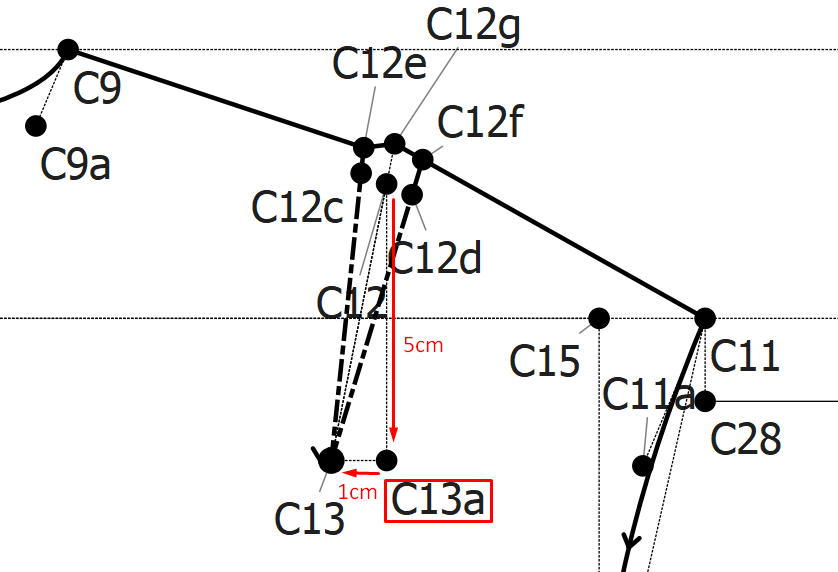
I’ve run into an obstacle with following the shoulder dart instructions, namely, where is the 1cm wide?
13 is the midpoint between 10 and 12
Is 14 5cm down from 13 and 1 cm towards centre back?, is that what instruction 13-14 is stating?
When it then states draw dart 1cm wide, is that 0.5cm either side of 13 (which then shifts the left side of the dart)
I.e. start drawing at a point 0.5cm from 13 towards 12 diagonally down to 14.
Then the other leg of the dart, which is to be the same length as the drawn leg, be drawn along a guideline from 14 through a point 0.5cm towards centre back from 13 (i.e. the other side of the first 0.5cm to make the 1cm wide)
But as that leg will be same length it will then form the top of the dart to be connected to 10?
Have I overcomplicated my reading of this? It seems the more I look at it the more I’m not sure how the placement of the right and left leg angles and lengths have been arrived at.
Sorry to hear you’re having trouble with your pattern drafting system. I don’t have any personal experience with Aldrich, & I can’t remember who besides @Grace does. She should be around in a few hours more.
Like you, I’m just getting more confused the more I look at it!
Sometimes drafting instructions can make you crazy. we get caught up in it. The wording starts to make my head spin!
I think the thing to do is realize the intent - which is to provide a dart for shaping over the shoulder blade
Place it approximately mid shoulder and on a slight angle as shown.
make it 1 cm wide in total and 5 cm long and yes you must make the dart legs the same length.
Use the dart leg length on the left as your measurement to match for the other leg of the dart.
Yes. Then the dart fold line is 14 to 13. The dart is 1cm wide at 13. Since the dart will not be perpendicular to the shoulder seam you would need to true up the dart so each dart leg is the same length as @Ttailor aluded to.
It’s even worse when you try to read through a period drafting system like Croonberg’s Supreme System. His Red Book is a little easier to follow than the older Blue Book, but it’s odd reading through the older style of writing. I also find with some systems that some details don’t translate well to a computer system… it’s easy to just eyeball some things on paper, but you can’t do that with an app like Seamly2D. So you end up fudging some points to get the general style lines.
After a while I just stopped thinking about it practically, remembering that a dart physically folds in the middle had helped me understand the intention of the instructions here.
I also add this formula to my measurement file. The sample is a Size 22 Nape to waist ( I switched to inches so my input is in inches) @Height<=63?16.15:@Height>=70?17.73:16.94 This will automatically adjust the nape to waist when the height changes. Aldrich has a few of this for shorter or taller people.
I would love to have a “quickie” tool to make darts, true them, and assign them to a dart group. We already have a very simple “quickie” tool to find the midpoint of a line.
If we had a quickie dart tool that assigned the dart objects to a group, then we could easily rotate these darts by selecting their group instead of having to select each object individually, which would be another time consuming patternmaking headache solved.
I know @douglas and @grace have said we can get by without this dart tool and the ability to perform operatiobs on groups, and I don’t disagree. We can get by as we are.
But it would save me and other Seamly users hours in design time if we had a “quickie” dart tool to gather parameters then make all the points, lines, and trued points needed. Pkus the ability to select groups in the operations like Rotate and Mirror.
Can we create a dart without a specialized tool? Sure, but I don’t think I’ve ever disputed a need for a dart tool. I would though go as far as saying there is no need for the True Dart tool, as truing a dart should automatically be performed within a Dart Tool - whether on a straight or curved seam.
Hmmm… Yes… I don’t mind a dart
tool but I think it is more important to have something that really does explain WHY a dart has to be a certain size in a certain place, etc. etc. I think darts are those mysterious things that take years of study & research to really understand. — SIGH —
If a tool can do all of that thinking for you, I’m all for it
Maybe I was lucky, or maybe just my path to pattern making, but darts are not that mysterious to me. I started drafting more than 50 years ago. Specifically starting with mechanical drafting where you had to learn to think in 3 dimension, and being able to translate that to 2 dimension. To me we’re just a 3d model. Darts have to exist to fit a flat piece on a body with shape. Doesn’t matter where on the pattern piece they are, as long as they are there and are of the proper size. When I started at the University for my Theater degree, the first class I took in pattern making was literally learning to move darts using the slopers. So to me, drafting darts are just second nature to me.
That being said, i don’t think it is our job or up to the app to teach or explain the hows and whys of darts. A user should come to the app already knowing how to draft darts.
I think this is the most logical, people are not going to be attempting to place a dart unless they want one in a particular place. Yes that may be because they are simply following block/sloper drafting instructions for the first time and the effects of truing the darts might be confusing, but I would have thought that harnessing the ability of the computer to do these calculations for us would be one of the positive benefits of using software.
From having read several of your very helpful posts @Grace across the forum, I understand that you learned pattern making having started with Valentina/Seamly and then studied the books (and you are light-years further along that path than I am). Looking at this from the perspective of future users who are new to pattern making, I can imagine that it may be more of a leap of imagination to think from screen to fabric to the body, whereas when working with paper it can be physically folded, slashed and spread etc.
Personally, I think understanding adding volume and translating that to Seamly may be more complex than reducing it with darts.
That holds true even in the drafting and draping realm. For ex: Draping darts to make a pattern fit a dress form is pretty straightforward… on the other hand there is an infinite number of “artistic” ways to add fullness to a draped pattern. Which incidentally should take into account the drape of a material being used.
Thank you very much for the vote of confidence @livingonanisland, yes, I found out with a huge thump that I would need to learn something about patternmaking AFTER I found the software. And I have studied a number of the different methods which (in my honest opinion) only give instructions and very little of the underlying theory. And with my questioning mind, I like to know the wherefore’s & whyfore’s behind the instructions. It’s very easy to place a line like this and a curve like that because you’re told to by a book. Or to create a dart at the should that is 7.6cm for a size 42, but nowhere in the book does it actually tell you that the dart is really reducing the fabric from across the bust to fit the shoulder-tip to shoulder-tip measurements (both halved) - especially when the shoulder-tip to shoulder-tip measurement isn’t used by the system. And the same applies to the Bust to Waist darts. And into all of these factors, one needs to remember that most pattern making systems work exclusives for a B cup size for women and then they give you formulas to divide the difference into certain sections around the waist with no regard to people who have an A cup or a DDD cup. It’s silly things like this that keep me studying book after book and reading up all over the internet. Perhaps another 20 years or so.
These are the things that @Douglas learnt in his training that has taken me years to figure out.