What I also suggest is that in your pattern in a seperate draftblock is draw a reference square of a given size… like 4in x 4in (or 10cm x 10cm). Then create a layout and export to tiled PDF and print. Measure the sqaure to check that things are exporting and printing to scale. Then go ahead and do your full layout & export.
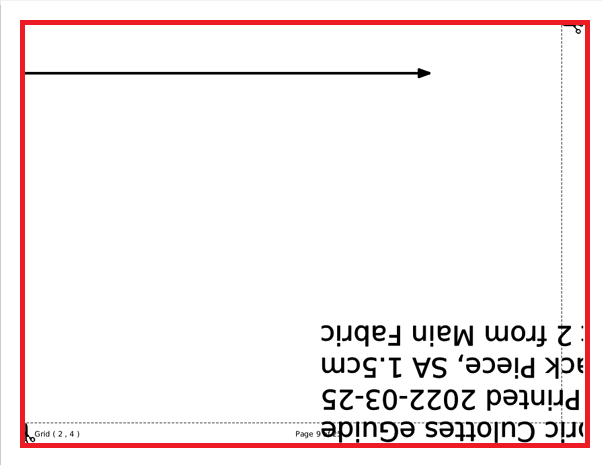
Also to note when you export to tiled PDF, pages you are going to have a margin on the right and bottom edges with the scissor “cut” icons
I always leave the pages uncut and just overlap and tape the pieces together. I tape a row and a time, and then tape the rows together. Tip. When taping - with clear packing tape - I lay metal rulers on the pages near where I’m taping so the pages don’t lift up with static and mess everything up. Been there done that.
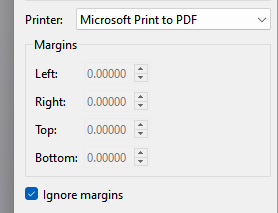
My printer won’t print to the edges. There’s a built in 1/4 inch margin, so I set it to that in Seamly.
On the screen, it looks like it does the cut line at 1/4 inch when I set it to that, but what I’m afraid of is that the overlap beyond the line is actually shortening the pattern.
I guess I’ll have to make a rectangle and experiment with those margins.
Ok… it’s been awhile since I printed anything from Seamly… but it’s coming back. I always used the no border option on my printer so I wouldn’t have to cut anything. Since you’re printer is going to have a border the left & top side will have the cut lines with the scissors. the right and bottom should be your overlap. PDF’s always have a hardcoded min border like 2.5 or 5mm? … So the the pattern will extend past what ever dashed margins on the right and bottom up to the PDF border or your printer border (red box) - which ever is greater.
I haven’t printed a pattern for a while now, either, but the part in the margin is an overlap of the connecting page so that you can match the page margin lines and the pattern lines to make sure that you’ve joined the pages together correctly.
First I printed a 10in by 4 in rectangle with 0.25 inch margins all around on the layout, and matching margins on the export to tiled PDF. This gave me a 9.75 inch line (if I cut on the cut line) for what should have been a 10 inch line. If I include the overlap beyond the cutting area, the full line length becomes 10.125 inch.
After that I had trouble getting it to align a 10x4 inch rectangle over two pages, so I increased the size to 14 inches.
With the “Ignore margins” button checked and .25" margins in the pdf export, the 14 inch line comes to 14.5 inches. If I cut off at the cut lines, it would be 13.75 inches.
With ignore margins and pdf margins set to 0, if I do not cut at the cut lines, it becomes 14.125 inches, and if I do cut at the cut lines it becomes 13.5 inches.
Since you both haven’t printed from Seamly in a while, is there a better method of getting these prints handled? I don’t mind doing some extra work to make sure I can print multiple page, dimensionally accurate drawings.
There is… but not with your printer. If you have a printing service in your area Export to PDF and have the pattern plotted on wide roll paper. When I had my costume shop we were lucky to have a document printing service next door, so that’s what we use to do.
That being said… one thing to check is make sure your printer is set to print 100% scale, and not to “fit”, as that wil definitely mess the scale up. The easy way to tell if the print is getting scaled is do a 4x4in square that will fit on 1 page.
Given that your printer will not print borderless I think the export margins have to match the printer margins.
Other options are to export as PDF and use the “Poster” or “Tile” printing options in your PDF viewer - like Adobe Acrobat, Foxit Reader - or other apps like Libre Office->Draw or Corel Draw that support tile printing.