A year ago, I used Seamly 2D to make a shirt pattern following Winifred Adlrich’s Metric Pattern cutting for menswear 5th edition. I was winging it but it worked.
I did not and still do not understand exactly what I’m doing or why. It was more of a ‘’monkey see, monkey do’’ kind of thing
I want to come back to learning patternmaking and use seamly2D but wish to take the time to understand what I’m doing.
I plan to read Aldrich’s book from the start and build the blocks as they come in the book.
First thing that I’m confused is about seam allowance.
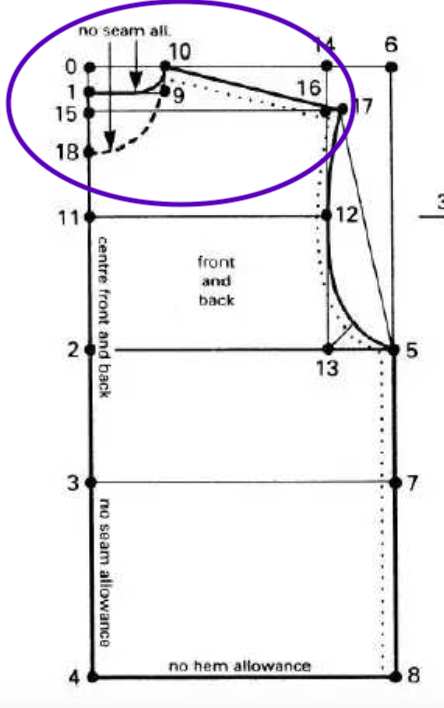
In Chapter 1, Aldrich’s says that a 1cm seam allowance is included in the blocks except where ‘’No seam allowance’’ is written.
Around page 38, there is a picture of the flat shirt block described in chapter 2 where the mention ‘‘No seam all’’ is written in the collar area. Specifficaly the two curves that makes the back and front collar. (sorry as a new user I cannot insert pictures yet)
My questions are about the ‘’No Seam Allowance’’ mentionned in the collar area of this block.
1- Why is there no seam allowance in the collar area?
2- When the times comes to sew this pattern, do I need to add a seam allowance to the collar area?
3- If yes, should I add the seam allowance to these curves in the layout of seamly2d before printing it?
4- finally on a more general note, is it ok for learning purposes to use my own measurement for the blocks instead of using generic measures as suggested in the book? Most likely, these patterns will be used for me only.
I checked your user level and you shoud be able to attach pics now.
Could be based on the construction technique used to make the collar.
Yes… but again, how much, and which pieces & edges you need to add will depend on the construction technique. For ex: If using a canvas / felt under collar no seam allowance is added to this piece.
Yes. If you post a pic of the collar from the book I can better suggest what to add where.
Well the idea with Seamly is to draft the pattern using measurements according to system. For example if the book says draw a line from A to B that is 1/6 the chest measurement - assuming you have created a measurment file - you would use a formula bust_circ / 6.
Yes you could just use your measurements directly in the formulas… but the pattern will not be resizable. So if your chest is 36 in the formula would then be 36 / 6 or even just 6… but keep in mind that using the formulas this way will not be self documenting. When you look at a formula with a length of “6” it has no context where as “bust_circ / 6” tells you exactly that the measurement is 1/6 of the bust (chest).
I will keep on reading the book. Maybe it will get clearer as I read on.
I am planning to use a measurement file with my own measurement so I can make changes in the measurement file that would then be reflected in the pattern. So all should be good.
Ok… yes you will need to add SA to the curves 1 to 10, and 18 to 10. In general you can add your normal SA (1cm). Some tailors will add more as fudge factor in fitting the collar.
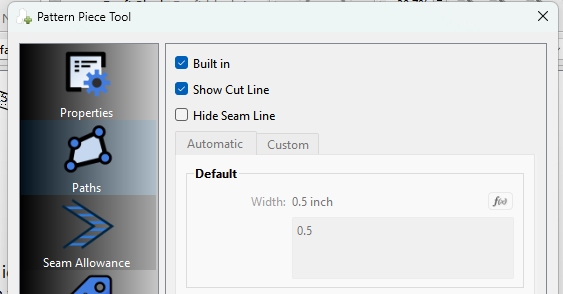
Since you’re working with a system that has builtin SA as well as needing additional SA in spots, I suggest setting your default SA in the prefs to 0, so that all the seam allowances have a 0 width. Then for those that you need to add SA you can set it to 1cm or whatever. If a pattern has all built in SA’s you could just check the Built in option which disables all seam allowances where it doesn’t allow you to add SA anywhere.
When I did my shirt a year ago that is how I’ve done it. Built in SA 0 and added SA where it was needed. That was a gut feeling based on nothing else than what I thought was logical. Glad you confirmed it. Now I know I’m on the right track. It’s easier to start on the right path than making multiple changes once you are almost done. Thanks!
I do not mind not seeing the SA in the printed pattern.
Generally not a big deal, but you may want to draw in or note any deviations from the 1cm to remind future self what the allowances are. As someone who was in the costume business it was common that I would add extra allowance in some seams for alterations so I just got in the habit of noting those differences. You never know when you might use a pattern again.
The reason there is no seam allowance in the collar area is… According to your image that you posted, you’re making a T-Shirt pattern. T-Shirts normally get a neckband and no collar. Therefore, the neckline will need to be reduced and the band attached so that the edge of the band lies flat against the skin and the edge of the band will be where the current neck line is in the pattern.
So, affectively, there is seam allowance in the neckline suitable for a T-Shirt but not suitable for a shirt with a collar.
If you wish to draft without the seam allowances, where the instructions say Plus 1cm you can leave this out, but you’ll need to use your discretion with this, there may be places where it’s not SA.
Where you see Plus 2.5cm, you can reduce this to 1.5cm because it’s 1.5cm ease plus 1cm SA.
PS - Ease is normally added to the width measurements.