Est-il possible de faire une rotation de pince sur une pince déjà existante (et donc en ajoutant la valeur à la pince existante)?
Pour être plus précise, je souhaite transférer la pince taille à la pince poitrine existante et donc ajouter la valeur pince taille devant à la pince poitrine. Cela est-il possible?
Merci d’avance
Hi all,
Is it possible to rotate a clamp on another existing one (and so adding its value to the existing one)?
To be precise, I would like to transfer to waist clamp to the existing breast clamp and so add the value of the waist clamp to the existing breast clamp. Is it possible?
The translation doesn’t really make clear what you would like to do but I think you would like to do is to copy and paste the the waist to the chest. This can be done by using the Move Objects tool which will copy the parts that you select and paste them where every you put them.
La traduction ne précise pas vraiment ce que vous aimeriez faire, mais je pense que vous aimeriez faire est de copier et coller la taille à la poitrine. Cela peut être fait en utilisant l’outil ** Déplacer les objets ** qui copiera les pièces que vous sélectionnez et les collera où vous les placerez.
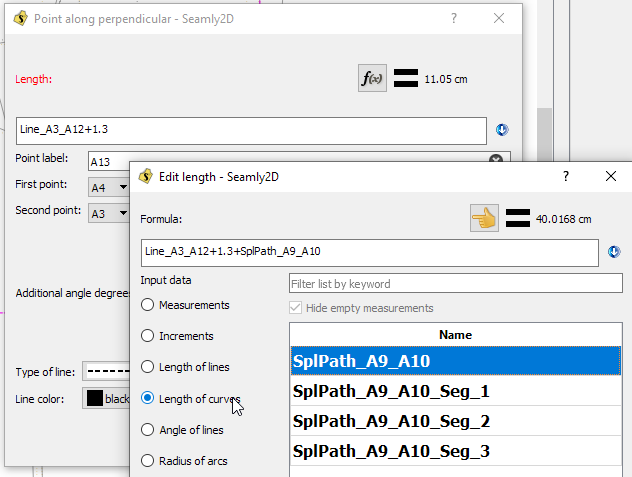
If this is not the case and you only want to add the length of the line/curve to the chest line, then it is much easier. All you need to do is to open the formula option on the chest line, select “Length of Lines” or “Length of Curves”, add a + after your chest measurement and then double-click on the item that you wish to add the length of.
Si ce n’est pas le cas et que vous souhaitez uniquement ajouter la longueur de la ligne / courbe à la ligne de poitrine, c’est beaucoup plus facile. Tout ce que vous devez faire est d’ouvrir l’option de formule sur la ligne de poitrine, sélectionnez “Longueur des lignes” ou “Longueur des courbes”, ajoutez un + après votre mesure de la poitrine, puis double-cliquez sur l’élément auquel vous souhaitez ajouter le longueur de.
I hope this helps, if not, please explain in a little more detail Thank you.
J’espère que cela aide, sinon, veuillez expliquer un peu plus en détail: light_smile: Merci.
Actually, I want to rotate a clamp on an existing one.
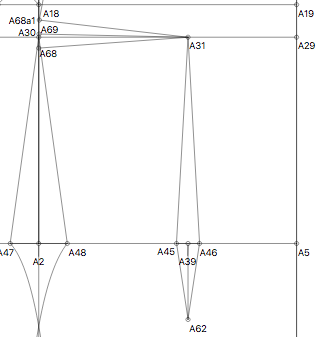
En fait, j’aimerai ajouter une valeur de pince à une autre existante. Voir l’image ci-dessous:
See image below:
I want the waist clamp “A45/A46/A31” to rotate to the existing breast clamp “A68/A31/A18”.
But I want the first clamp value to be added to the breast clamp value, so the breast clamp value will be the one existing + the one added (replacing the waist clamp value).
J’aimerai que la pince taille “A45/A46/A31” tourne jusqu’à la pince poitrine “A68/A31/A18”.Et donc que la valeur de la pince taille soit donc ajouter à la valeur de pince poitrine.
I hope this is clearer.
J’espère que c’est plus clair
Many thanks in advance for your help,
Best regards
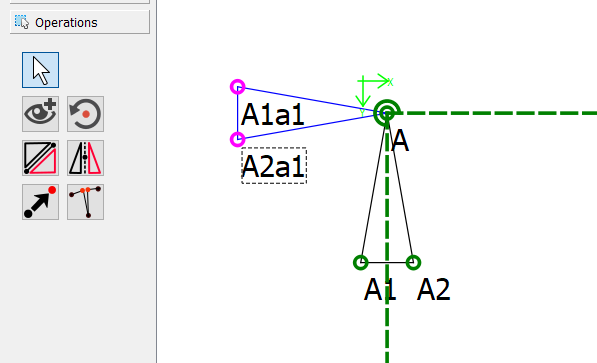
Select the Rotate tool and, holding the CTRL key, click on A45 and A46 to select them and hit Enter. Then click on A31, which is your point of origin, and hit Enter.
Rotate them in the direction where you would like them to be and hit Enter again. While you are rotating them, you will see the nodes in red and if you hold down the Shift Key, the increments in degrees will be in 25 degrees. You will be able to edit the rotation degrees afterwards.
I have drawn in the new lines in blue so that you can see the new dart:
P.S. All rotations start at 0 degrees, so while the parts are at 270 degrees, we want them to be at 180 degrees, so the rotation from 0 is only -90 degrees. This is why the green line going to the right of the A is pointing at 0 degrees, the one going down is pointing at 270 degrees and the green outer circle is showing that we have rotated the nodes by a full 270 degrees from their place of origin. It seems a bit confusing until you get used to it
Thank you! Yes I already used this fantastic tool and angles are a bit confusing but we get used to it
My problem is:
I want to ADD the value of my waist dart, to my breast dart.
In paper, I would have make the waist dart disappear and it would have open wider the breast dart.
I do not know if this is clear. I know how to rotate a dart from one point to another, but not when I need to add the value of a dart to another one existing.
At the end, the waist dart would have disappear and the breast dart would be bigger than initially.
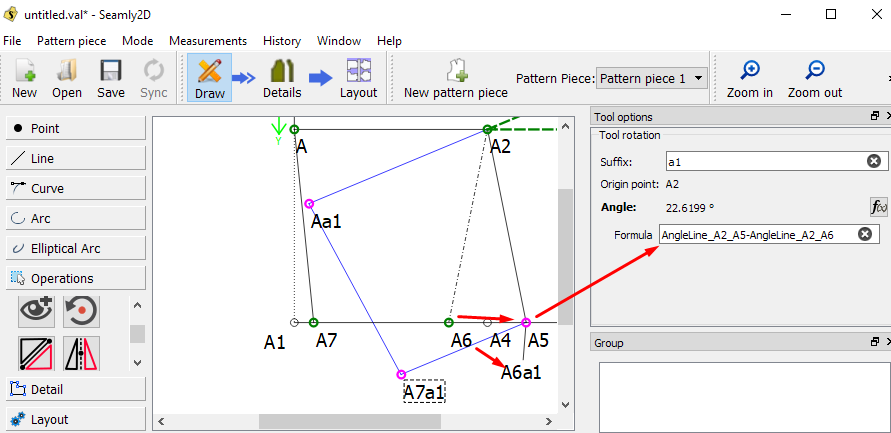
In the example, I drew the lines from A2 to A6 and A5 so that I could use them to create the formula I used. And I made the new lines blue so that you could see them better.
I think it would be better if you did this rotation from a node that is above A the same distance as the line between A6 and A4 so that the dart actually is centred over A.
 Thank you.