Bei der Dolman-Ärmelanlage nach dem Müller&Sohn Schnittsystem muß der Vorderärmel an einem bestimmten Punkt am Vorderteil angelegt werden und dann gedreht und aufgesperrt werden, um zwei verschiedene Referenzlinien zu berühren. Ich muß den Vorderärmel am Anlagepunkt also gleichzeitig über zwei verschiedene Drehpunkte in die gewünschte Position bringen. Hat es vielleicht schon jemand geschafft eine Formel für dieses Phänomen zu finden?
1 Like
I don’t know the Muller & Sohn methods at all but looking at the diagram, I’d do it in single steps.
-
First swivel the red line to the necessary angle and length - You could use the tool Point At Angle & Distance to avoid too many extra nodes.
-
Rotate the underarm part using the rotation tool.
-
Complete the sleeve.
I hope this helps or at least gives you ideas on how to continue 
Thank you for your prompt reply! I think that’s what I did. The problem is that the process is not transferred analogously to other sizes.
1 Like
Sorry, I think a bit was lost in the translation.
It should do, if you used formulas relating to the sizes in the other parts of the pattern.
For instance, the red line from armhole going down at 270 degrees, would have the measurement of the length of arm from underarm to wrist in the formula, OR the one on the right should have this length in the formula.
And the underarm curve should also be adjusted automatically if the size goes up or down, so the curve should be attached to nodes that are measurement based formulas. The curve itself is base on the nodes that it is attached to and should curve very nicely between the nodes, regardless of size, and the rotated curve will always replicate the original curve.
If you send me the .val file and the measurement file(s), I can have a look for you, if you wish
Yes, that’s exactly what I need! It would be great if you would take a look at it. Unfortunately, my layers are labeled German, I hope you will find everything you need. So far, I have only judged the angles by eye. The “formulas relating to the sizes” is what I need.Gr34.vit (2.0 KB) Gr38.vit (2.0 KB) Gr42.vit (2.0 KB) Gr54.vit (2.0 KB) dolman project.val (61.4 KB)
Thank you!
1 Like
This file is the variant with the better first pivot point!01_dolman project.val (60.9 KB)
1 Like
Good morning, @Dina
I drew a line from A37 to A6 (See orange arrow). This was to serve 2 purposes: a) to give the angle, b) to give the distance between those 2 points.
There is already a line between A5 and A6.
I then changed the ‘hard code’ in the original curve of the underarm to formulas as in the image below (see green arrow):
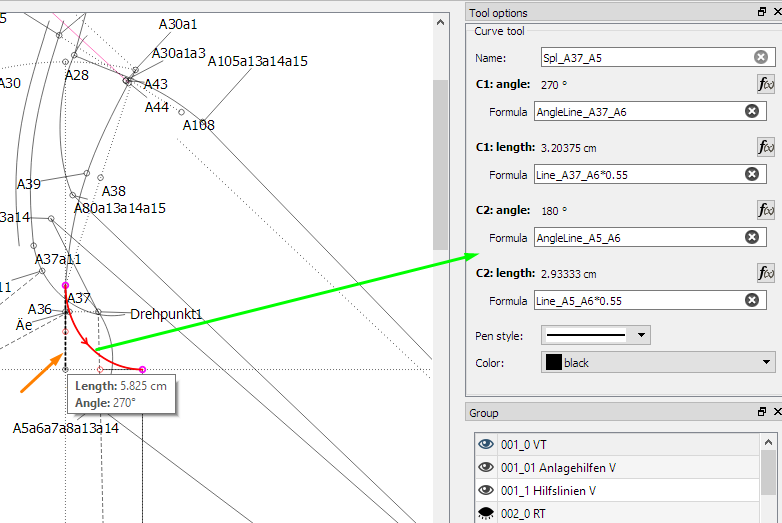
Have a look at this new pattern and see if it is now doing what you want. I checked it and it seems to be resizing ok now.
01_dolman project-a.val (61.0 KB)
With regard to the sizes:
At every possible step in the process of creating a pattern, you should try to use a measurement from your .vit file in the formula space. This should also apply to the length of the sleeve and the circumference of the biceps. But, as you say, it’s all written in German, so I don’t know if you are using them. I’m understanding that sleeve length is ‘Ärmellänge’ but that’s about it 
But in noticing the sleeve length, I see that it’s 60cm in all the sizes. There is no allowance for less or more distance over the curves of a smaller or larger size. So if this measurement is used in determining the distance from the shoulder tip to the wrist of the sleeve, it will have the same length giving the appearance of a very short, fat sleeve in the larger sizes (size 54) and a very narrow, long sleeve in the smaller sizes (size 34).
I think you will need to go back over the original points and check that you have used the actual measurements in these areas and if you have, check that the amounts entered in the measurement files (.vit) are accurate for the sizes.
But to me, they seem to be resizing beautifully Just remember that whatever you do to the original points (e.g. A80) will automatically readjust the moves and rotations (e.g. A80a13). The moves and rotations can’t be individually adjusted, only their directions and distances as a group can be adjusted, and the nodes can be used to further add to the pattern.
I hope this helps and let me know if you have come right or if you need further assistance.
1 Like
P.S. When you open the pattern that I have sent you, you will need to point it to the measurement file again because I downloaded all files to the same directory.
Good morning @Grace, thank you! as soon as I have time, I’ll take a look and of course I’ll share my results with you.
1 Like
Too bad, unfortunately that does not help me. I probably did not explain well what has to happen.
In file 42 I fixed the 2 angels by eye so that:
- the point of interest matches the reference line2
- the curve A99a13a14a15_A105a13a13a15 matches the reference line1.
I think the 2 angel formulars I’m searching for to match this in all sizes have to do with the angel of the bust dart.
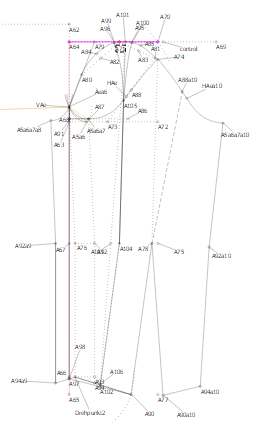
Gr42, fixed by eye:
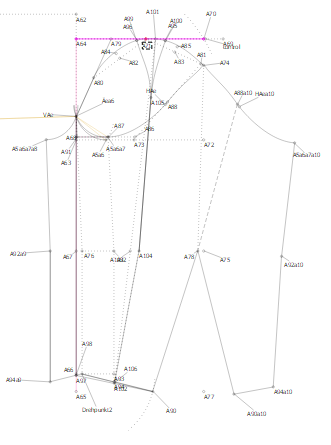
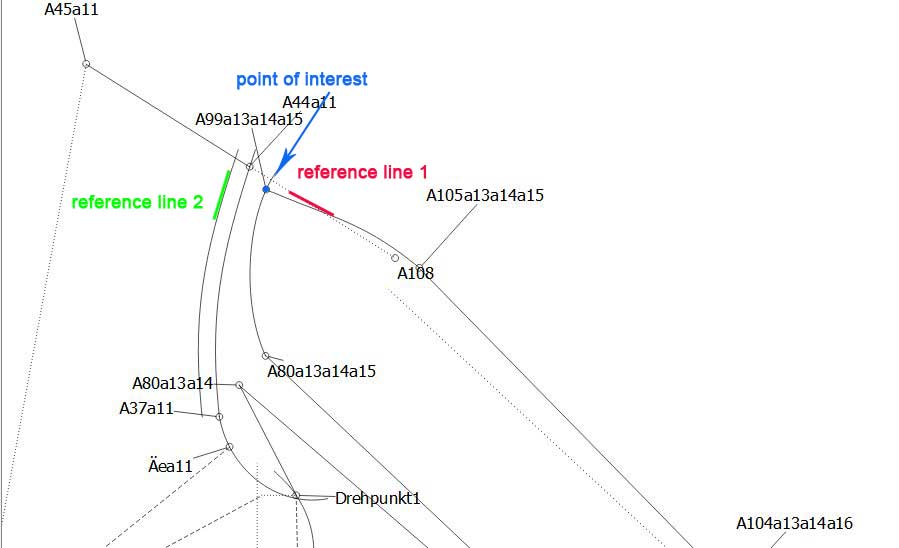
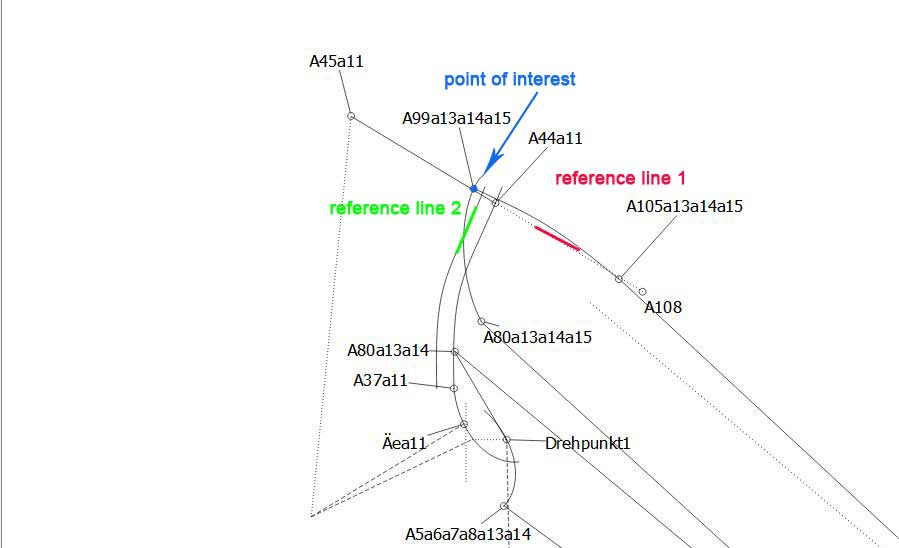
Gr54, doesn’t match the references Gr34, doesn’t match the references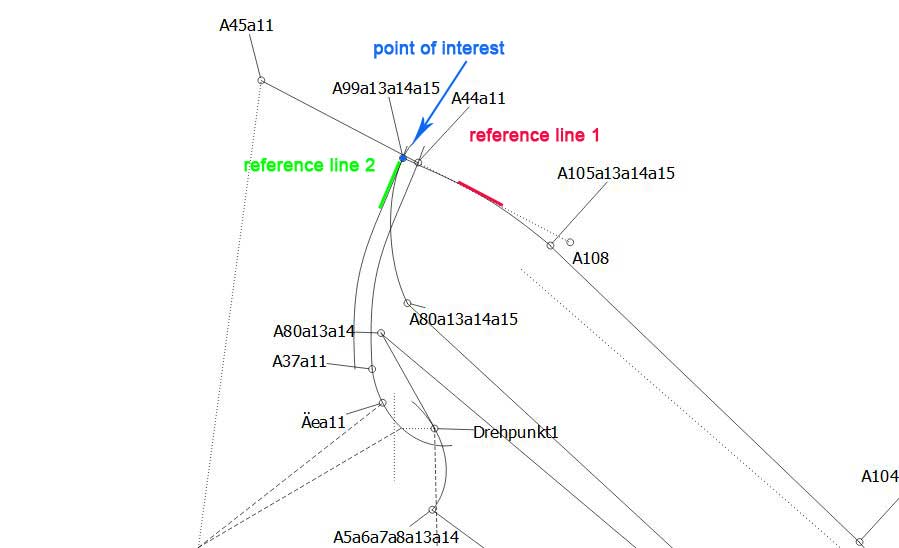
1 Like
Ok, am I correct in saying that parts of the sleeve that you created to the right, you need moved and rotated to meet the top and bottom reference points that you created at the armhole of the bodice on the left?
I think @Scholli is German and also uses the Muller & Sohn methods. Perhaps she will be able to explain how she does this for us. I’m getting very confused by all the markings already there but what I think is that there needs to be a common point on the shoulder and on the sleeve where the 2 points need to meet when moved and draw in a line from common point on the shoulder to the Drehpunkt1 in a different colour so that you can see it.
With the rotation, the angle A45a11_A44a11 can be used as the formula .
And I’d do the top part of the sleeve separately and the bottom part separately. First rotate the parts on the sleeve on the right and then move them to meet the bodice on the left.
That should keep the lines minimal on the bodice side because so much is happening there already.
But I’ll continue to look at it and try things and will let you know when I have some sort of a solution for you.
1 Like
Yes, you are. 
1 Like
Thank you! I keep working on it and get in touch with you.
1 Like
One of the things I just put on my list of things to do not yet done is to come up with a list of terms in German, Italian, Finnish, English, and Russian. This would include terms like dart, armhole, armskye, shoulder point, and many others. I will start a WIKI page for them, but I am concerned that automatic translation will not provide the desired results. In my mind, it seems that there are commonly used terms that may not be a direct “google translation”.
I have only 3 more days before I will be without internet for 45 days, so I will try to get at least the beginning of the WIKI page done this weekend.
2 Likes
dict.cc is a good starting point for translation: dart -> cloth. Abnäher (german)
1 Like
I just added a table to the glossary where anyone can input a word or phrase and others can help translate it. This is not intended to replace the ongoing project wide translation effort. This is intended to identify phrases that are unique to those who do patternmaking.
@bernt I added the term Abnäher to the table.
2 Likes
Ich arbeite unter anderem auch mit Müller und Sohn. Kann aber nicht erkennen, was Sie genau machen wollen. Was mir aufgefallen ist: Haben Sie die Größen im Mehrgrößensystem angelegt? Dort werden ja auch die Sprungwerte zwischen den Größen angelegt. Ich habe mir Ihre Maße mal angeschaut und habe sie dort nicht gefunden.
Ich habe die Erfahrung gemacht dass Müller und Sohn sehr handwerksbezogen die Schnitte aufstellt. Bei Schnitten auf CAD darf man am Anfang nicht zu sehr ins Detail gehen. Wichtig sind die Grundlagen - das Gerüst. Dann muss man sich überlegen wo man hin will. wo sind meine Abnäher? Wo muss ich drehen? Welche Armform?
Wollten Sie ein Raglan konstruieren?
2 Likes
Ich habe seamly2D erst im Dezember entdeckt. Ich schaue noch wie es funktioniert und wie ich es für das System Müller&Sohn einsetzen kann.
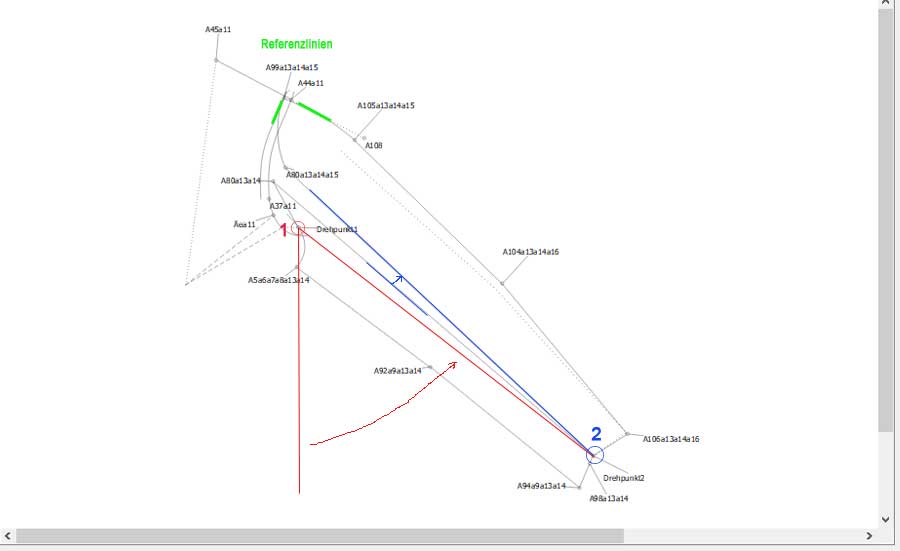
Im konkreten Beispiel handelt es sich um die Dolman-Ärmelanlage. Die erfordert bei der Anlage des Vorderärmels an das Vorderteil ein Eindrehen über zwei verschiedene Drehpunkte mit dem Ziel zwei verschiedene Referenzlinien zu treffen. Ich habe hier kein konkreten Punkt als Drehziel, sondern ein Punkt muss nach der Drehung auf einer Linie auftreffen.
Das lässt sich mit Augenmaß sehr gut machen, aber damit es übertragbar auf andere Größen wird, muss ich natürlich eine saubere Formel finden.
Ich möchte meine Schnitte später an individuelle Maße anpassen, die zwischen Gr.36 bis maximal Gr.54 liegen sollen, wobei die Spanne wahrscheinlich schon zu groß ist um schöne Ergebnisse zu erzielen.
Mit dem Mehrgrössensystem habe ich mich noch gar nicht beschäftigt. Danke für den Hinweis, das schaue ich mir an!
Es freut mich sehr, dass sie sich gemeldet haben! Es hätte sein können, dass sie das Phänomen kennen und eine Lösung gefunden haben. Vielen Dank.
1 Like
Mit dieser Ärmelanlage habe ich mich noch nicht beschäftigt. Ich weis aber das man mit Drehungen genau auf Punkte auch auf einer Linie treffen kann. Als Hilfsmittel arbeitet man dan mit den Linienwinkeln.
Ich habe am Sonntag oder Montag wieder etwas mehr Zeit und werden mir mal diese Ärmelanlage anschauen.
2 Likes