I have another question about translating a book instruction into a parametric Seamly2D construction.
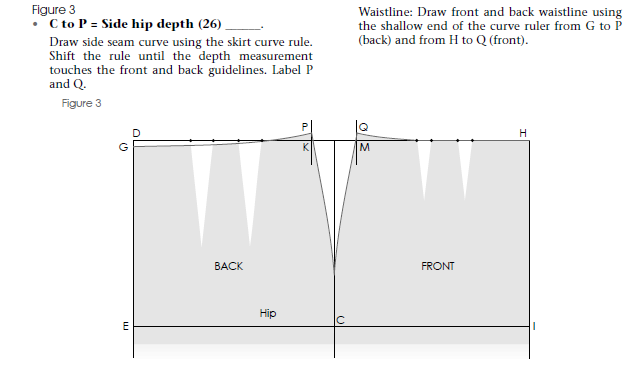
I am working on the side seam shaping of a basic skirt block. In the original drafting instruction, the side seam curve is drawn with a curve ruler. The curve starts from the hip point C and goes up to the waistline area. The instruction says to draw the side seam curve using the skirt curve rule, and to shift the ruler until the side hip depth measurement touches the front and back guidelines. The resulting points are marked P and Q.
My difficulty is that I am not sure how to reproduce this in Seamly2D in a geometrically meaningful way.
A simple workaround would be to place P and Q on the vertical guidelines with a fixed vertical raise, for example 3 mm, and then draw a curve from C to P and from C to Q. However, this would not preserve the actual curve length, because the curved seam line will be longer than a straight distance between the points.
What I am looking for is a way to construct a curve from a fixed point C to a point on a vertical guideline, where the curve length corresponds to a given measurement, in this case the side hip depth. In other words, the endpoint P or Q should lie on a vertical guideline, but the length along the curve from C to that endpoint should match the measurement.
Is there a way in Seamly2D to define or control a curve by its length while its endpoint lies on a given line?
Or is there another recommended workflow to approximate this kind of curve-ruler construction parametrically?
I am aware that I could use a Bezier curve with control points and adjust it visually, but I would like to understand whether there is a more geometrically consistent method for this type of drafting instruction.
Any advice or workflow suggestions would be very helpful.
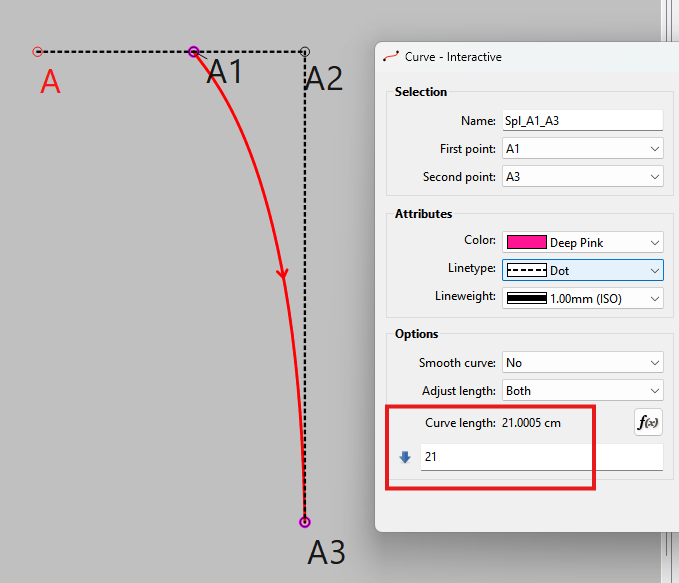
Thank you, this is very helpful. I had not noticed that the new Curve - Fixed and Curve - Interactive tools now have a curve length attribute. That is definitely a step in the direction I am looking for.
However, I think my actual problem is still slightly different.
In your example, the curve is defined between two existing points, A1 and A3, and then the curve length can be adjusted. In my construction, I only have the lower fixed point, comparable to A3, and I have a vertical guideline on which the upper endpoint should lie. But I do not yet have the upper point, comparable to A1.
In the original drafting instruction, this upper point is found by placing or shifting the physical curve ruler until the required side hip depth measurement touches the guideline. So the endpoint on the guideline is not known beforehand. It is the result of the curve ruler placement.
So I am looking for something like this:
fixed start point = C
unknown endpoint = point P somewhere on a vertical guideline
required condition = curve length from C to P equals the side hip depth measurement
Is there a way in Seamly2D to construct or solve for that endpoint on the guideline based on a required curve length? Or would the current workflow still require me to place an approximate endpoint first, then adjust the curve length manually or visually?
The indents for the front & back skirt waist are actually a dart hidden in the seamline, so they are normally identical (points K & M).
Then P & Q are at a certain indentical distance above K & M.
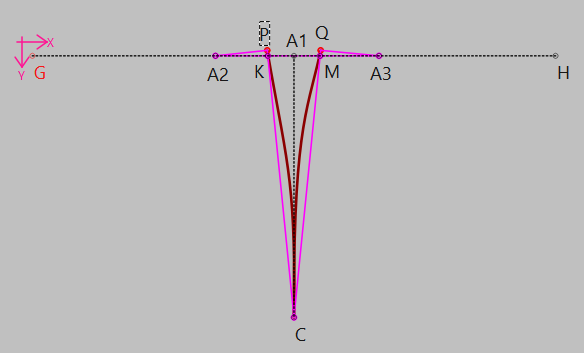
What I normally do is… I only do the curve from C to P and then I mirror it to the front. This way, if I adjust the curve for some reason, it will automatically adjust the front, as well, and the seams will match exactly.
Normally, the curve handle at C will be at a 90° angle with a distance of 1/3 or 1/4 of the line from C to the point between K & M
The curve handle at P (on the side seam) will be at +90° to the curve handle on P for the waist line. If you haven’t drawn in the waist line yet, then you can check what looks good and then use this -90° for the waist line curve. It is just important to have the 90° difference between the 2 to keep the waist smooth. You can use the same line (as reference) for the length of the curve handle as you did from C, just divide it by a higher or lower number until you get the curve that you want and adjust the C curve handle by dividing it by a higher or lower number until your curve is perfect.
You can upload the skirt image into Seamly and resize it so that it matches your existing frame-work, lock it down and then adjust the curve handles to match the image, but always use something as reference that will resize as you change your sizes.
Thank you both for your suggestions. They are very helpful and give me a better understanding of possible Seamly workflows.
I think the exact construction from the book is probably not directly reproducible in the way I first imagined, because the original method depends on placing a physical curve ruler and finding the endpoint through that ruler position.
For now, I have decided to use a workaround for my reconstruction. I will place P and Q on the vertical guidelines with a small fixed raise and then draw the side seam curve from C to these points. I am aware that this means the resulting curve length will be slightly longer than the original side hip depth measurement, but it gives me the waist shaping I need and seems closer to the intended draft than keeping the waistline almost flat.