As the (probably ) oldest newbie here, I am keen to develop skills in ‘Slash & Spread’ techniques.
I have read the ‘Wiki’ on the relevant tool(s), but still have difficulty in seeing what initial state that a pattern should have, in order to ‘Slash & Spread’ in an orderly fashion.
If anyone should care to pass on a simple pattern test file to demonstrate the technique (‘before’ & ‘after’) please - I would be most grateful!
Should there also be some sort of guidance text, this would be most kind.
PS: I am very visually oriented and need to ‘see’ what goes on before I can really internalise the knowledge!
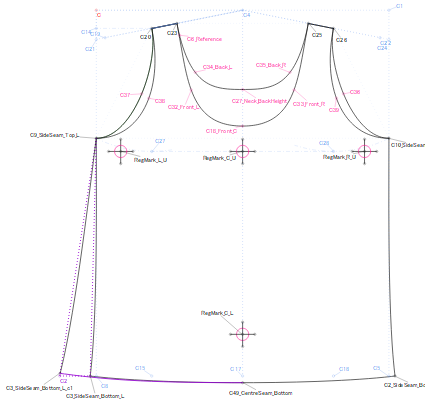
Here, I’ve used the slash & spread technique to adjust the pattern for cup size and for rotating the darts. Each dart rotation is in its own group, so you can view the original and any rotation in the same pattern.
thanks for the feedback … Sorry to say, in spite of your best efforts, it would seem that I am not bright enough to see the ‘wood’ for all those ‘trees’.
I don’t have enough knowledge to jump into your design data and extract the techniques to do something akin to this - even on the most basic level.
Back to the , as my ol’ mum would say: "Suck it and see” methods.
My earlier response may have seemed ungrateful and I would apologise for my tone. My excuse: feeling overwhelmed / frustrated with an undertaking that was becoming beyond my knowledge / capabilities.
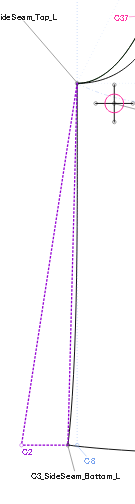
I enclose here the pattern that is at the root of my issues:
The initial task was easy enough: copy a tank-top for Carolee … This was done in very short order, and, barring some learning about the arm and neck linings, went quickly.
Then the issues came to light!
I had drafted the top, which had the front and back pieces identical except for the arm / neckline shapes (see the pattern).
I had to increase the dimensions of the top proportionately:
“C3_SideSeam_Top_L“ → “C3_SideSeam_Top_R“
&
“C3_SideSeam_Bottom_L” → “C3_SideSeam_Bottom_R“
to deal with ‘fitting’ issues.
In doing so the width of the top became to wide and I had to ‘fudge’ it, and it (sort of) fits.
The realisation came, that in reality, the front and back panels have to have differing widths to accommodate the need for more material at the front, than the rear.
Now I need to treat these panel separately, this requires that I master, or at least can deal with, ‘Slash & Spread’!
Having zero knowledge of how to initiate this process -
a; how to decide and prepare the pattern piece for ‘Slashing’ (setting nodes etc)
b: where the rotational point(s) should lie
c: when spreading, how to avoid deformation of any other elements (neckline / armholes)
caused my frustration and lack of provision of an appropriate amount of information for anyone who could provide the advice that I obviously need.
Having realised that the front and rear must be of differing widths, I now have - in addition to all of the above - the issue of ensuring that the side seams remain at the side of the top, and how to ensure that these mate correctly when sewing.
As will be apparent and obvious to all, I need a lot of assistance.
BTW: the material in use is French Jersey … ‘single’ I believe.
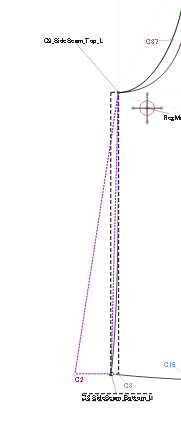
Thank you, yes I had already done that, but this had the negative affect of making the bottom (hem) width wide enough, but the under-arm width (C9_foobar to C10_foobar) then too wide - that was the dimension that I had to fudge to get the top to fit half-way. Thus my fixation upon ‘Slash & Spread’ to widen the bottom without affecting the upper area unduly.
I could of course just leave it at that, but I would still need to acquire the proper techniques at some point in the near future anyway.
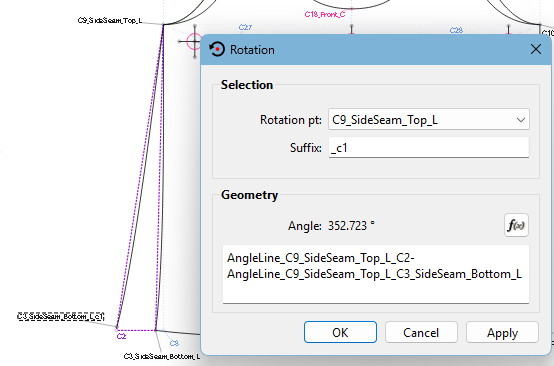
Next, pick up the Rotate tool and, holding the Ctrl key, select the side seam curve and the hemline point. Hit Enter and select the armpit point as the rotation point. Drag the rotation around slightly and hit Enter again.
What this formula says is, take the angle of the line from armpit to the new point and minus off the angle of the line from the armpit to the existing hemline.