Can someone tell me what I am doing wrong. I have created a simple pattern and I am trying to piece it. I have selected all the points in a clockwise direction as directed but it come up with an errror I have to create a pattern. I have tried everything. I just don’t know what I am missing.
1 Like
Need more info… a screencap of the “error” would help.
Also… you can follow along with the tool help in the status bar.
1 Like
Buenas tardes. Me pasaba eso a menudo y si te puede servir de algo, dejo activada la tecla mayúsculas fijas, porque se requiere para incluir los arcos (sisas, escotes, etc.) al momento de crear un nuevo bloque de patrón para imprimir.
1 Like
I have a screenshot but can’t figure out how to attach the file. I only see an Icon for attaching video. The error says (You can’t use piece mode yet, create at least one pattern piece
1 Like
Hello, @Saphire
Once you have drafted your pattern, you need to create the individual pattern pieces.
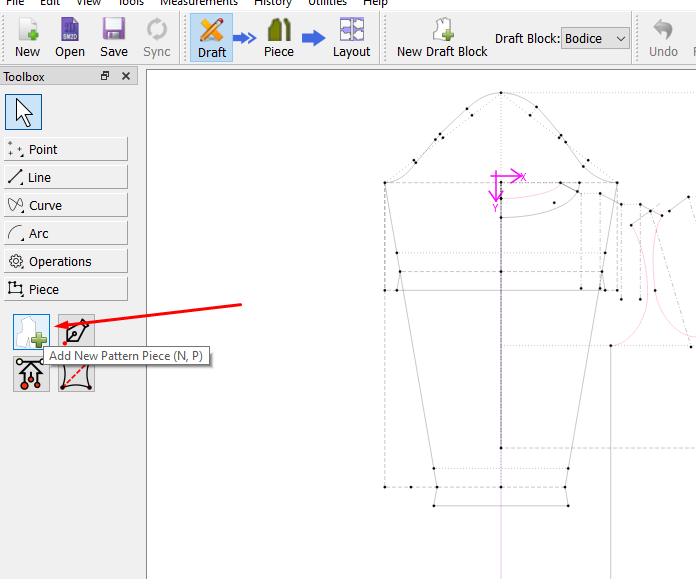
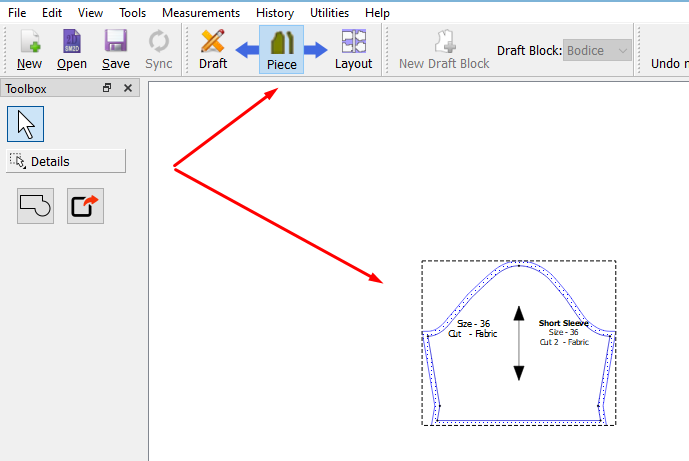
Click on the tool and then select all of the nodes and curves that make up the pattern piece:
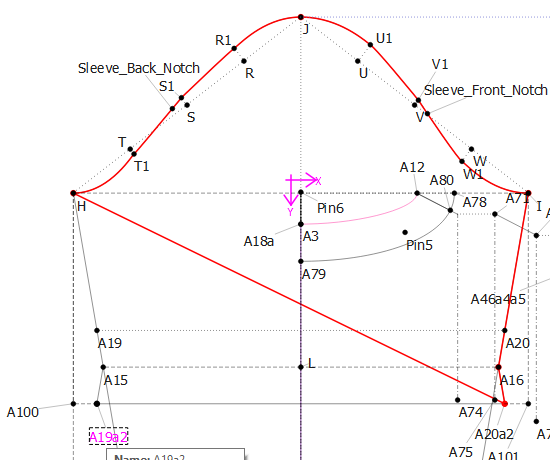
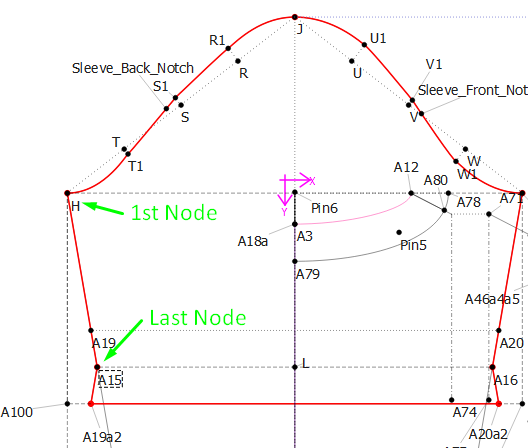
Once you have selected all of the objects required, hit Enter.
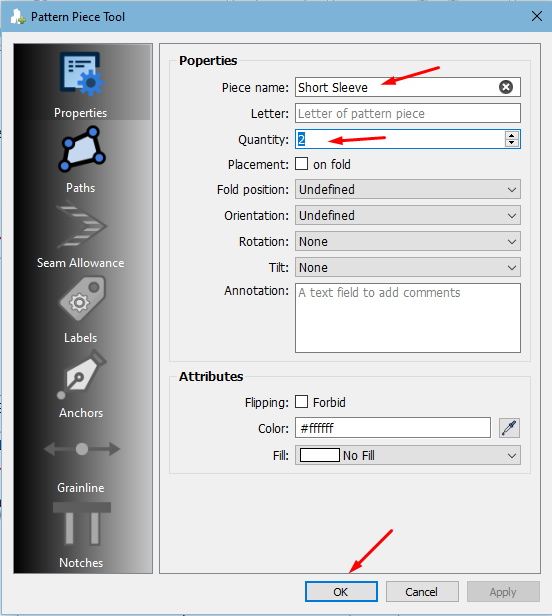
The following will come up where you may enter the name of the pattern piece, the quantity, whether it;s on the fold, etc. and then you may click on OK:
Only then will you be able to go to Piece mode to add other details to your pattern piece:
Right-click on the pattern piece and select Options to add further detail to your pattern piece.
1 Like
Thank you all for your help Grace , following your diagrams I have found out what I was doing wrong, when the pattern piece window opened and after pressing okay which closed it and went back to the pattern, It was no longer highlighted, so thought it hadn’t worked. I didn’t realise you had to press the piece icon. Doh! The pattern piece now shows with seam allowance, Stupid me!, It’s been over 40yrs years since I last used a cad program so i am having to relearn plus my 75yr old brain is a lot slower. Now. I can have some fun designing for myself.
2 Likes
Glad Grace was able to help explain creating a pattern piece. I tried to make a short video for you, but was having my own senior moment trying to get the gamebox screencap to cooperate. LOL
While there are some similarites to CAD applications, the formulaic nature of Seamly2D makes for it’s own uniqueness. We’re always here if you get stuck. :
3 Likes
Thank you Douglas, I don’t normaly ask for help but after 2 weeks of trying to figure it out Ihad enough i was just going round in circles, the photos that Grace posted helped a lot. I did try to put a screenshot but can’t see an icon to load an image.
2 Likes
I’m glad that we could be of help, @Saphire. Please don’t wait 2 weeks again, just ask, we’re very happy to help and someone normally pops by a number of times during the day to check if anyone’s needing help.

This is the upload icon in the red square, for future reference. I have a small program on my laptop… Lightshot… which makes it easy to take a photo of your screen and to paste it anywhere, like on here. Just press the PrtSc key, copy the screen portion that you want & Ctrl V to paste. (Also for future reference ![]() )
)
1 Like
Or you can use Windows capture… Windows key + PrtScr… saves the captures in Pictures->Screenshots.
I just installed Lightshot. Definitely easier to use than doing the screencap then having to open in paint program to crop & save. ![]()
2 Likes
Thank you again, Grace,Douglas you have both been very helpful, I find it sinks in better if I can solve a problem first before asking others. This time I was totally stumped. I was bought a new MacBook for Christmas so I could run Seamly my old MacBook was 12yrs old. Seamly works in open source so it keeps my brain functioning Lol!. I used to build my own computers at the start of the 1980’s for my kids until I got fed up of the dreaded blue screen in 2012 I tried Apple and never looked back. My two grandchildren loved it when I visited with new tech and let them play. I love Seamly because it take me back in time with formulas.
2 Likes
1 Like
Just as tip… since the default is “silent”… you can set the selection sound in the prefs - I use the “scissors” sound - where the sound will give you feedback that a point or curve node has been selected. It’s like the beep at the checkout where the scanner beeps as items are swiped.
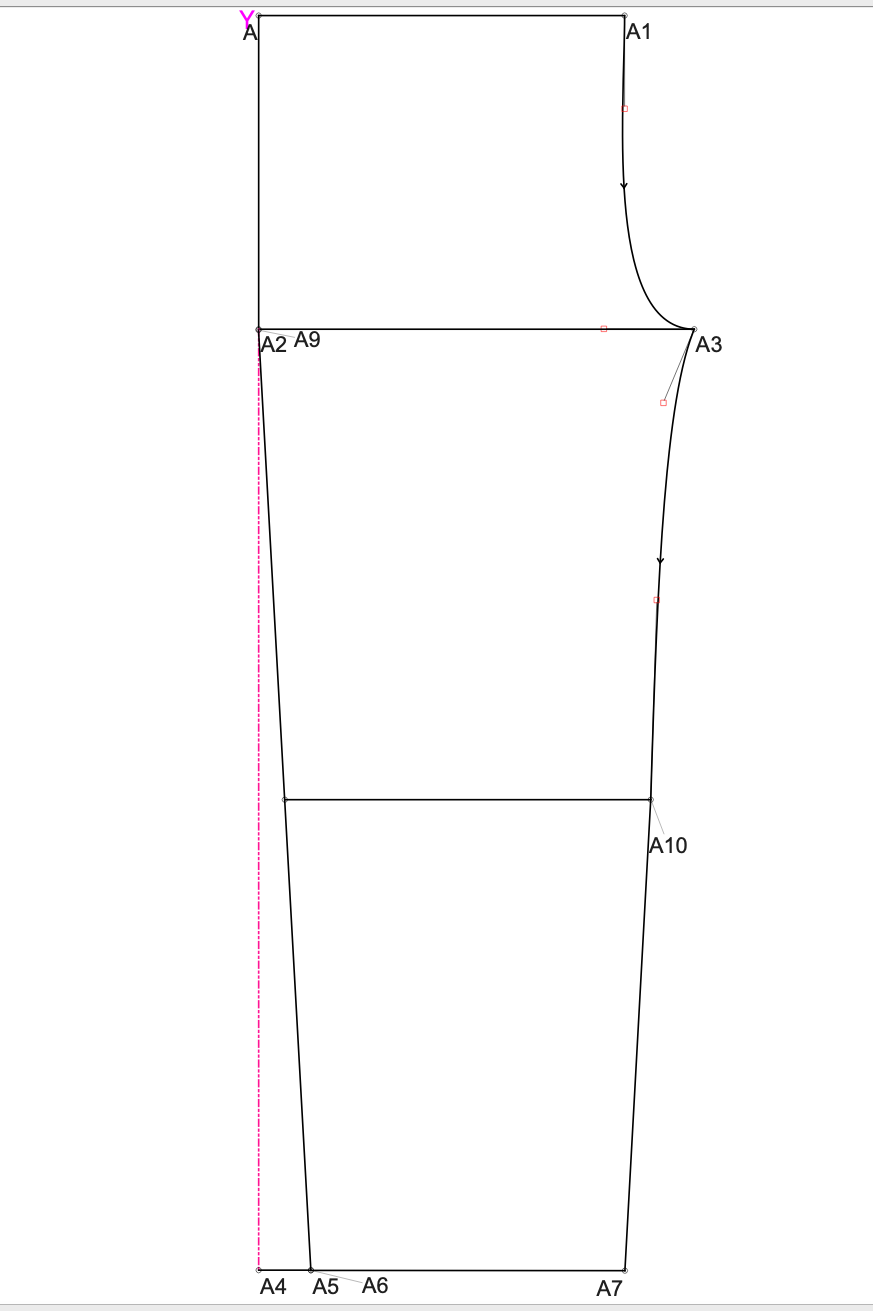
That being said… what’s the purpose of the duplicate points A2 & A9 and A5 & A6?
So Select A, A1, Spl_A1_A3, A3, Spl_A3_A1, A10, A7, A5 or A6, then A2 or A9, Enter. Wtach to make sure the path is highlighting as you click around the path. You should see the Pattern Piece Tool dialog.
2 Likes
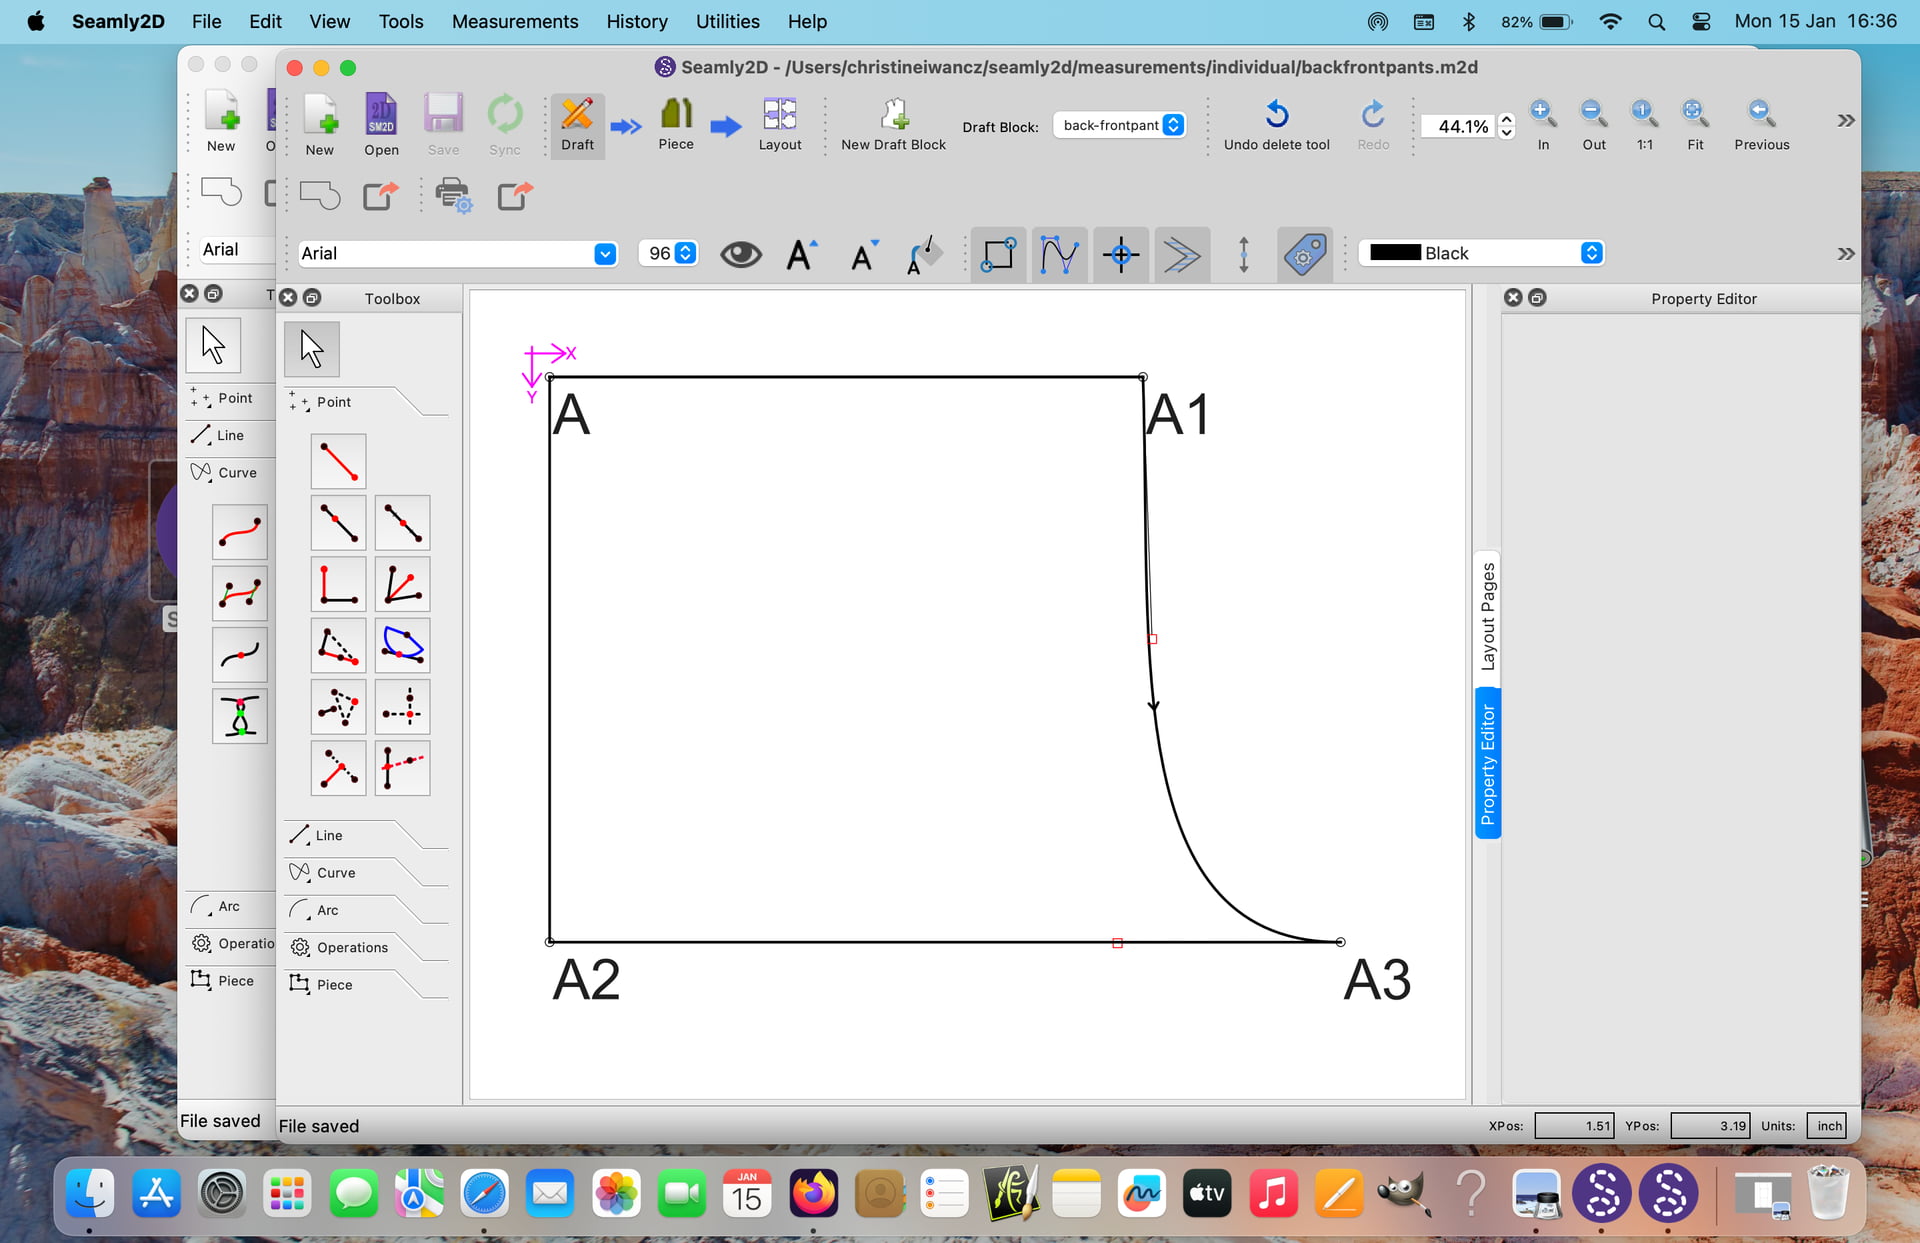
Hi Douglas, the A4-A5 is the 1.5” node from the corner red line. The side seem is A6-A9 should have linked to A2 I zoomed the image to place the line dead centre of A2 but it added an extra node A9. I made sure to press the shift key when I knew which lines were anticlockwise. I have just recreated a simple pattern with simple lines the only line going anticlockwise is A2-A3 here is the screen shot.
1 Like
Ah, that was confusing to me at first too. Seamly drafts are not based on lines, but on Points. The only structural lines are the curves. The lines are drawn between points only to show which point your point is based from. There is also a Line Tool for when you need a measurement between two disassociated points, (which can also be used aesthetically.)
When tracing the pattern you do not use the point or line tools, you use the Add New Pattern Piece tool (first tool in the Piece toolbox, or keyboard shortcut NP) as pictured in @Grace post. Having activated the Add New Pattern Piece tool, the status bar at the bottom of the screen will indicate what you are to do. In the case of this last picture you might start at Point A, then A1, Spline_A1_A3, A3, & end at A2. tap enter & you get the Piece dialog where you can fix accidental back-clicks & name the Piece.
Then you can go mess with it some more in the Piece mode.
I hope that helps!
![]()
1 Like
Thank you Douglas. I have made a pattern following a utube tutorial, that pieced, it turned out lovely with no problems. I have turned on the beep now so it tells me if I have picked up the node The confusion for me is all the points turned red in sequence finishing on the last one. I will keep practicing and see how it goes.Thanks again.
2 Likes
Thank you, I will give that go on this simple pattern reading your explanation and Douglas I must be missing some nodes, I have been going round in a clockwise direction but only picking up one node, five in total ending at A.
2 Likes
If you missed a node don’t worry. You can always use the insert node tool to add any points or curve sections you missed. Also in most cases the app will detect if a curve needs to be reversed, so you don’t have to use the shift key. You can always reverse a curve later if need be. The direction of a curve is indicated by an arrow.
Also - not that it applies in this example, but if you have a point on a curve - say for a notch - you need to select the curve, the point, and the curve again.
2 Likes
Thank you all yet again, I now have a trouser pattern which I can work from, it was easy once I got my head around it. I just need to get more detailed measurements, iwhich isn’t easy.doing it myself.![]()
2 Likes
Aaaahhh… yes. I normally make use of a few leftover pieces of elastic around the bust, waist, hips to highlight these lines while measuring. And then stickers with a line on it for the centre front & back, a T line for the neck side & shoulder tip position. Then a piece of tape or ribbon through the eyelet at the start of the tape measure for grip (especially to stand on while you measure waist to floor), and then a small rubber band on the tape measure to anchor it while you read the circumference measurements. For the back, use your phones camera to view in the mirror that you have the tape measure placed nicely and to take a photo of the measurement.
It’s a bit complicated, but it does work ![]()
1 Like