Should I have used custom measurements instead of a Variables Table

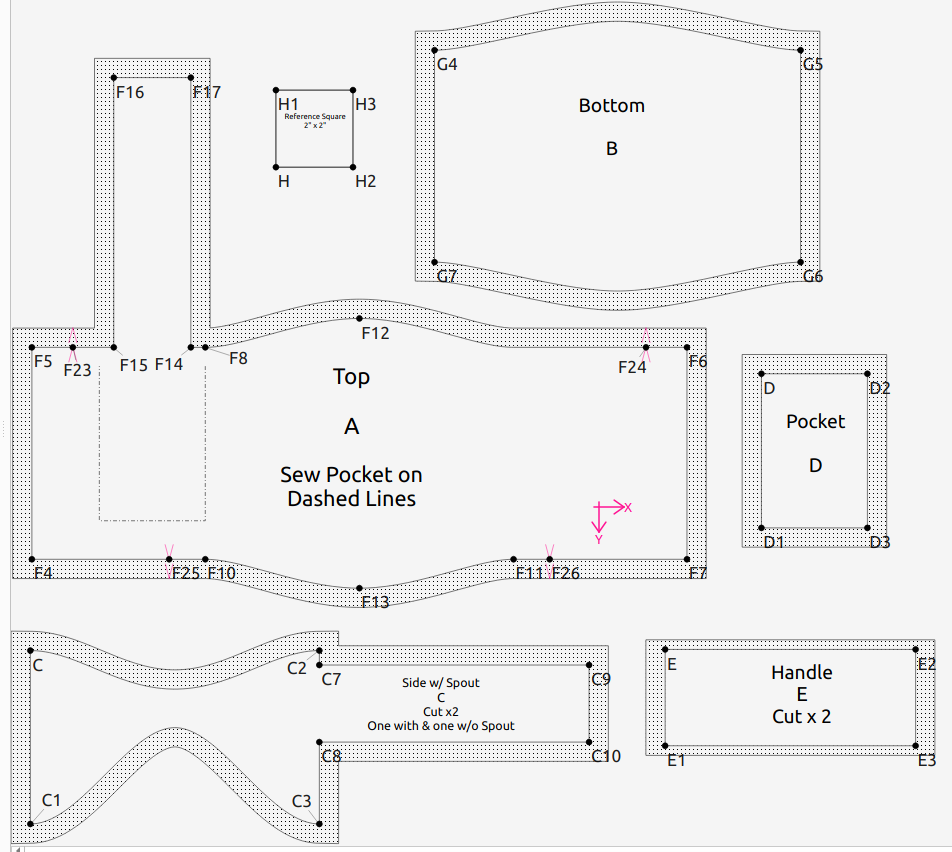
I came across Seamly software last week and have created my 1st pattern with it.

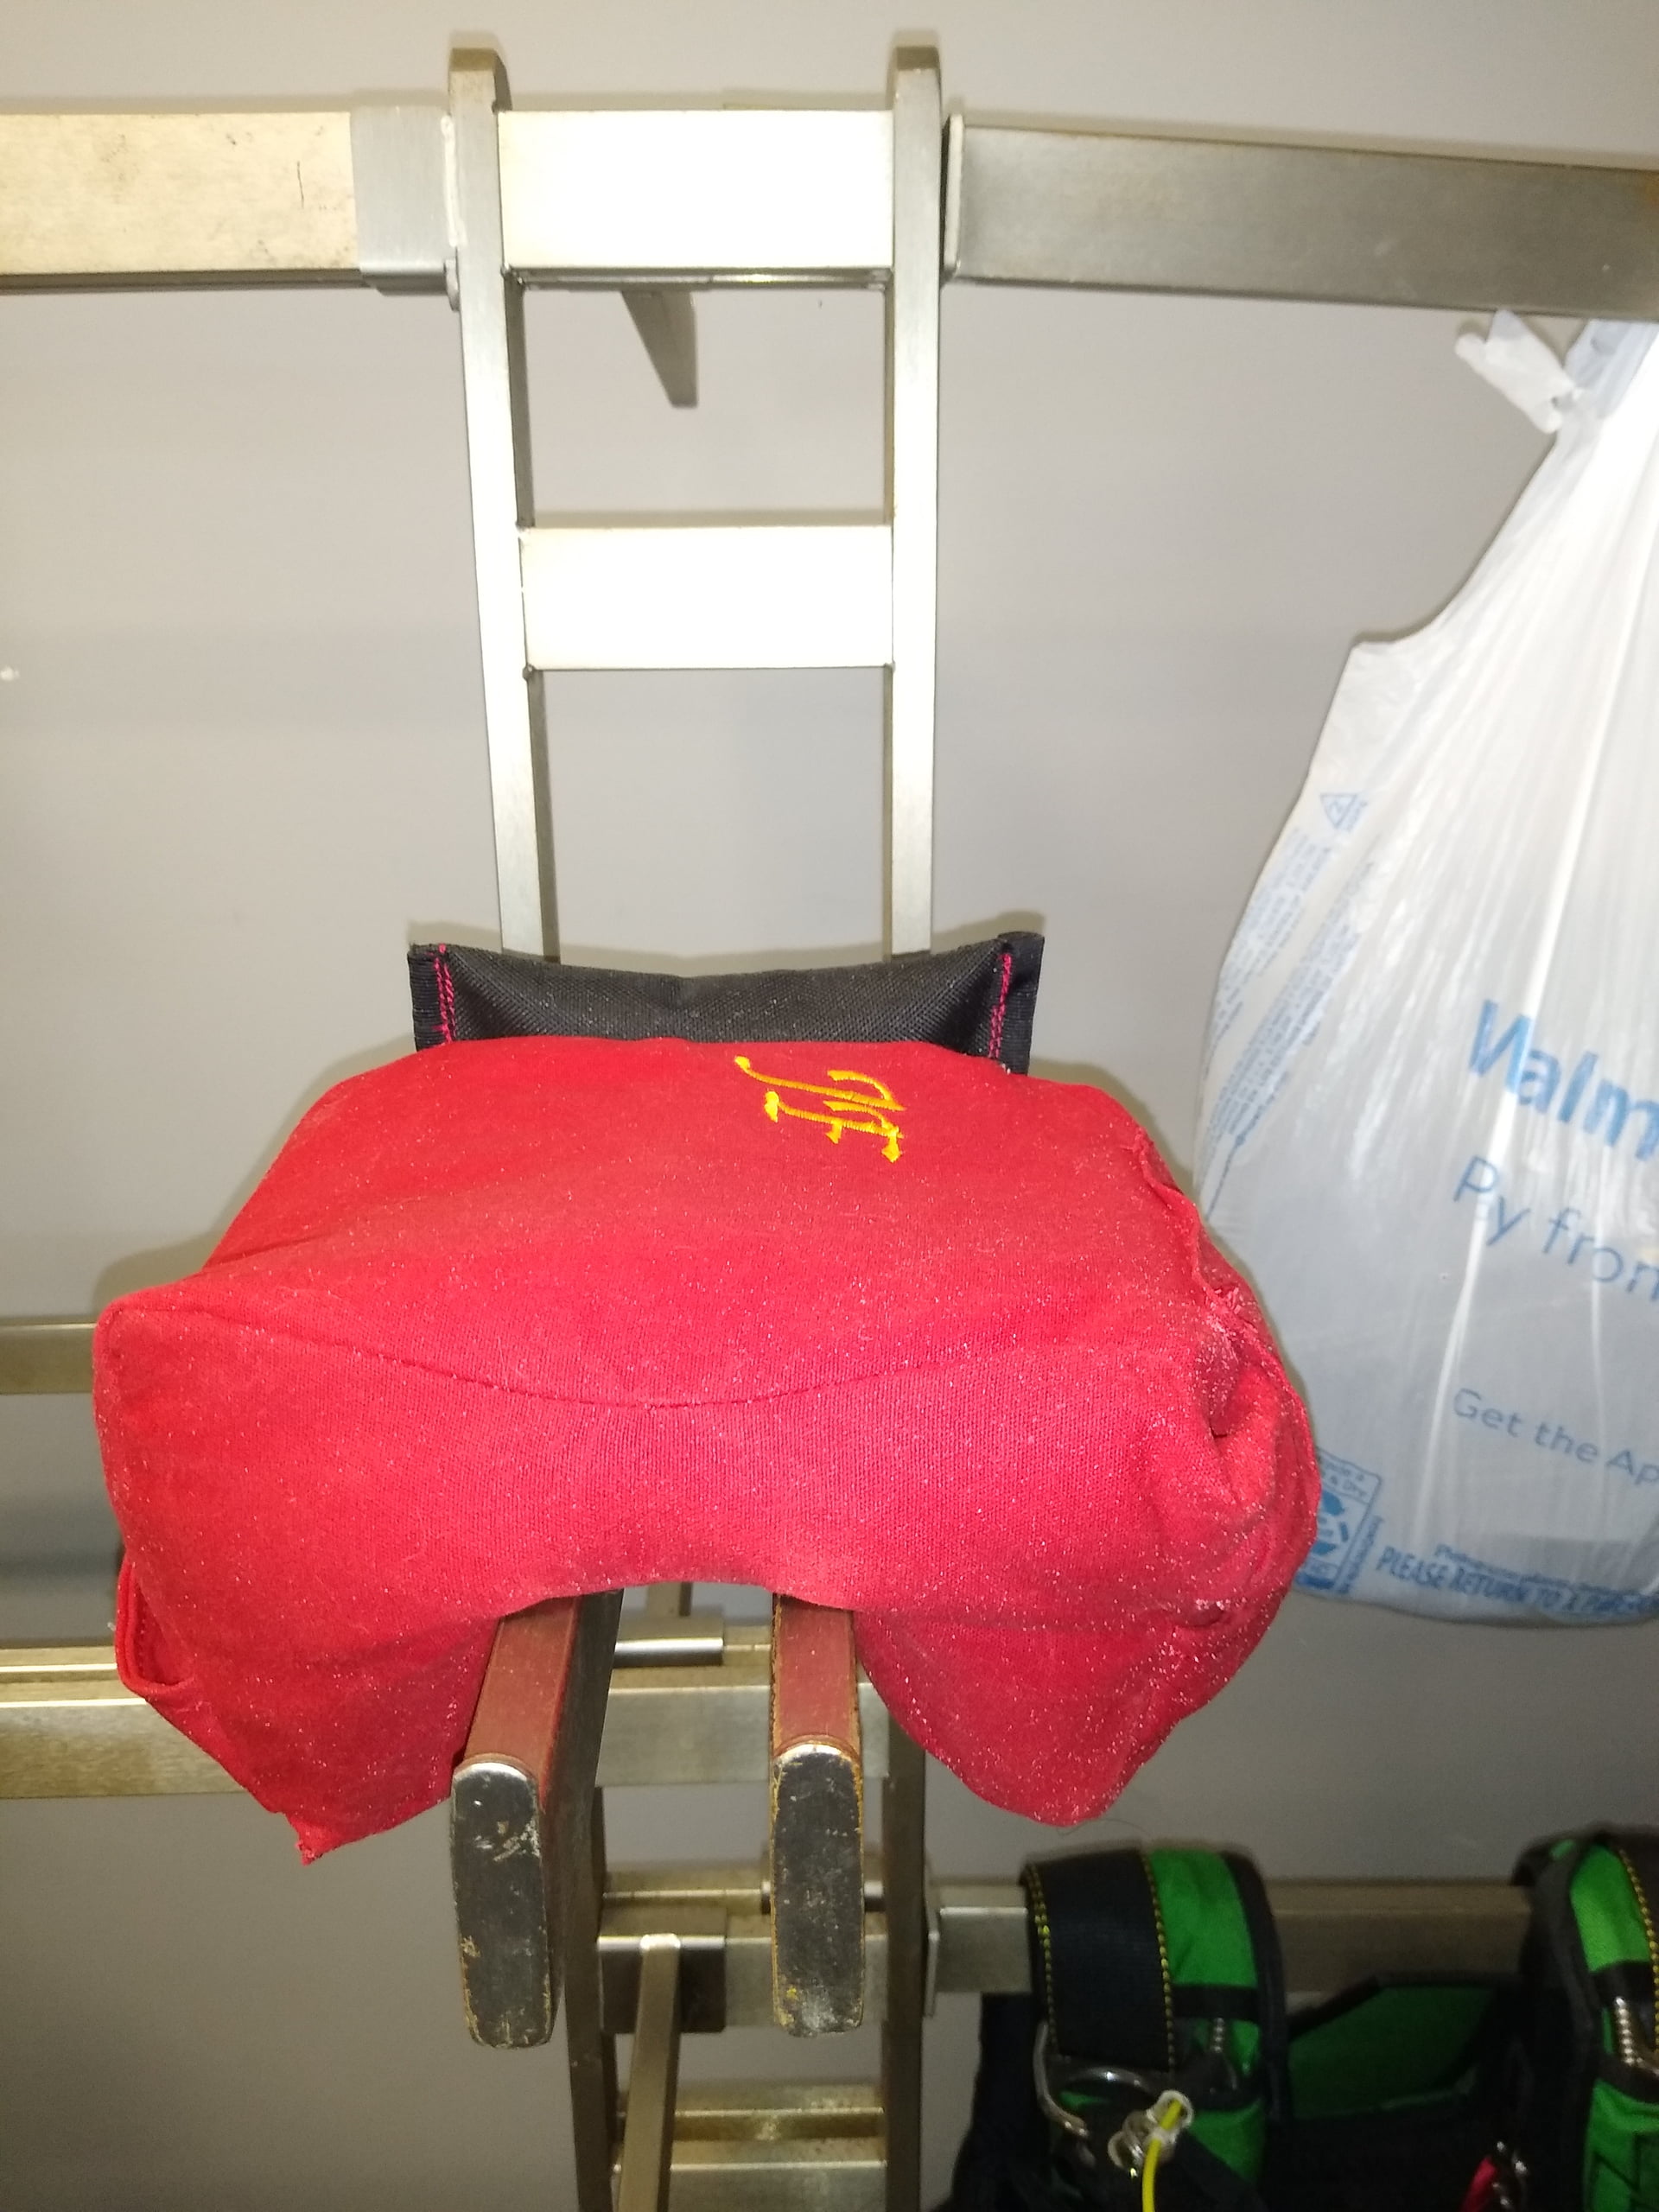
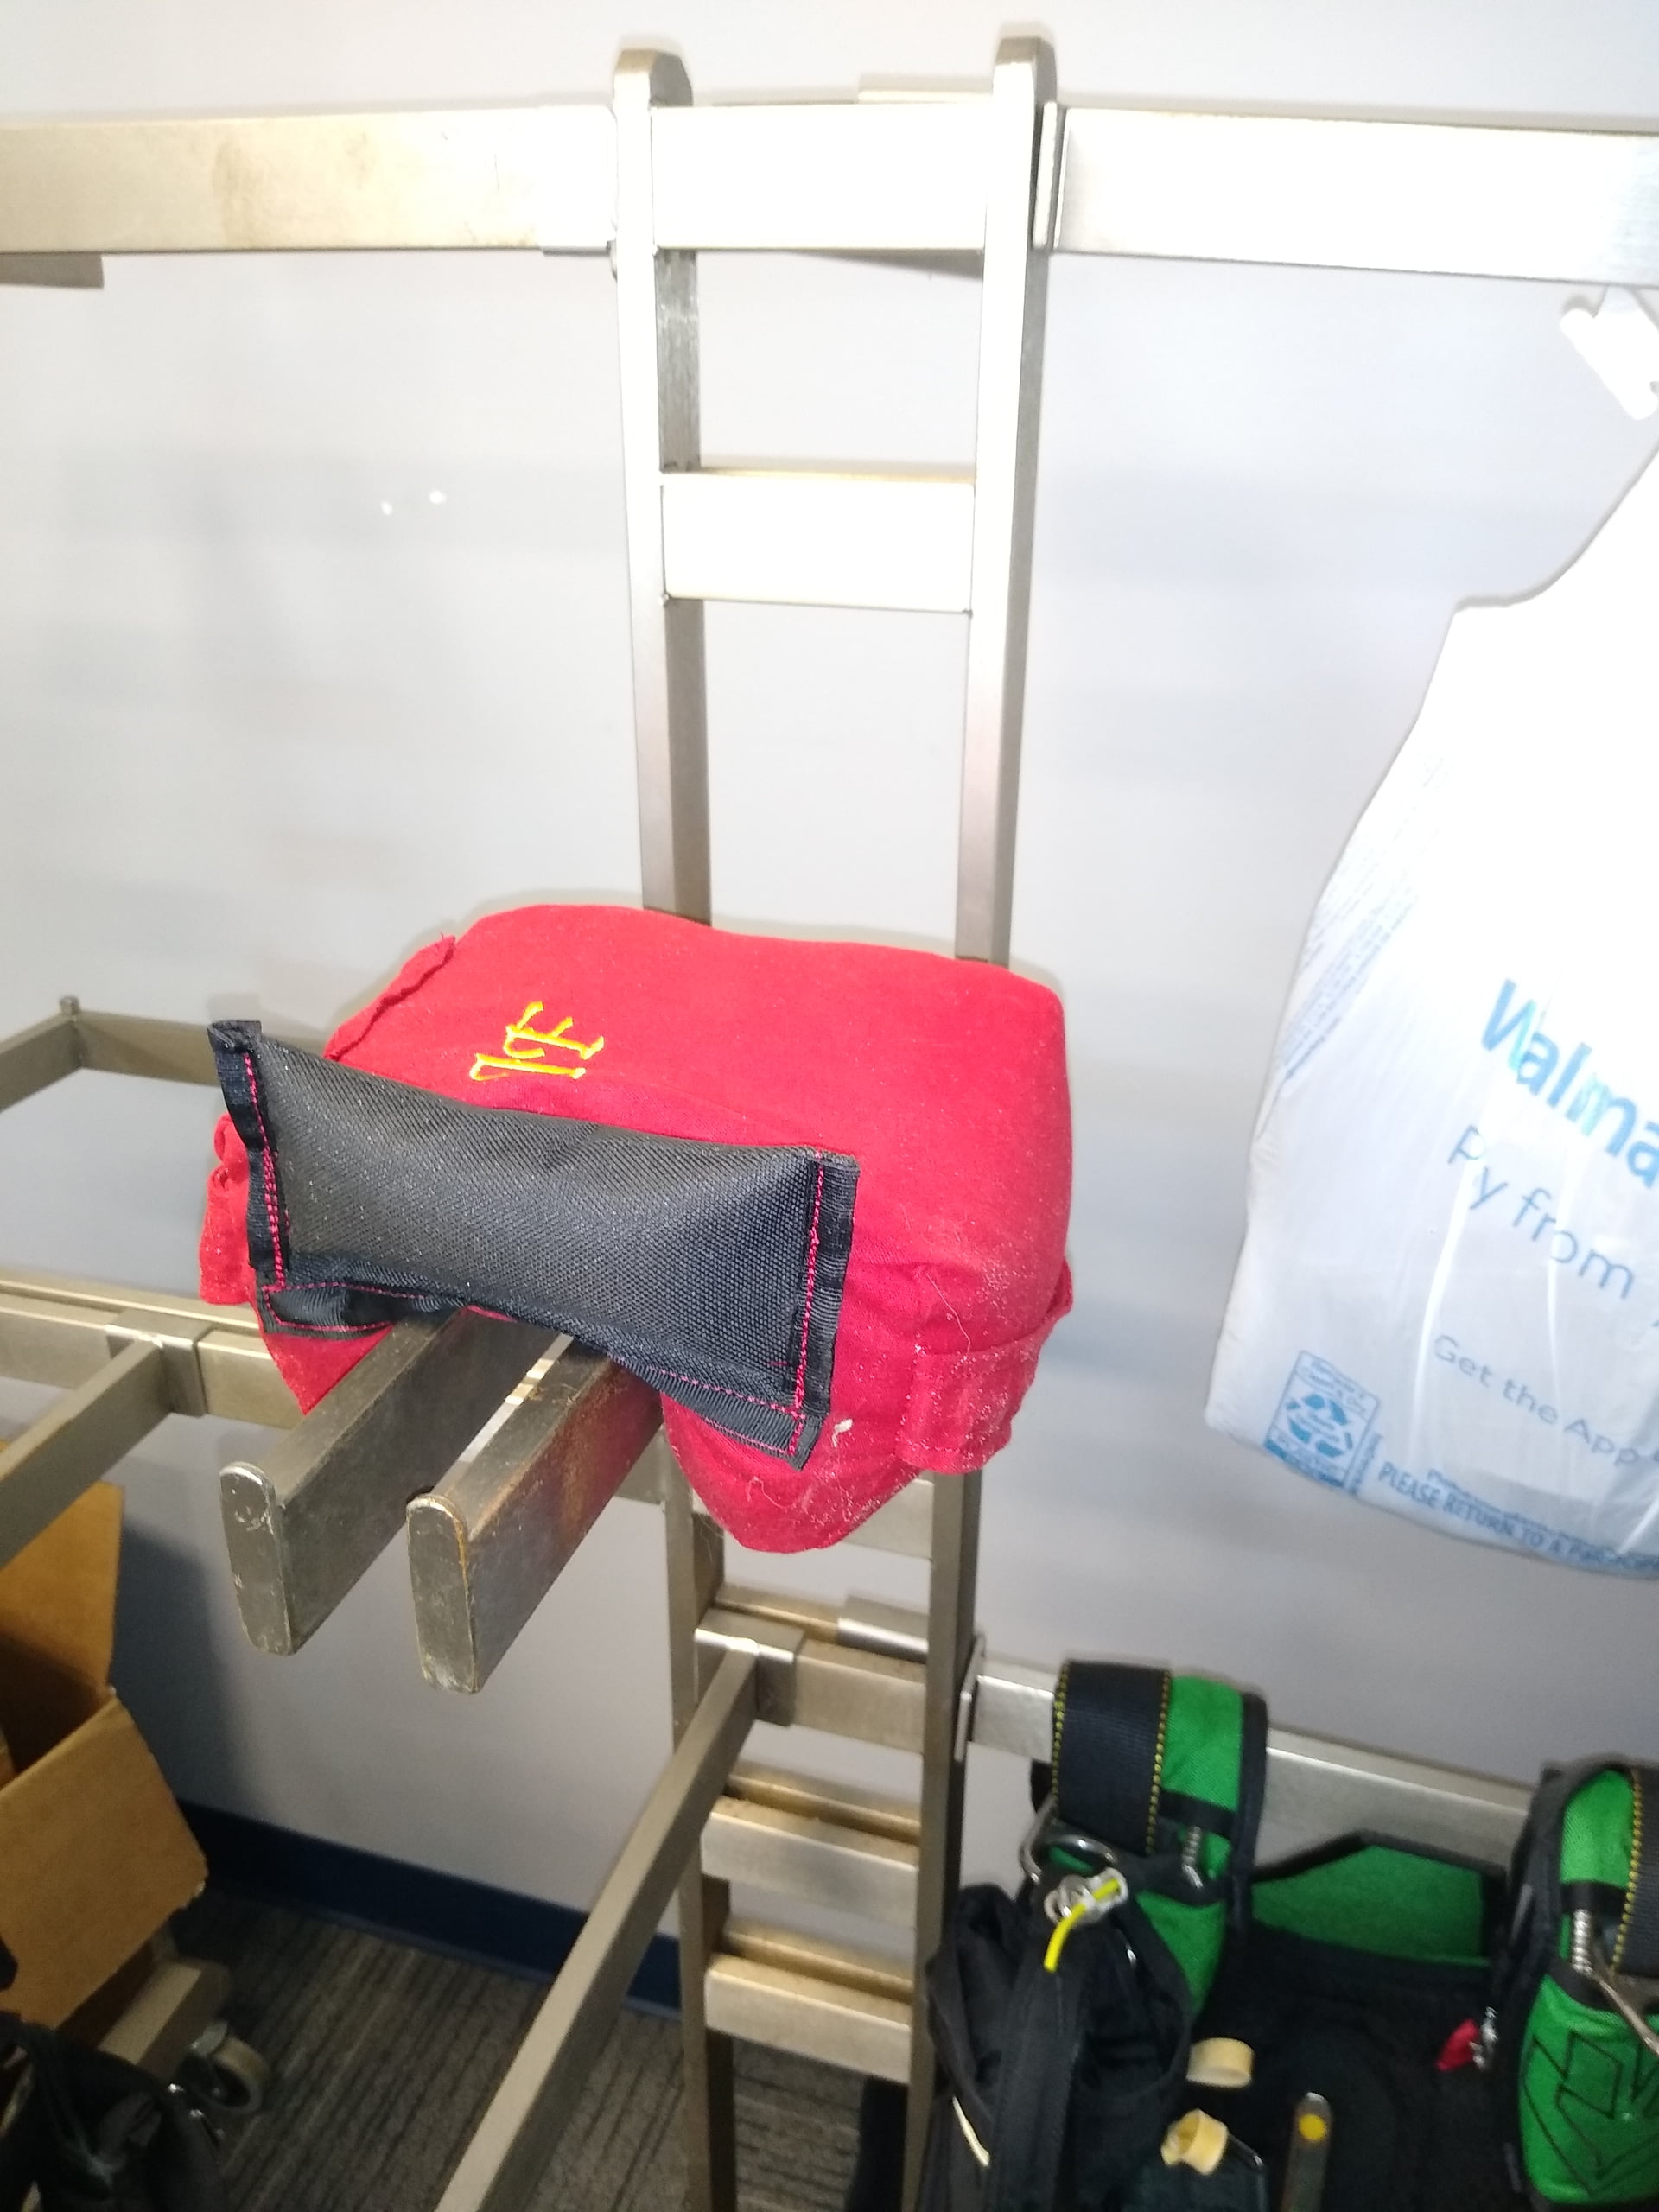
It is not a garment, rather it is bag to be filled and placed on fence rails as a support. Last summer a skydiving friend who is a competitive airgunner asked me to make it for him. Initially I looked at a comparable one he already owned and created a pattern in Inkscape. I have made several revisions based on the outcome sewing the object. He is satisfied with the last 2 versions I supplied him a few months ago.

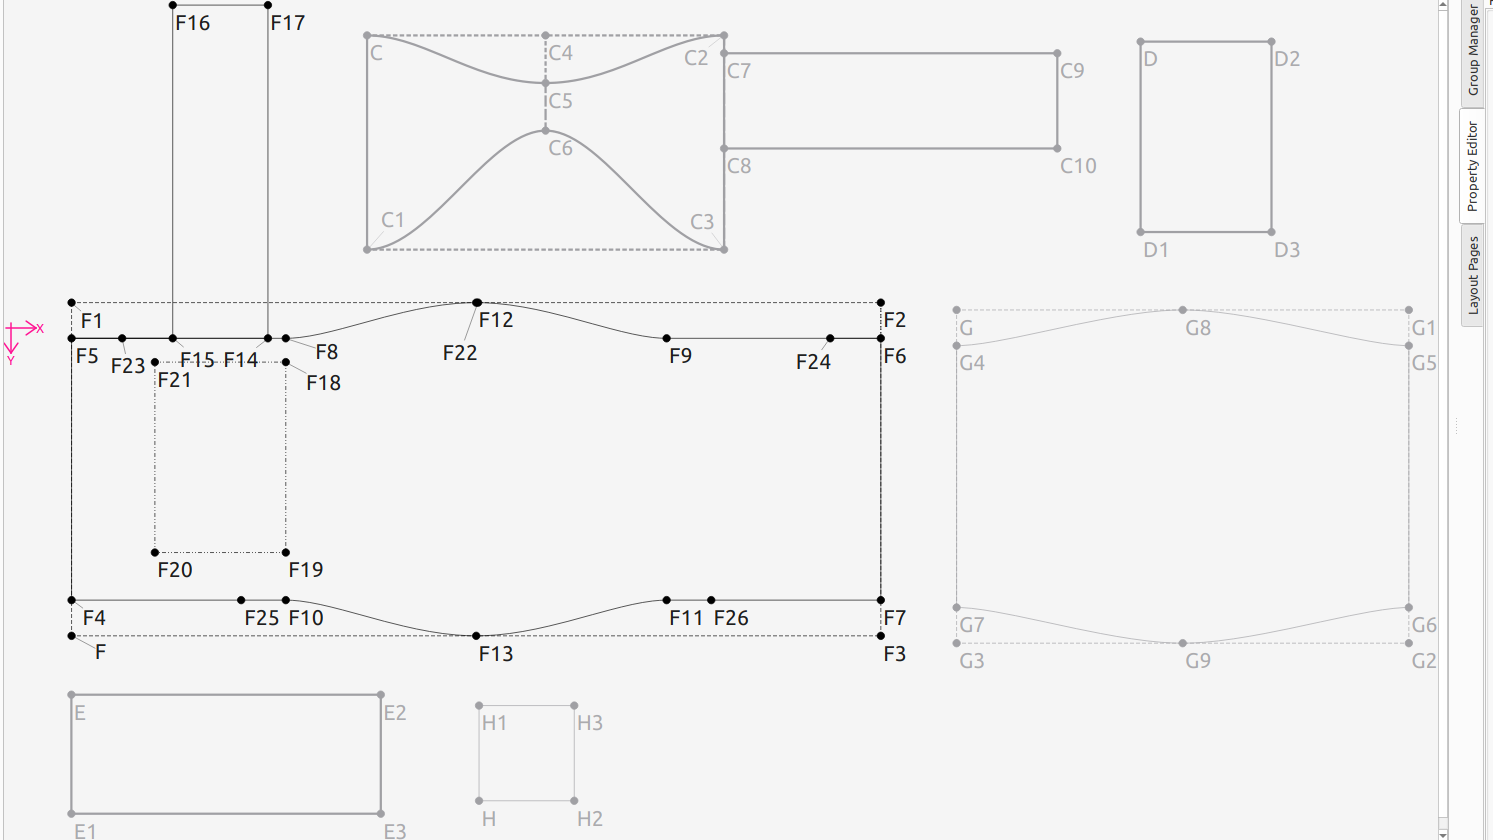
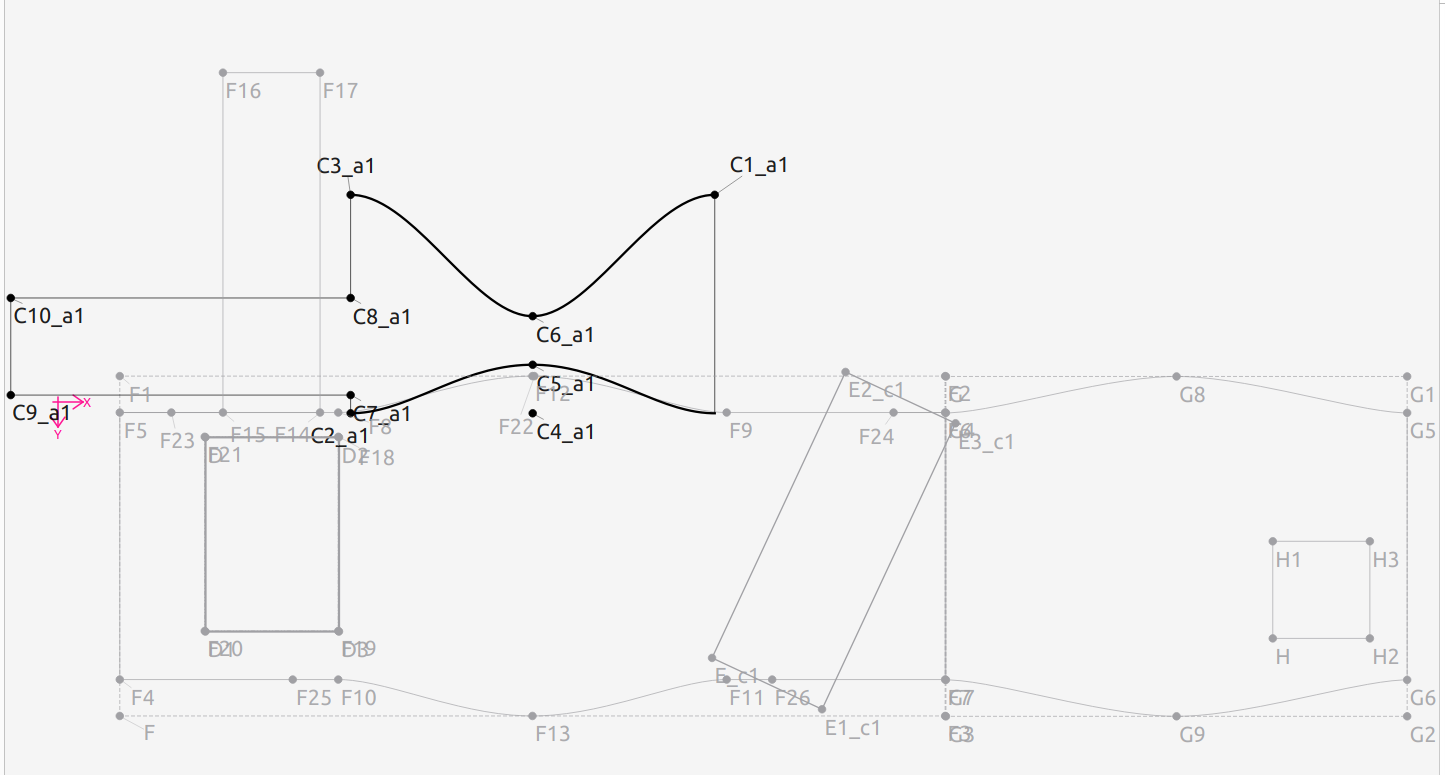
While perusing Youtube I came across mention of pattern creation websites and followed the rabbit to learn about Seamly2D. I became interested because of the parametric capabilities and wondered if it would be possible to make my bag pattern easily in multiple sizes. After viewing scores of videos I finally came across a non-garment item, it was a backpack. The poster used a Variables Table to enter all of his dimensions. Subsequently I used the same method to recreate my pattern.

My first version of the pattern in Seamly used a mixture of those variables, formulae using the variables, and on lengths. After revision I believe I no longer have any dimensions that are not related to a variable. Following completion I have been searching and reading on this forum I have found nothing about parametric resizing using only a variables table.

I know my description is nebulous and would be clarified if I posted my pattern and images. I will, but I believe that I am required to have a unstated amount of interaction with the forum before being allowed to do so.

Thank you for any assistance.

2 Likes

Your level has been bumped up, so you should be able to post files now.

The variables are great for things like “ease” in garments, where the same pattern specific measurement might change, or just to be sure that your formulae are well labeled for anyone who reads your language. But as far as multi-sizing goes, using measurement files is more handy.

:unicorn:

2 Likes

Thank you for the bump @Pneumarian

The current version of my pattern is

Shooting-Bag-pattern.sm2d (35.5 KB)

The Inkscape version of the pattern shows the current layer instead of the entire file, well it should be needed.

1 Like

Probably the last post for the evening is a couple images of the filled bag as delivered. It is made from waxed canvas.

The black grab handle is a requested add on and not in my pattern.

2 Likes

Seamly itself is indifferent to measurements or variables as far the formulas go. The main difference is the variables are contained in the pattern. My rule of thumb… if its a (body) measurement it goes in a ME measurement file. It’s it pattern related - like @Pneumarian mentioned “ease” it should be a Custom variable. The measurements are really used for resizing as all you need to do is load a new measurement file or switch size if using a multisize file. You don’t want to edit a bunch of variables to change a size.

3 Likes

Oh… in your case you would want to use Custom Measurements as the Known measurements are all body related. :slightly_smiling_face:

3 Likes

I was just reading your reply

and now with your clarification it is a little more clear to me.

I believe – To resize this pattern, or create other future resize-able non-garment patterns, I would create a SeamlyME file choosing the Multisize option using Custom Measurements. And in the case of my current pattern, I would recreate it as such with my current Variable Table as the Custom Measurements and designated as the base size.

I guess my next objective is to learn to apply a formula to the Control Handles in the two splines in the side piece of the pattern.

2 Likes

It’s really a matter of semantics. For ex: A person doesn’t have “ease”… a pattern may have ease. So while you could create a Custom measurement @ease, semantically it fits better as a Custom Variable.

Yes… multisize makes even more sense in your case. The one caveat is that currently the size (and height*) range labels are fixed based on a Russian GOST table in metric for military uniforms. So those labels probably have no relevance to your bag sizes. Let’s say you want a small, med, large, and extra large bag size… maybe you just use the sizes 34, 36, 38, and 40 to represent your sizes repectively. Doesn’t matter which 4 you pick, as that all depends on which one you pick & define as the base size, where the others increment up/dn from the base based on your increment formulas.

Hopefully in the near future we will have a multisize feature where you can define your range of sizes in inch or metric.

  • height… most users don’t bother with the height as again the multisize was orginally based on a Russian system, where most pattern systems don’t use the height to this extent.
2 Likes

Hello & welcome, @dawgdoc

To add my ticky’s worth… Remember that Multisize tables only use metric measurements, so if you work in inches, this isn’t an option.

If you are working in metric then you may create all your custom measurements in SeamlyME. The sizes in SeamlyME are only even numbers from 22 to 70 (I think), so you can choose any numbers to represent which ever sizes you need.

When you’ve created your SeamlyME file, you can load it into the pattern and in the Custom Variables, you can put in the formula to the SeamlyME custom measurements. This way, you won’t need to redraw your pattern completely or change the formulas to SeamlyME measurements and you’ll still be able to edit the formulas in SeamlyME for special cases.

1 Like

So, you are saying Size Height doesn’t matter.

Base on the one garment I have made, it was without a pattern, height does matter.

The guy in the photo is 6’3”, it was made for him.

2 Likes

Thank you.

I will attempt to do just this, or at least attempt so. I had been considering creating a new similar pattern and not using the previous work. Now it seems I can combine both.

1 Like

Not when it comes to using the multisize in Seamly.

1 Like

Most standard measurement charts are for one height and the sizes are the according to persons that are that one height:

Therefore… you only use the size increments, otherwise you will get an oversized areticle as in your photo.

When using the height increments, certain size measurements change minutely according to the size distance that the fabric needs to cover as the height-to-size ratio gets more. This value can be as little as 0.2cm.

If you have a measurement chart that covers these minute measurements, then you will enter the height measurements in the height collumn and the width measurements in the size collumn along with these minute measurements.

This method is used and researched in the Russian military unform standard size chart and these minute measurements listed in the last collumn of the table.

If you are making an garment for an individual, then you should take that person’s measurements and create an individual measurements files in Seamly and load it into the pattern.

2 Likes

I apologize to you both, @Grace @Douglas .

I have previously read in the wiki and other posts in the forum. About Size and Height in use in Multisize measurement creation.

My previous post was intended as a humorous jab at myself. Notice the crotch of the jumpsuit at his beltline, the shoulders above his head, and yet the ankle cuffs are on the ground.

BTW, I’m the guy holding the jumpsuit.

3 Likes

Precisely. A point I just made to another new user in another topic.

1 Like

:rofl: My reaction was “Oh, dear! Another one just like me!”

I once doubled the size of a knitting pattern for a pink panther and knitted it on the knitting maching. Shock of all shocks! It came out as a perfectly proportioned 6’5" pink panther.

And then I was asked to make a onesy for a new-born premie that was about 20cm tall. That didn’t even fit on a Barbie doll.

I’m a master at getting the sizes wrong. :rofl:

So no need to apologize. It’s good to explain how the height increments are intended to work. If anyone can get their hands on those measurements in English, I’d be really grateful if they will share them with me, because they really do take measurements to the next level.

2 Likes

Got you beat… I use to own a costume shop, and years ago we made a GIANT Saturday Night Fever suit for The Worlds Largest Disco in Buffalo NY: :slight_smile:

4 Likes

Gorgeous.

Made me recall a movie I saw a couple of decades ago: “The Wonderful Ice Cream Suit” with Joe Mantegna and Edward James Olmos.

Sadly, I made the jumpsuit for my use. I never did jump of a plane wearing it.

2 Likes

Here’s a picture of 1 of the Gost measurements:

I think the last 2 columns are the size & height increments.

2 Likes

@Grace I have seen in several other topics where you, and maybe others, put the points that will be used in several pattern pieces into one Draft Block. I believe you have Master Blocks that incorporate bodice, trouser, sleeve, collar, etc points into one. You then use groups to hide/show points to aid in creating Pattern Pieces.

I expect that I misunderstood what you intended. I can see the usefulness when Pattern Pieces have many points in common. I fail to understand the reason for having bodice and trouser points in one block. Should I have taken it to mean within one pattern you have several Master Blocks; one for trousers, another for bodice, a third for sleeves, and so on?

I ask because I was contemplating how to make all of my pieces for this pattern into one Master Block. Currently I have a separate Draft Block for each unique Pattern piece, sort of.

Or

To remake this as one Master Block my natural inclination would be something like:

Is the main advantage of one Master Block the fact most of the Pattern is contained within one screen at the largest size possible? If so, what I just showed is of not much benefit.

  • Turning the bottom back to the left instead of having it extended to the right would decrease the width by around 30%.

To produce this I joined Top to Bottom at F6-G4 and F7-G7, Top to Side at C2-F8 and C-F9.

  • The points (C2-F8 and C-F9) are not aligning on Paper, but they did when sewn.
  • The opposite Side piece would not have the spout. I would simply fold the spout back when marking and cutting out the second fabric side.

To create the Handle as part of a Master Block I would have F26 serve as the mid point to a short side and then angle across over its end point. I don’t think I need the second Handle and second Side in the Master Block since they could both be generated as Pattern Pieces from what is shown. I imagine I could place the Pocket Piece into the same Master Block by using the points that I created for the internal path on the Top Piece in two groups, one to retain as the internal path and the second to create the Pocket Pattern piece. I can place the reference square in the middle of either of the larger pattern pieces. Is an internal path the best method?

When sewing the bags, a Handle is formed by folding along the long axis and hemming with right sides together and then turning right sides out. the Handles would go diagonally from F24 to F26 and F23 to F25. (It looks like I need to lengthen the Handles by 0.5 inches)

(I was distracted some during the composing of this post. I am sure I forgot to include some of my questions and thoughts. I hope the whole is not too disjointed.)

2 Likes