I think that’s the question that @Douglas is trying to answer. At this point, it’s either because it’s not going to be as easy as @Douglas hopes to make it unnecessary for the user to care, or because of Spaghetti Code Alpha, (ie, the code reads more like a cludged together proof of concept than an actual program meant to be used,) in which case the answer is that it really shouldn’t.
Because if the curve is not going clockwise when added to a pattern piece it doesn’t work, and you get a straight line. For seasoned users they can usually figure out which curves might need to be reversed, but new users tend to get lost a bit. If I can figure out the direction a curve was created, then I can automatically have the app reverse the curve when adding it to a piece path if neccessary.
So here’s the good news… if you recall your calculus and determinants, if you find the determinant of a vector of curve points you will get a + or - value, and from that you will know which direction the curve is going. I have figured out a routine to calculate the determinant, and providing it works, I can eliminate the need for a user to reverse curves, either with holding the Shift during selection or in the Pattern Piece Dialog main path list context menu. That is, by inserting a 7 line isClockwise() routine , I can eliminate a whole bunch of unnecessary code. I’ll let ya’ll know how it goes tonight or tomorrow afternoon.
As an aside… I may be getting ahead of myself, but this may also provide some insight into resolving a couple other issues… adding seam allowance to internal cutouts, and adding a negative seam allowance or in essence display a seam line for pieces with builtin allowance.
Don’t know if I’d go quite that far, but yes there are many aspects of the apps (more so 2D) where there’s just baggage that just doesn’t need to be there (such as the FancyTab stuff) or things are handled in a inconsistent manner or kludged together - for example the groups or a double whammy with the FancyTab that is only used in the Piece Dialog, but not the Prefs dialogs? There’s also a ton of code style issues too that contribute to the readability issues.
That being said… it wasn’t the spaghetti I was concerned with, but rather is there an easy way to determine curve direction - or for that matter any polygon, and there is.
@Douglas, While I have had calculus and could probably remember enough of it to do what you suggest, I do not assume that most people who want to use the Seamly2D software have the same background or need to.
They don’t have to… I do. To implement having the app automagically reverse curves when needed. By having the app reverse curves when necessary, there’s no need for a user to do so. All you will need to do is select a curve to add to a piece path, and not be concerned with which direction it was drafted. Basically the direction of curves will be a moot point, eliminating any future issues such as your OP. Also in the process I can remove uneeded code.
Well, as usual nothing is easy with this app. So I got the curve direction isClockwise() to work… only to realize that again what direction a curve is created in only matters when it’s put in context of what node point precedes the curve. And then I thought Aha! I don’t even need to know what direction a curve is going per se, but rather does the 1st point in the curve vector = the previous node point? If it does, the curve is clockwise, if not it’s counterclockwise. If it’s counterclockwise, reverse it. Brilliant! Got that to work no problem… until… I tried it with a curve with a point along the curve - ala a notch point. Select curve - point - curve. No bueno… because testing the “prevous node point” (by using getLastId() of selected objects) - which is somewhere in the middle of the curve will never match the 1st point of the curve, and will not reverse the second half of a counterclockwise curve. Then there’s the issue if you “Insert” a curve node, the last object could be anything, not neccesarily what precedes the curve in the path so there’s no way to determine which direction the inserted node needs to go yet.
Still trying to wrap my head around a way around this, and usual it raises more questions.
Like why when you add a curve… let’s say a simple curve from A1 to A2, then place point A3 along the curve… then add the curve A1_A2 and point A3 the path is
Spl_A1_A2
A3
Spl_A1_A2
And not
Spl_A1_A3
A3
Spl_A3_A2
??? If the latter was the case it would not be a problem comparing the last node point = to a curve segments 1st point, and thus it’s clockwiseness. Not sure how a curve’s vector of points is getting split when other points are inserted between segments. Hmmm
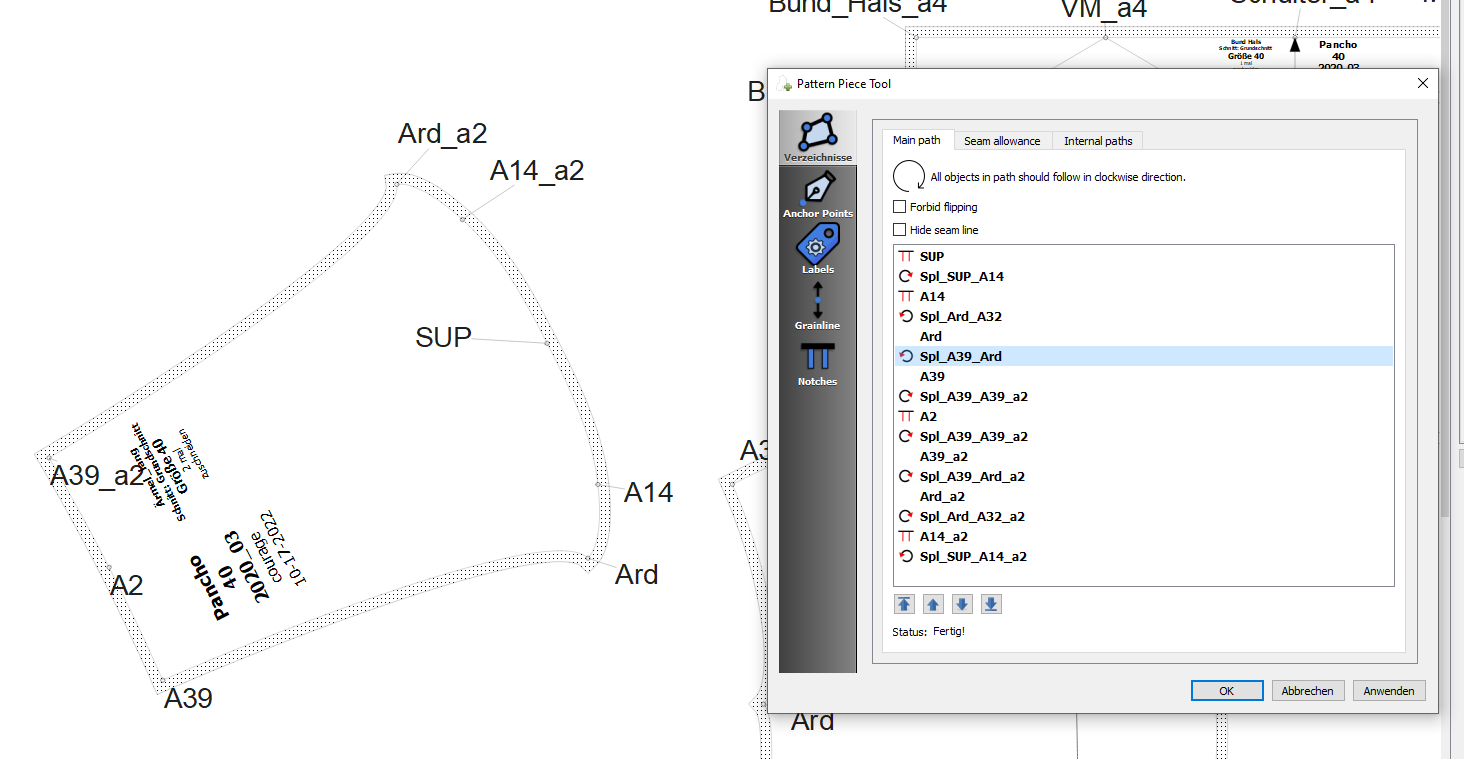
Die Kurve der Seitennaht müsste von Ard nach A39 laufen, damit sie richtig dargestellt wird. Im Fenster sieht man aber das die Kurve von A39 nach Ard angelegt ist. Also muss ich sie umkehren.
Understood, but my point was this does not indicate which points need to be reversed, it only shows which curves HAVE been reversed. That’s the point of @AnnaFields original post… that some curves needed to show while others need to show
… mistakenly thinking all curves need to show.
The idea is if I can have the app determine which curves NEED to be reversed when added to a Pattern Piece path, then there would no need for a user to do so, and subsequently no need to show that a curve has even been reversed.
I think that it’s perfectly clear that the shows that the orginal state of the curve has been reversed for the purpose of that pattern piece, so I really don’t see an issue there.
However… I do so love the idea of doing away with the necesity of having to hold the shift or to reverse a curve to make the pattern piece.
Hmmm… yes, it’s something that I thought about a very long time ago but shrugged it off as ‘the way the program works’. I think to get it to work in any other way will take a lot more programming in other areas of the program.
A related thought at the time was why, if you split a curve with a node, you didn’t get 3 curve references in the formulas, like spl_A1_A2, spl_A1_A3 and spl_ A3_A2. Instead you got spl_A1_A2_section_1 and spl_A1_A2_section_2, etc. and then you have to go out of your very complicated formula to check which direction the curve is going in and exactly where A1 and A2 are situated to determine whether you want section 1 or 2 in your formula.
I guess what I’m suggesting is that one must look at how the curve is split and recorded in the software, and it may mean that when you do place a node on a curve, it may need to actually physically cut the curve into 2 or more curves, which won’t really serve at all, since we do want the position of the new node to move when the original curve changes when a pattern is resized.
Yes, but if you reverse a clockwise curve the will display to show it’s been reversed, but the curve is now counterclockwise and won’t display coreectly, and on the same token if you reverse a counterclockwise curve the will also show, but this time the curve is clockwise and displays correctly. Again the icon is displaying state, not direction - which I admit can be confusing.
Yes… it’s complicated. Beyond the scope of the topic, but in a nutshell what more or less happens when you use the point along curve (or line) is the tool creates 2 more objects… the 1st segment and the second segment, but only the original full curve is displayed as the graphic item you see. It’s the graphic items that allow you to interact with app. That’s why I can find the 1st or last point of a curve, but not the start point of a second (or more) segment. If the full curve graphic item was split into 2 separate graphic items it would be easy, as you could select the seg 1 obj, point, seg 2 obj… and it would be easy to find the 1st point of the 2nd segment, but as it is I can only test the 1st point of the whole curve.
At any rate, I think I have a way to test multiple segments of a curve by checking if the curve already exists, if so use that “reverse” state, if not then test the 1st point and reverse if neccessary. That works for adding new curves, I still have to figure out how to handle inserting curve nodes, as they’re placed at the bottom of the path list, and most likely not in the correct order. Again could check if the curve already exists and use that reverse state, but what to do if the curve doesn’t already exist in the list?
Hmmmm “lightbulb” momment… when inserting a curve it would be possible to place a curve after a node that matches the 1st (or last) point of the curve, but again that works for the 1st segment not subsequent segments.
I think I can certainly remove the need for the Shift- select, not so sure about removing the need to be able to manually reverse a curve.
I just THOUGHT I understood how it worked and tried to make all of the icons show as “clockwise”. I have now figured out that I just need to play with each situation and use shift select as required to create a new pattern piece. It does not bother me now, I only mentioned it because it might confuse a new user.
Understood. I believe I can improve (ie speed up) the workflow while eliniminating any confusion.
It’s also one of those things where taking a deeper dive in this area I can glean a bit more understanding - in this case the piece path - that I can use elsewhere.
Woo hoo! I’ve got adding curves with multiple segments to auto reverse based on if the 1st segment is reversed. Only needed 4 lines of code. This is so cool.
Now just need to figure out getting the insert node to do the same thing. May also need to have the list auto correct the curves if the list order is changed- for example if you select the path counterclockwise or if a node preceding a curve was missed… although hmmm I probably need to allow for a curve to curve path. Which is easy to check - the last point of the 1st curve needs to match the 1st point of the second curve, otherwise reverse 2nd curve.
Hey, BTW I had a thought while waiting for the last build to compile… what does everyone think of using the Property Editor dock to display a list of path objects while you select a piece path? This way you can tell while you select and before you press enter whether you missed an object.
Oh, wow! This would be amazing. Sometimes one clicks a node & misses, think it’s selected and moves on, only to find it didn’t select. Not a fault of the program… It normally happens when I’m not wearing my glasses
Actually, if you click a object a second time in a row - it removes it. It’s pretty easy to double click an object removing it unexpectedly. Also, if a curve is drawn counterclockwise, it does not highlight red when you select it… unless you shift select it. Another possible source of confusion. Thats why I thought having that immediate feedback would help. The curves are usually easy to tell if you’ve selected one, points - especially ones on top of one another not always so easy.
What I can do is spin off the main path listwidget from the Piece dialog as it’s own class, and then display it in either the dock or the dialog. That’s the beauty of widgets when used correctly… you can share the code with any number of ui forms.
So cool! Here’s a case that I don’t know how/if it has any connection, but it struck me as you were talking about special cases: what effect (if any) will this have on placing curves in Internal Paths?
is a lovely idea , especially while going around the neckline/armscye area.
I had another tangential thought: if/when the notches are inducted into the, (currently non-existent, but occasionally mentioned as an eventual goal,) markers class of items, it will be unnecessary to stop&start a curve, because the notch location will be added after tracing rather than during tracing, which, (if my memory serves,) would also be more intuitive to most newbies.


 This is so cool.