Unable to get spline to properly transfer into

Ahhh… good point. Thank’s for pointing that out. Lol

Yes, the internal paths dialog class is more or less a duplicate of the piece dialog class, albeit most is not used. What ever I add to the Piece Dialog, needs to be added to the Internal Path dialog. Of course if I spin off the path list widget, it would be used here too… meaning some more code can be removed.

Are you saying to make it so you trace the path, then in piece mode to add any notches? If so, the problem with that is only the nodes (including anchor points) that are added in draft mode are available in piece mode. I’ve always thought that it would make more sense to add notches, anchor points, symbols, text, button holes, etc in piece mode, but without some refactoring all the points are just not available.

2 Likes

I guess I was thinking more of something like the Internal Paths or Anchor Points: added in Draft Mode, but not as part of the original tracing process.

:unicorn:

1 Like

This is an amazing idea. Thank you and looking forward to seeing it

2 Likes

I figured it would be. I think it would help eliminate sone of the need to fix a path after the fact. You would be able to see in real time if you’ve missed a node or selected a wrong one.

Update: Reconfigured the selection so it now recognizes a curve after a curve, and will reverse the 2nd curve if neccessary. One slight issue I ran into is if the 1st selection is a curve, there’s no way to determmine yet whether it’s clockwise or counterclockwise. I think what I can do is make it so you have to select a point first to start a piece, after that it’s ok. Anyone see a problem with that? I can add a status tip noting you need to select a point first. I always add the 1st and last points of curves anyway so you can control the seam allowance along the curve. Besides there may be some of those unexplained allowance issues when a piece starts on a curve.

I also thought of another scenario I need to check… what happens to the seam allowance if you just select 3 curves with no node points? What happens to the before and after? Hmmm.

2 Likes

I always do try to start with a point. It seems to compensate for lots of spooky behavior, some of which may have been already fixed.

I looked at another thread, where you were discussing issues with a heart shaped pattern. While that has not affected me I have no doubt that it would affect someone at some time.

2 Likes

Yeah, like I said there may be some other odd behaviour with the seam allowance if the piece starts with a curve. I know for sure there are some issues with the node intersection angles, or transition. I’ve jyst akways assumed you need to select point, curve, point, so it nevered occurred to me you could could select curve, curve, curve. IMO it’s not a problem to have the 1st node a point… unless someone else has a valid reason not to. It would be nice to know though whether placing that limit on pieces fixes any other issues.

I’ve had some cases where the SA does odd things when the inside angle between edges becomes too acute… like in the heart. I’m still trying to unravel some of things RT was doing to manipulate the SA… it’s rather tedious as some routines are ill named and poorly @briefed. :frowning:

3 Likes

To answer both questions, it’s not possible to have a Piece with <1 point.

:unicorn:

1 Like

Point or node? A point is just 1 type of node. That being said, you currently can still start a piece with a curve.

2 Likes

Right. <1 point. If I include a small circle as a marker in my draft, I have to select both the arc & a point for Seamly to accept it. I recently, (possibly for this thread,) tried tracing off a piece with zero points, only three curves, & Seamly wouldn’t let me OK it, I had to go back & include a point.

I guess it would trouble some new users to not be able to start tracing a piece with a curve. I had gotten stuck on the notion of curve-only pieces, which would be less trouble to be blocked from starting than to trace & then discover that it doesn’t count.

But on that track, if it wouldn’t accept the tracing unless a point is in the first position might work. Especially if there’s a note on the Main Path dialog mentioning the need.

:unicorn:

1 Like

There’s nothing to prevent you from either excluding points or deleting them once the dialog is open. I just need “a” point to determine a curve’s direction… once the curve node is in the path list the preceeeding point is no longer needed to determine the direction. If you start with a curve though, there is no preceeding point.

Yes, that’s exactly what I would do… although the “note” would be a help message in the status bar as the dialog would not be open yet. Or it could also appear in the dock (prior to the dialog opening) if I implement that. I also thought of using the QApplication::beep() with invalid path selections.

2 Likes

I ALWAYS start a pattern piece on a node. I have no idea why, it just makes sense to me. So no problem from my side.

LOL, yes, me too.

Dunno, never tries :laughing:

1 Like

Well I tried… 1st I used an older ver pre validating the before & after. It allowed just 3 curves, no nodes:

But as you can see the formulas show error - which could result in other issues elsewhere such as the other thread. 3curves2

Then I loaded it into my current build, where while it allows the dialog to open, since now the formulas are being validated, the OK button is disabled.

Then I added a point node and it enables OK, as the before and after are valid.

BTW… because I tired of constantly having to drop down the Piece combobox in the Insert Node dialog to select the last used piece, I made the combobix default to the last pattern piece - which is what one would want most of the time. :slight_smile:

insert_node

2 Likes

Ich fange und beende im Musterstück die Kurven immer mit den entsprechenden Punkten. Das empfinde ich auch als total logisch:)

Zumal man für die Nahtzugaben die Punkte brauch, denn Kurven werden dort nicht angezeigt

2 Likes

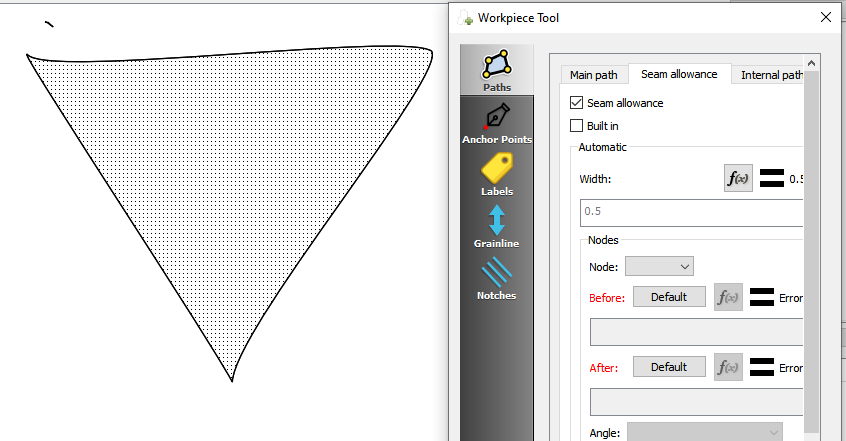
The point nodes allow you to change the seam allowance width. If you don’t include any points in the path - more on that later - the seam allowance for the curves is simply the default (CurrentSeamAllowance).

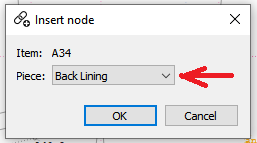
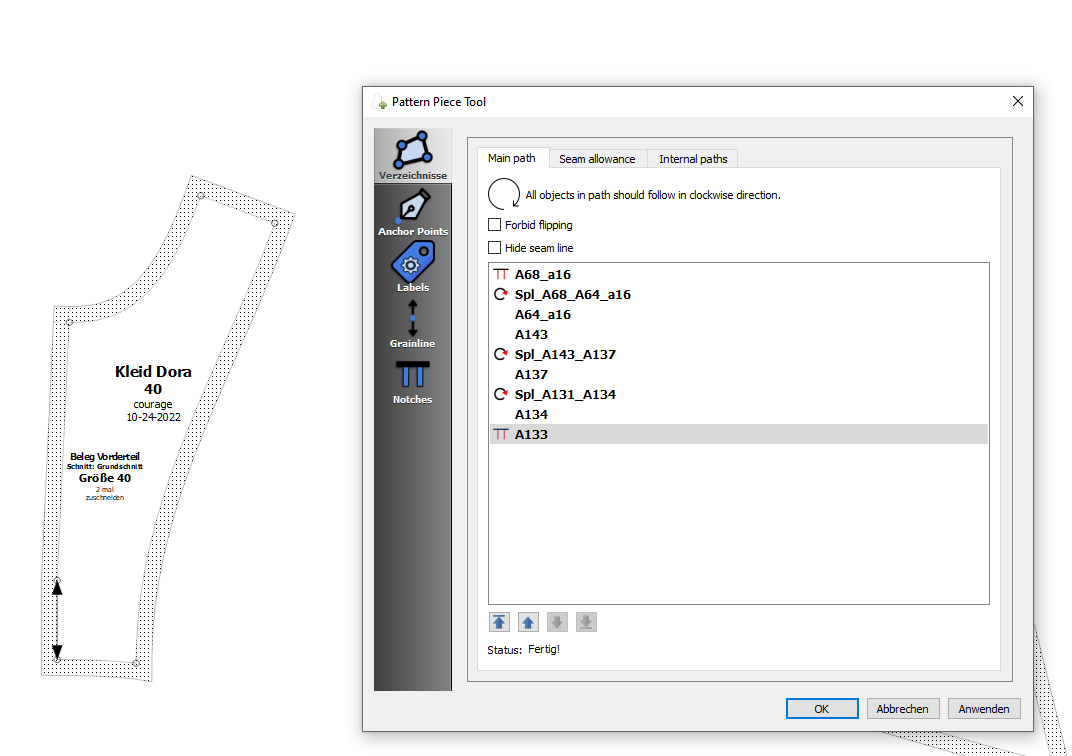
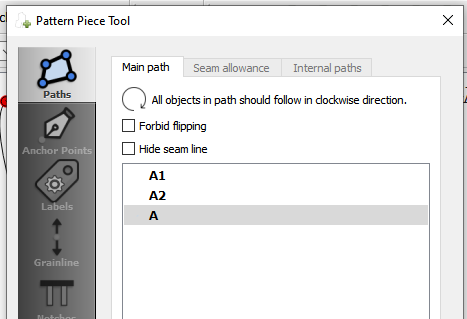
Versions before I fixed the before and after SA formulas allowed you to create a pattern with no points. The current ver requires at least 1 point to work. I have made it so that you need to make the 1st node a point, which you can then later edit to exclude or delete the point, as it is no longer needed to establish the direction of a curve if it is the 1st node, or as the case is, the second node. Note the excluded point A1, but you can now click OK.

excluded_pointOK

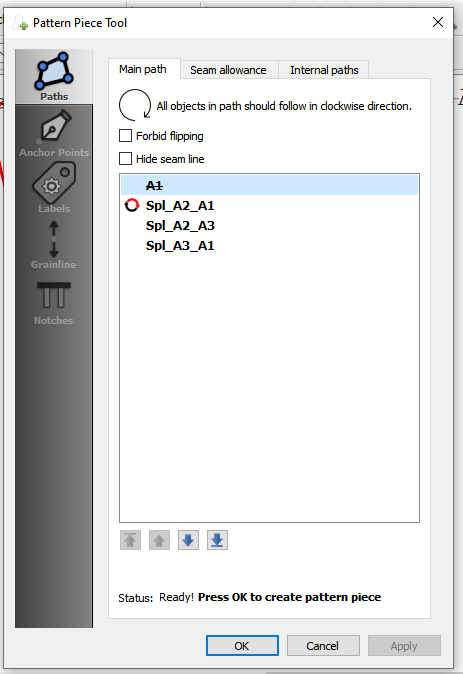
Note in the path list there is a new “reverse” icon, which now will now just show which curves have been reversed.

Some other improvements I made were to change the highlighting of selected point node, which are now a solid red circle vs the secondary color outline circle.

point_node_selection

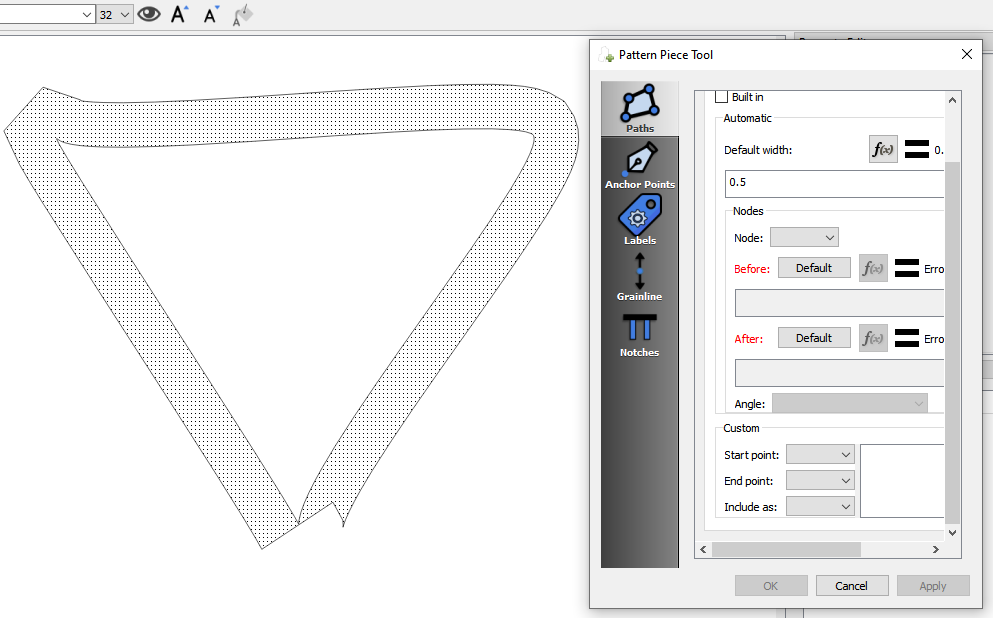
I also fixed the disabling of the SeamAllowance and InternalPath tabs - which can’t be used - when the dialog is in creation mode. disabled_tabs

I also made the Pattern Piece dialog tab pages so they’re not in a scroll area, which was messing up some the layout auto resizing.

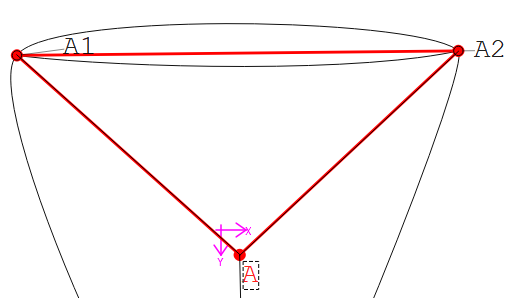
And lastly I figured out how to disable - what I find annoying - the dashed line(s) when selecting nodes. I never saw the point, but what I’m thinking, if there is a consensus to keep them - to make it a preference the user can set?

selection_lines

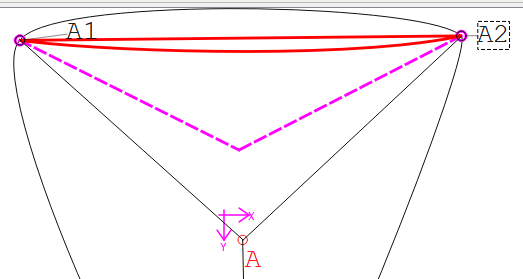
I also want to figure out how to eliminate the red straight line that appears with a selected counterclockwise curve. Again, IMO it’s just another annoying and confusing thing.

I also tried to eliminate the need to select objects in a counterclockwise direction, but found (for now) it was going to add more complexity, as I would need to basically need to detect counterclockwise selection, and flip flop all the auto reversing, and then reverse the whole path. Maybe later.

4 Likes

I’m now looking at the Internal Paths… for now the direction of curves has no effect. That’s why there’s no specifying that you need to add objects clockwise like in the main path. You can insert points in any order or curves in any direction. Although I’m not sure why RT left the Shift-select code to reverse curves in the Internal Path dialog? The only reason why you need to select objects clockwise and have curves go clockwise is due to the seam allowance. Since currently you can’t add seam allowances to internal paths, the direction of curves is a moot point. At such time when I can implement SA’s on IP’s, that’s when I’ll have to deal with the direction.

Just have to figure out auto reverse when inserting curve nodes. :slight_smile:

3 Likes

So, do I understand correctly: It is unlikely to create the curves without also creating points where the curves meet. If one wants to have different seam allowance at different locations on the pattern piece that can be done by including the points in the pattern piece. Is that the way it works?

This is a hypothetical and I don’t know why one would need to do this. The only different seam allowance I have in mind is a zero seam allowance when a piece is designed to be cut on a fold, which would be a straight line. Others may think of a reason why this issue matters.

1 Like

Yes. Lets assume you have a pattern piece that is all contiguous curves - of course with points between each curve. You could create just a piece using the curves (which could be straight) , but you’re limited to the default seam allowance all around. By using the node points in between it allows you to customize the seam allowances before and after the points.

Which you would not be able to do if you used just curves, as you would need the 2 node points that define the fold line - which would allow for a zero SA between the points.

That being said, while I reverted the behavior back to allowing just curves, I don’t really see much advantage to using just curves. In practice the main difference is the point node names will display when in piece mode - which you can hide anyways if you dont want to see them. Also in practice one is probably going to include notches in most cases - which also need the node point(s).

2 Likes

There are some instances that a narrower SA is needed, like the armhole curve and certain curves in the collar which are needed for neatness and reduction of bulk. Sometimes, a section of the curve has a different seam allowance. We don’t use this anymore, but when it comes to bespoke tailors, they will require it.

I totally agree. It just doesn’t make sense to only select curves. Even when starting to select the objects, one needs to set the start-point so you know where to end.

2 Likes

If you look at any of my patterns the seam allowance changes depending on the seam. It’s common for us to use 1" side, center back, and shoulder seams to allow for alterations, where the rest of the seams are 1/2". Also there are just parts that use different SA’s around the piece. Another thing I do is use a wider SA on a hem… such as sleeves where I allow 2".

Well, the start point would be the 1st or starting node of the first curve, and the app will automatically close the path from the last node point to the 1st. You don’t need to, and shouldn’t reselect the 1st node point, as you can’t have the same node point more than once.

Athough, I’ve never thought to test that with using the same curve more than once - not counting a curve with multiple segments. Hmmm.

2 Likes

Wo wir gerade bei Kurven sind: Ich habe eine Ausgangsdatei, die ich mit Speichern unter für eine Kundin neu angelegt habe. Ich habe alle Änderungen für die Kundin gemacht und wollte dann den Schnitt ausdrucken. Im Peace Modus hat sich dann bei den Nahtzugaben der eine Punkt verändert und haut mit der Nahtzugabe ab. Wie kann das passieren? So ist der Ausgangsschnitt:

Das kam dann nach “Speichern unter”

Wie man sehen kann sind alle Eingaben identisch, aber das Bild der Nahtzugaben hat sich verändert.

2 Likes