Hi @Scholli
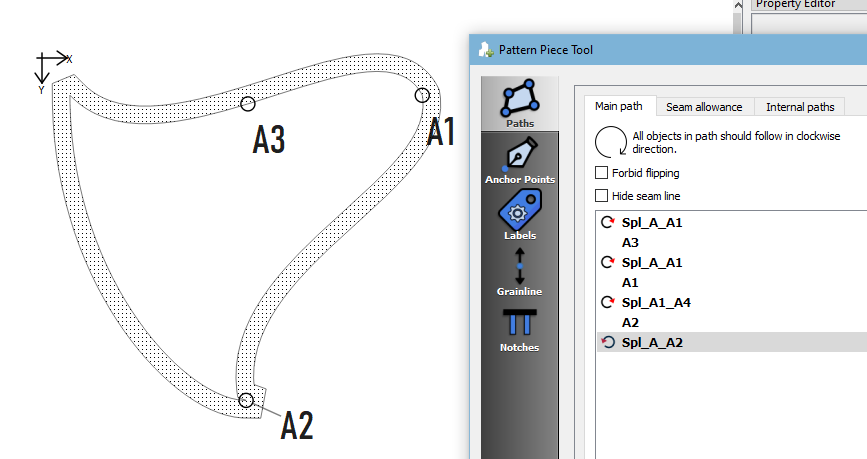
This normally happens when the bottom line doesn’t meet with the line of the curve above but overlaps the selected node somehow. Please send me your pattern so that I can have a look 
Hi @Scholli
This normally happens when the bottom line doesn’t meet with the line of the curve above but overlaps the selected node somehow. Please send me your pattern so that I can have a look
2022-017-Deutsch, Karin-Kleid_neu.val (232,2 KB)
Was ich nicht verstehe, da ich dort keine Änderungen gemacht habe:( Anbei das Muster
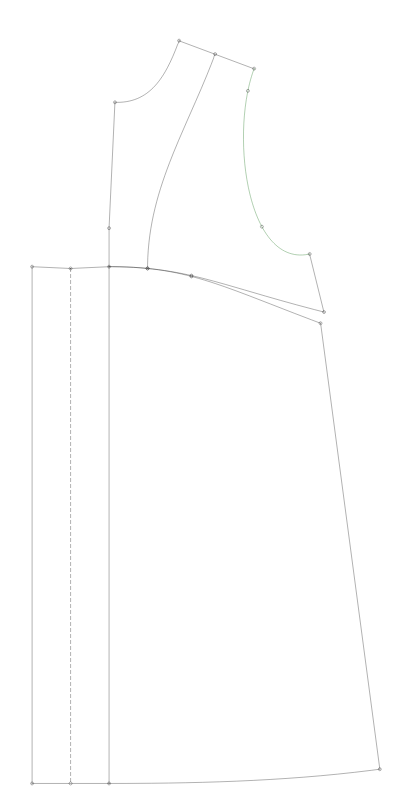
Ich habe den Fehler gefunden. Ich habe im Oberteil und im Unterteil zwei unterschiedliche Kurven:) Dieser Punkt gehört leider zum Unterteil. Ich werde jetzt auch noch einmal den Ausgangsschnitt kontrollieren, denn es wundert mich warum es da funktioniert:)
Vielen Dank für den Austausch und das tolle Forum
In testing auto reversing curves I’ve come across some strange behaviors with curves, and it seems to revolve around the placement of the control handle points. I was getting some cases where just 1 point would show, and I couldn’t edit the piece. Just by changing the control points would fix the issue.
Yes, it’s one of the reasons why I normally choose the nodes very carefully & put them into their own group before making the piece. Often it looks correct in one size, then one changes a size or something in the design & it does this. I’m happy that you found it ![]()
Test.val (3.5 KB)
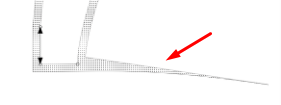
This is a very bad example of the strange behaviour of the SA like in @Scholli 's case.
And this also shows exactly why one should select nodes before & after the curves ![]()
Ich habe jetzt festgestellt. Das ich bei beiden Schnitten den eigentlich falschen Punkt gewählt habe. Die Kundin hat eine große Oberweite und ich habe in den Änderungspunkten die starke Brust geändert. Die Folge ist, das der Abnäher in der Seitennaht größer wurde. Das hat dann die Nahtzugabe abhauen lassen. Bei dem kleineren Brustabnäher hat sich das nicht bemerkbar gemacht.
Der Kundenschnitt mit einer starken Brust:
Ausgangsschnitt mit einer normalen Brust:
Well done! @Scholli
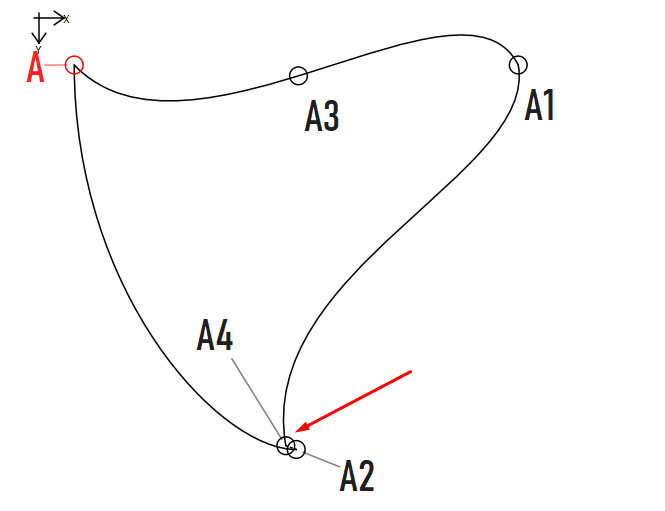
Actually shows why the curves should be using the same end point - either A4 or A2. Even if you add A4 and A2 as nodes with the curves, you will get a line segment between them.
Ok… following up on auto reversing curves in the Pattern Piece Tool dialog, I’m working on the Insert Node tool. First step is to make it the Insert Nodes tool - were a user can select multiple nodes to insert.
To more appropriately represent the idea of inserting nodes rather than making a link or connection - changing the tool icon to:

The dialog will now display the selected nodes / objects in a list, where you can use the context menu or the Del key to delete a node.
Now just to have to add some code to intelligently add nodes - to try and auto reverse curves if possible, and since you can’t select a curve more than once - to detect if a selected point is located on a curve so that an additional copy of a curve node can be placed after the point node.
Oh, and based on some discussion we had on the topic in another thread - for now I’m going to just add the nodes excluded at the bottom of the path list. Down the road I can try and see if we can intelligently add included any of the nodes to the path list in order.
Got the Insert Nodes intelligently working. It will now auto reverse curves, and it will automatically insert another curve node if you selected a curve followed by a point on the curve excluding the first or last point.
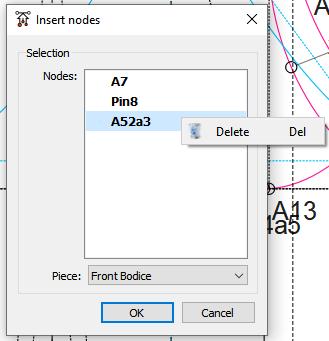
In the above I selected in order point A3, spl_A12_A3 (a counter clockwise curve) , A95, A97, and A12. It produced the correct path between A3 and A12.
Woo hoo.
So the question is do I add the ability to set points as notches and / or reversing curves in the context menu OR just leave those items for editing in the Pattern Piece Dialog->Main Path?
Wow! Very well done!!!
A small question… What happens if you only want a portion of a curve? Say from A95 to A12? Would the portion from A3 to A95 be excluded and not cause problems with the SA?
I think that, since it is reversing the curves dynamically, there’s no point in adding it to the context menu, but I do think that we will still need to set points as notches, otherwise the list for choosing the notches for the nodes may be a bit long and confusing.
Das wäre super, wenn man sich einzelne Bereiche einer Kurve, die zwischen zwei Punkten liegen, herausnehmen könnte. Besonders wenn man sie bewegt werden, würde nicht immer die ganze Kurve mit gespiegelt, gedreht oder bewegt werden.
If you selected A95, the curve, then A12, that’s what would be selected, although since A95 is not the start or end point of the curve we can’t determine direction and auto rotate if neccessary. Basically what the code does is look at the node before the selected one, if the previous node is a curve, and the selected node is a point on the curve, it appends the point, followed by a copy of the curve. Had to do it this way, or you wouldn’t be able to select the curve again (if needed) , since doing so removes the node from the selected objects.
As previously noted… this only works if you select a curve’s first or last point, then the curve. So I have to leave the option to reverse curves for some cases. You could for ex: select the whole curve as in my previous post… which will auto reverse if neccessary - then just delete the nodes you don’t need before pressing enter.
Figuring out how to intelligently insert newly selected nodes in the main path is another story. There will be some cases where you can’t know where in the main path the nodes are to go. Figuring out where to insert a missing curve node is easy… but then again I’m thinking now I could apply the same logic to selecting a pattern piece, where you would only have to select a curve once.
Oh, BTW… I added the beep sound when you select a node as confirmation an object was selected.
That’s a whole seperate draft mode issue. This simply applies to inserting multiple nodes to a piece at the same time, as opposed to inserting them one at a time as currently required in the app.
That being said, it gets rather complex as to what happens when you segment or intersect a curve. As far as the curve (tool) is concerned there is only 1 curve. To be able have multiple curve segments, every tool that cuts or interacts a curve, would need to create 2 new curves… so that you can select just that segment of the curve.
Yes, a totally different issue.
For now, the best would be to create the curves in segments, but the idea is a great one, @Scholli ![]()
Currently you would have to create your curve… then create a point along the curve or an intersect point. Then using that point and the curve’s start and end points create 2 new curves… and THAT’S what would need to happen if the tools were to do that automatically.
The one problem I see is if the curve segments lie on top of the original curve, you can’t select the curve if you wanted to use it in piece. You would only be able to select the segments that lie on top, as there is no way (currently) to raise or lower an object’s Z
Your wish is my command… lol
Not only did I add a context menu item to set a point as a notch, you can set the type via a sub menu.
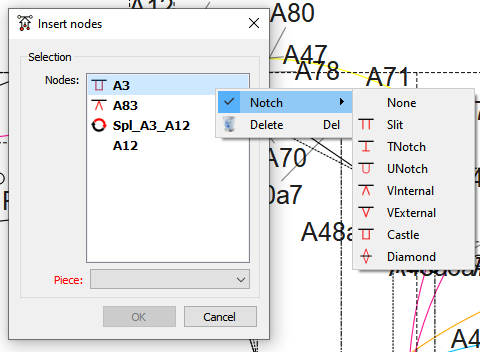
I’ll make the same addition to the main path context menu.
BTW, just to be consistent I added a reverse menu item for curves.
Discovered an odd quirk when inserting nodes. If more than 1 duplicate node point is “included” in the main path, no notch is displayed.
Wonder if I should add a duplicate point node check that pops up a warning saying something to the effect “this node is a duplicate do you want to replace the existing one, remove the selected one, or keep both?” ?
I too think that might be desirable.