Circle Skirt pattern

To create a circle skirt you’ll need the radius of a circle where the diameter is your waist circumference.

diameter = 2Piradius waist circumference (waist_circ in Valentina) = 23.14radius = 6.28*radius radius = waist_circ/6.28

This circle skirt is completely resizable because it uses control handles for the curves, and doesn’t use any absolute numbers except Pi.

The curve’s control handles are 1/3 the length of the line between the curve’s segment end points, and they are perpendicular to the lines at the curve’s segment end points.

This image shortens the skirt length to better show the labels. Click on the image to enlarge:

Create the hem curve similar to the waist curve. This image shows correct waist to knee measurement:

4 Likes

Thank you for this! I’m going to draft this to get a better understanding of the control handle for curves.

2 Likes

@definitalie That’s why I didn’t post the *.val & *.vit, instead I posted the instructions. Re-sizable curves require understanding that only comes from creating them.

A true circle using Bezier curves can’t be created in quarters. Each quarter must be divided in two. The control handles are 1/3 distance of the lines drawn from from begin to middle, (1st section) and from middle to end (2nd section).

So each panel of the circle skirt is a quarter of a circle, divided in the middle. And @definatalie you could change the direction of the hem curve to A4-A6-A1 so that you won’t need to reverse the hem curve direction when you create the detail seamline (so that the entire seamline flows in a clockwise direction).

1 Like

Hi, @slpencer, thank you very much for the instructions. I have made my pattern pieces and it works perfectly. I’ve printed the instructions out :slight_smile: and placed them in my file. I don’t want to forget this one.

1 Like

Just for kicks, where does 2PiRadius= circumference come from? It comes from 2PiRadians=360degrees

https://plus.google.com/+CorinaMarinescu/posts/Ry1qJoTxoDi

2 Likes

Hey @slpencer thanks alot for posting these instructions. So much easier to familiarise myself with the tools. Are there anymore of these floating around? Keep up the excellent work :blush:

2 Likes

Another tip, for making skirts for real people not dressmaker’s mannequins: Create the circle skirt using the hip line instead of the waistline (use the hip circumference instead of the waist circumference, and the distance from hipline to hem) Then: Measure up the back center line the distance from waist back to hip back (waist_back_to_hip_b), Measure up the side seam the distance from waist_side_to_hip_side (waist_side_to_hip_side) Create the arc from waist back to waist side. Measure up the back center line the distance from waist front to hip front (waist_front_to_hip_f) Create the arc from waist front to waist side. Create the details for both front & back circle skirt pieces.

After sewing but prior to hemming, hang the circle skirt for one day from the hip line, not from the waist line. Some leveling may need to be done by chalk marking a level hem while the client is wearing the skirt, but the amount of levelling will be tiny and won’t affect the drape.

This way those with: -big hips don’t get a ‘hike’ in the back -big tummies don’t get a ‘hike’ in the front -small hips and tummies don’t get a ‘hike’ on the sides

This skirt will have a beautiful swirl. The adjustments for different lengths in front & back were made during design at the waist, not ‘fixed’ by adjusting a new hem.

3 Likes

what do you mean?

She means that a real woman is not a cylinder or cone but has a belly, a butt and both not necessarily with the same diameter and on the same hight. :rofl: The skirt with two radii works well on a cylinder or cone, but not if you have curves because the seam will be uneven.

@slspencer thank you for the instructions; I was just wondering why I should need a pattern for a circle skirt but like this it makes totally sense :slight_smile:

1 Like

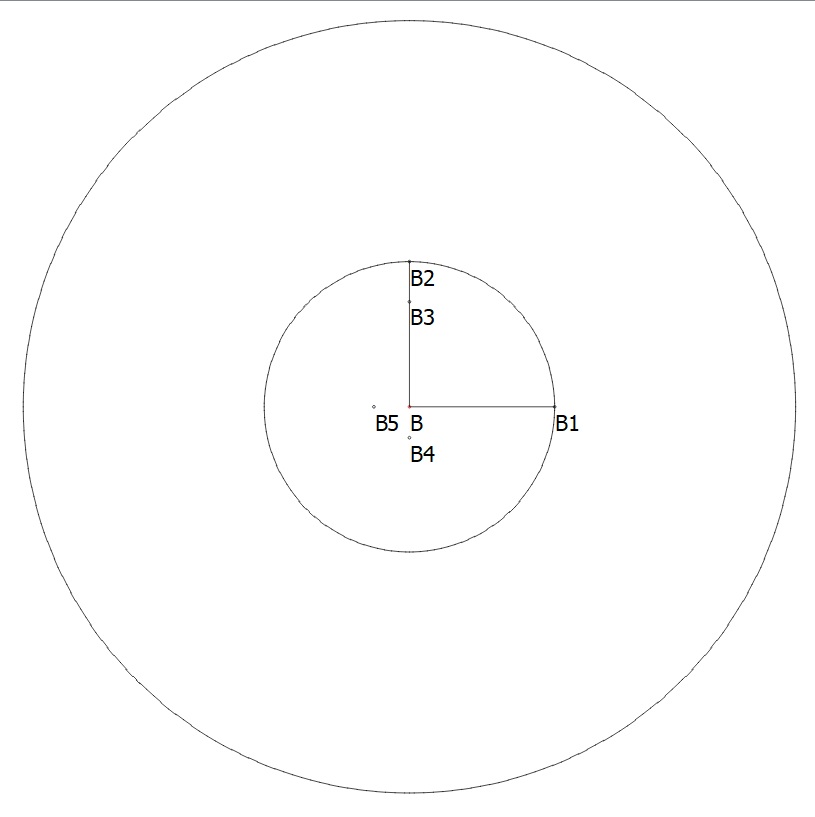
I know what she meant but I don’t quite understand the instruction. I tried to make the pattern from hip circumference but how can I determine the waistline? If I added it by the same formula, isn’t that turned out to be the same with if I make the pattern from waist circumference? Here is my pattern:

circle skirt from hip

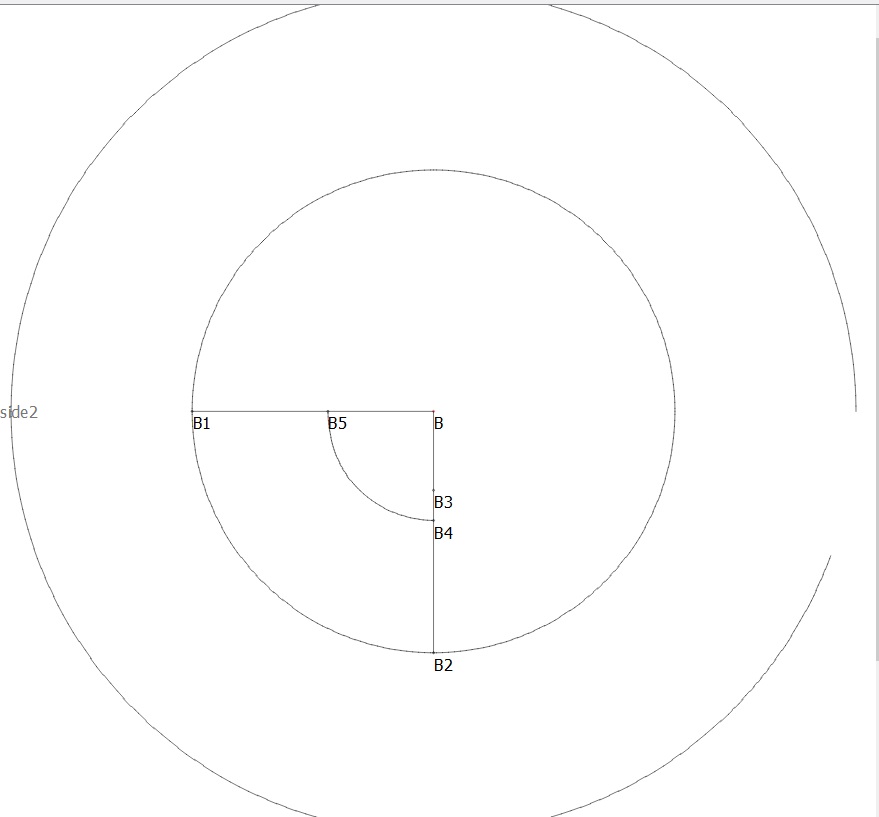
B1 is hip side, B2 is hip back. I used Hip circumference/6.28 formula. B3 is waist back (calculated by the same formula with how I get hip radius), B4 is also waist back (if using hip length from waist back; say 19cm), B5 is waist side (using hip length from waist side; 19.5cm). From the picture, if I join the B4 and B5, the waist circumference is too small. But if I used B3 as waistline, what is the difference with using waist circumference formula from the start? Also, the skirt length would be too short. Maybe you could explain what I do wrong?

Edit: I add the hiplength into the formula for hipline (hip circ/6.28+hip length from waistline). Is this the way to do it?

Btw, I compare the circle skirt made from hip circ and the usual skirt, it seems the new skirt is slightly bigger.

1 Like

I think… try making a front quarter and a back quarter and then following the instructions from the @slspencer has given. If you’re using full circle arcs, they are going to move in and out as you change the measurements always retaining the full circle.

Circle Skirt Pattern Stage 1.val (3.0 KB)

I haven’t used a measurement file and this is only the first stage of creating a circle skirt quarter. If you change the measurement of the line A to A1, everything will resize automatically and you will be able to add your own measurement file to extend the pattern further according to @slspencer’s instructions to work from this hip line down to the hem line and up to the waist line.

I hope that will help :grinning:

1 Like

That is the point. As fas as I understand it she uses the circles (arcs) only for seam and hip. For waist she uses the points she describes and connects them with curves, that is splines, not arcs. That makes totally sense to me. For a plain circle skirt I wouldn’t bother at all to make a pattern. I’d just take a pen/chalk and a cord and draw the circles on the folded fabrics.

2 Likes

Just a note on circles skirts… if one is using a material that has a lot of bias to it, you may not want to have a perfect cricle. You need to flatten out the hem line or reduce the waist to hem on the bias because it’s going to stretch. Therefore using an arc will not work - need to use splines to accomplish this - refer back to original post. Length of A5-A6 could be as much as an 1" less than A-A1 and A3-A4.

And yes… having cut 1000’s of circle skirts in the last 36 years, I don’t bother with a pattern. A ruler, string (or strip of paper) , pin, marking chalk/pen, and the knowledge of PI is all you need to draw out a skirt.

1 Like

@grace: I can’t open the .val file because it only support up to 0.4.8 version. My valentina version is 0.5.0.1.

@moniaqua: So, on my 2nd pattern, am I right? I also use arcs only for seam and hip, for waistline I use curves. The formula for hip radius would be: hip circ/6.28+hip length?

@douglas: noted! On bias reduce the length by 1".

The amount will depend on how much stretch is in the bias. For example… a felt poodle skirt will have no stretch, so there is no need to shorten, where as a loosely woven wool or knit will.

Sometimes at my costume shop we will put a skirt / dress together, then let it hang overnight on a dress form… then mark and trim the hem.

1 Like

@alexandria - You’re making a true circle skirt, my instructions were for a circle skirt that is fitted from waist to hip.

My suggestion:

  1. Create two separate quarter drafts, one for front one for back, each using a center fold. This will allow you to fit it between waist and hip if you want to (you don’t have to). This quarter-pattern approach will eliminate most of the problems you’ve been having with this pattern.
  2. Use the Flip tools to mirror the points, arcs, & curves to complete the front & back draft patterns.
  3. Then make a point along one side seam to mark the end of the placket for a zipper for buttons.
  4. Then create a waistband that is longer than the waist so you have overlap for button underneath, bottonhole on top.
  5. Then create three workpieces: Front, Back, Waistband
  6. On both front & back workpieces, make the seam allowance +1/4" wider from the the placket point to the waistline. The zipper will be easier to sew and it won’t be directly underneath the seamline so it’s hidden a bit and lays more smoothly - this is a nice touch.
1 Like

It looks like concentric circles to me, that is not what @slspencer describes. What is your B3, isn’t that the point hip-waist in the front? Than there should be a curve B5-B3. It looks to me as if you had an arc B5-B4.

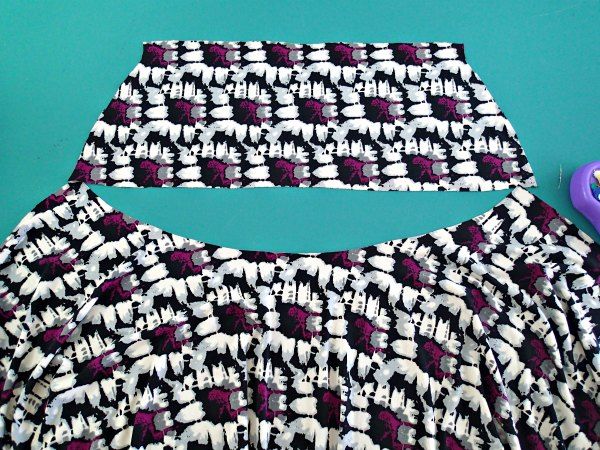
@slspencer: do you mean the skirt would have a stitches to join the circle skirt (from hip) and the regular fitted piece from waist-hip? So it’s going to be have three pattern pieces (front fitted waist-hip, back fitted waist-hip and circle skirt from hip)? Something like this?

semi mermaid skirt

@moniaqua: B3 is waist back according to waist circ/6.28 formula (measured from B point). B4 is waist back if I measure it using waist-hip length from hip line (B2 point).

Hi @alexandria_tale, Here is an example of a circle skirt which is fitted at the waist:

This circle skirt has a larger initial waist circumference, which results in a larger circumference for abdomen and hips. This is a good approach for someone who is an XXXL, with a large upper abdomen and large hips. The enlarged waist must be taken in with darts.

The waistline has wearing ease equivalent to adding 1" to a 24" waist–> (1/24) = 0.042

(waist_circ * 1.042)

It also has 20% extra to accommodate the client’s body shape:

(waist_circ * 1.042) + (waist_circ * 1.2) = (waist_circ * 1.242)

Convert this to use the front measurements and back measurements waist_arc_f and waist_arc_b. Especially with persons who are in the larger sizes, the front waist is not the same as the back waist. Substituting waist_circ with 2*waist_arc_f, the circumference or diameter formula becomes:

(waist_circ * 1.242) = ( ( 2 * waist_arc_f ) * 1.245 )

Plugging this into ( d = 2 * r * _pi ) and solving for r:

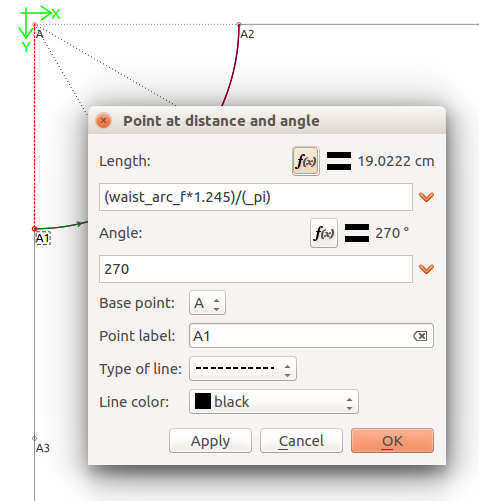
r = ( (waist_arc_f * 1.245) / (_pi) )

The waistline begins at r away from point A.

Use Point from distance and Angle. Origin = A, Length = (( waist_arc_f * 1.245 ) / _pi ), Angle = 270 Create A2 using this length, and points A3 and A4 exactly the same as for the regular circle skirt. image
Create the dart centers:

Points A7 & A8 are created with Point Intersect Curve and Axis, at angles 300 & 330. image
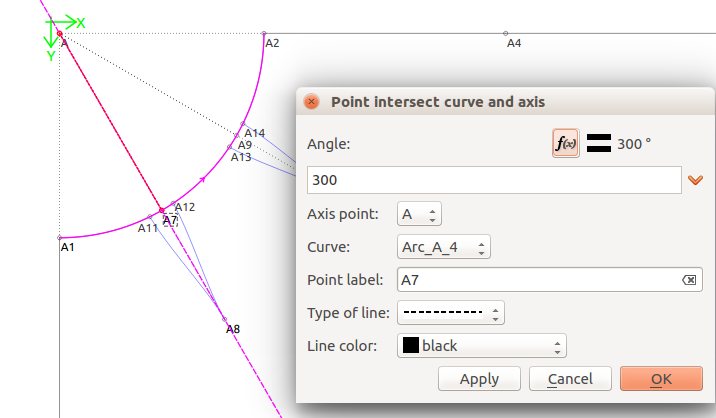
Create the dart sides:

The darts are created using the sub-arcs which were created by A7 & A9 along arc Arc_A_4. The excess amount at the waistline is 20%, or 0.20. ( 0.20 / 4 ) = 0.05.
Points A11, A12, A13, and A14 are ( waist_arc_f * 0.05 ) away from A7 and A9 along Arc_A_4.
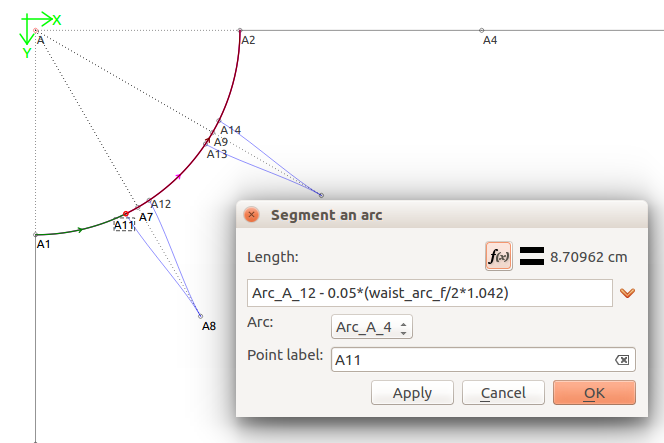
image

Create the dart points:

Points A8 an A10 are created using the Point along Line tool, using Line_A_A7 and Line_A_A9. They are about 2/3rds, or 0.6 of waist_to_hip_f which was used to create A3, so Length = 0.6 * Line_A1_A3. image
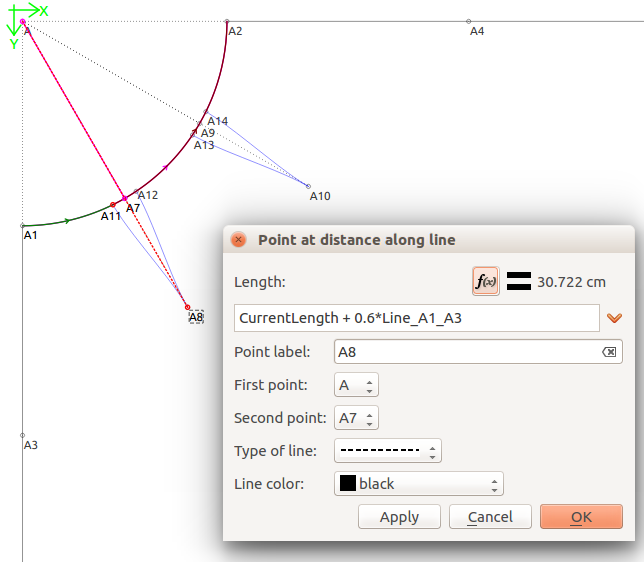
Create the dart legs:

The curved darts are created using the Simple Curve tool: image
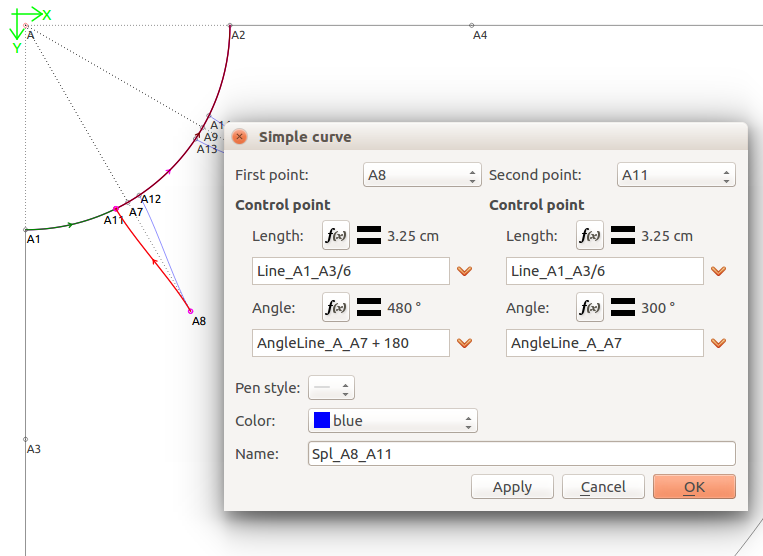
Repeat the above instructions to create the back draft. Then flip vertically. You will have two pattern pieces, sew them with side seams.

1 Like

Thank you very much for the tutorial! So the fitted waist is because of the dart! Btw, is there any way to segment an elliptical arc?

1 Like