As long as the sleeve is larger than the armhole between an inch - inch & half… you can set the sleeve. If the sleeve is smaller… no bueno.
2 Likes
The Blue dot or approx 1/2 the distance of the back piece is usually where you will place a notch, that lines up the the back seam of the sleeve. It also could be the point at which you make the pattern into a fiddle back style.
2 Likes
I found a book last week, which seemed interesting as it has to do with period uniforms (several which are pretty similar to what I’m working on), called “Uniform-Maßschneidern für die Wehrmacht - Eine Fachkunde auf der Grundlage der amtlichen Bekleidungsvorschriften”, or “Uniform Tailoring for the Wehrmacht – A Technical Manual Based on the Official Clothing Regulations.” from 1938. It’s written in German and with the good old Fraktur font, so I’ll be spending this weekend reading through it. Might have to brush up on my tailoring vocabulary a bit.
Anyways, while I was browsing it I also decided to look at one of the originals I took to pieces and compare it with what my draft kicks out. I chose the one that was less stretched and at least somewhat cut and sewn properly - the other one is all over the place and no two measurements seem to agree on it.
Anyways, here’s some of the comparisons:
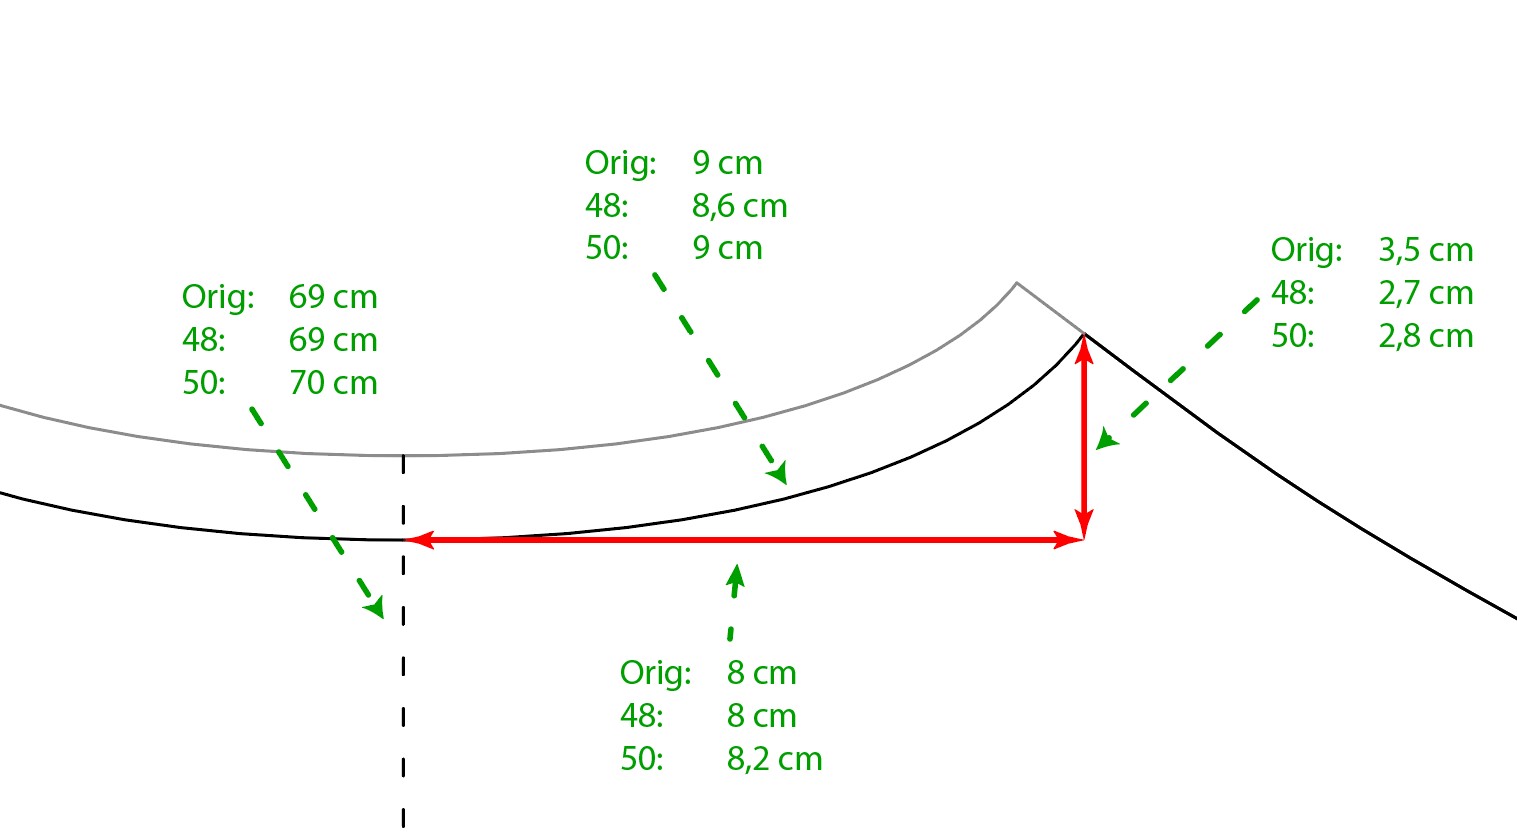
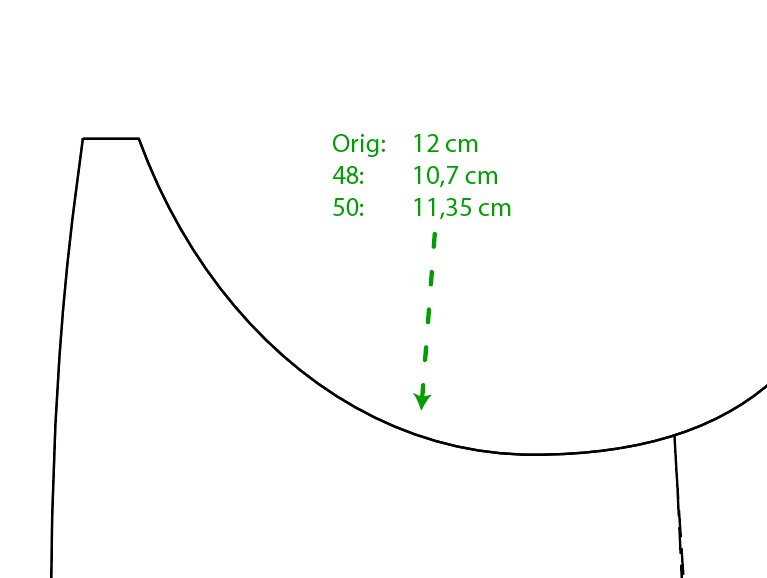
Here’s the neck area and back length. Orig. is the original jacket,the two others are what my draft gives as their lengths. Red angle here is just a straight angle, which is used in the drafting guide for the distances so it was a nice “known point” to have.
Back shoulder seam is already “out of place” by a bit.
And so is the front shoulder seam. Here the “front shoulder seam is 1 cm shorter than the back” really shows up. In the original it’s also cut straight, not curved like mine. Difference is not huge in the final length though.

Front neck the differences show up too, but there might be issues with stretching etc. here so the original measurement may be way off.
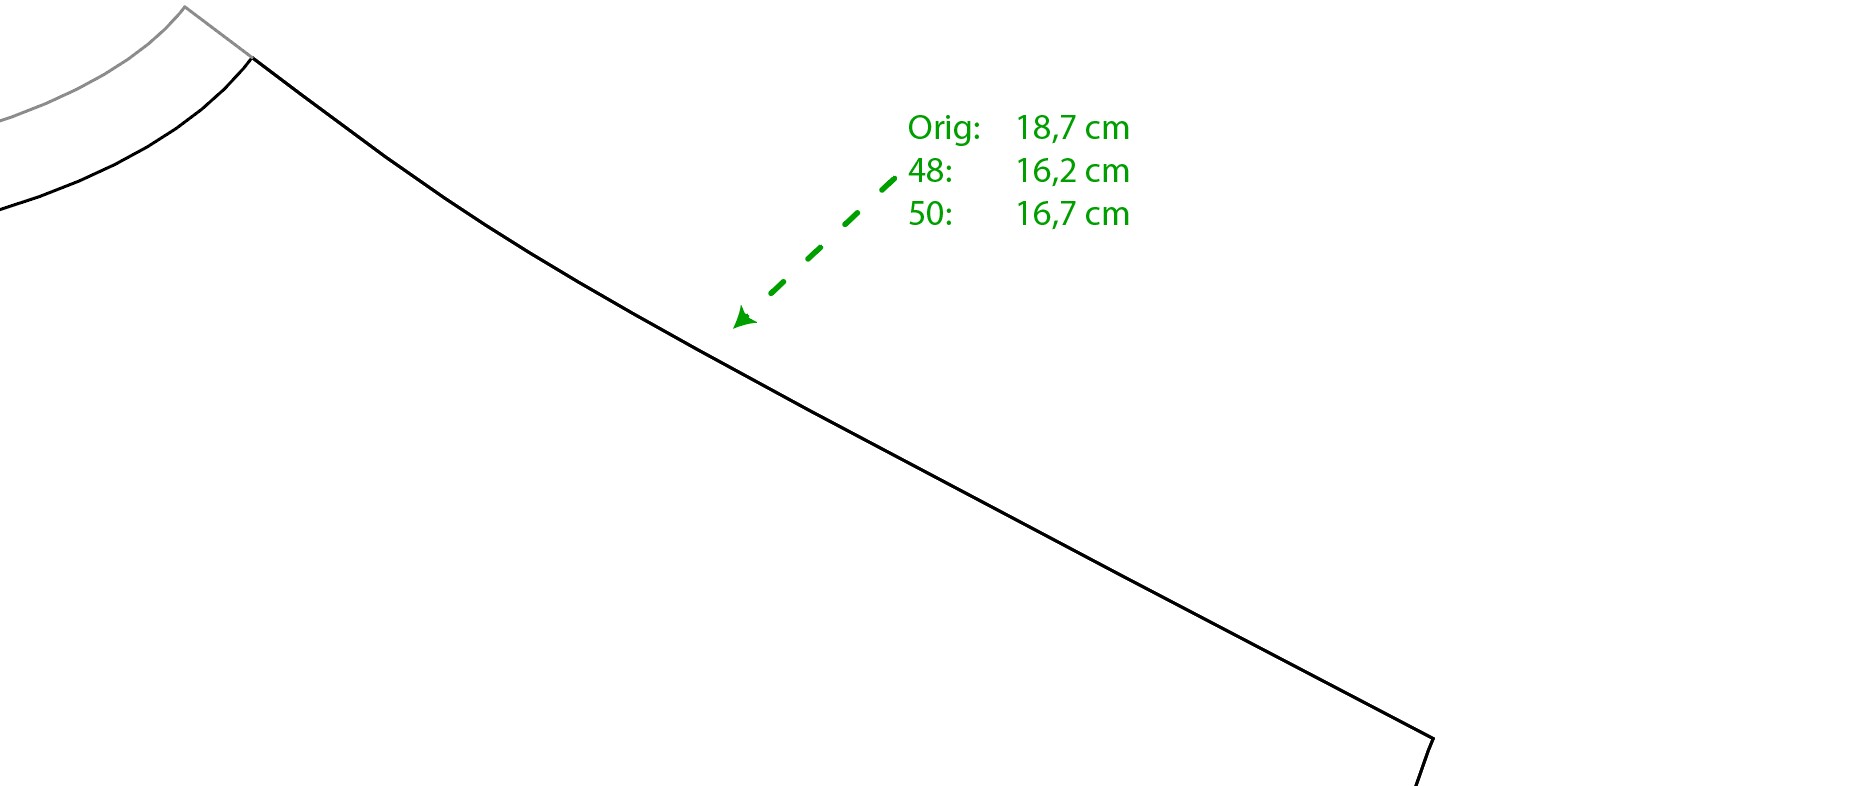
And here’s the armhole curve in the back.
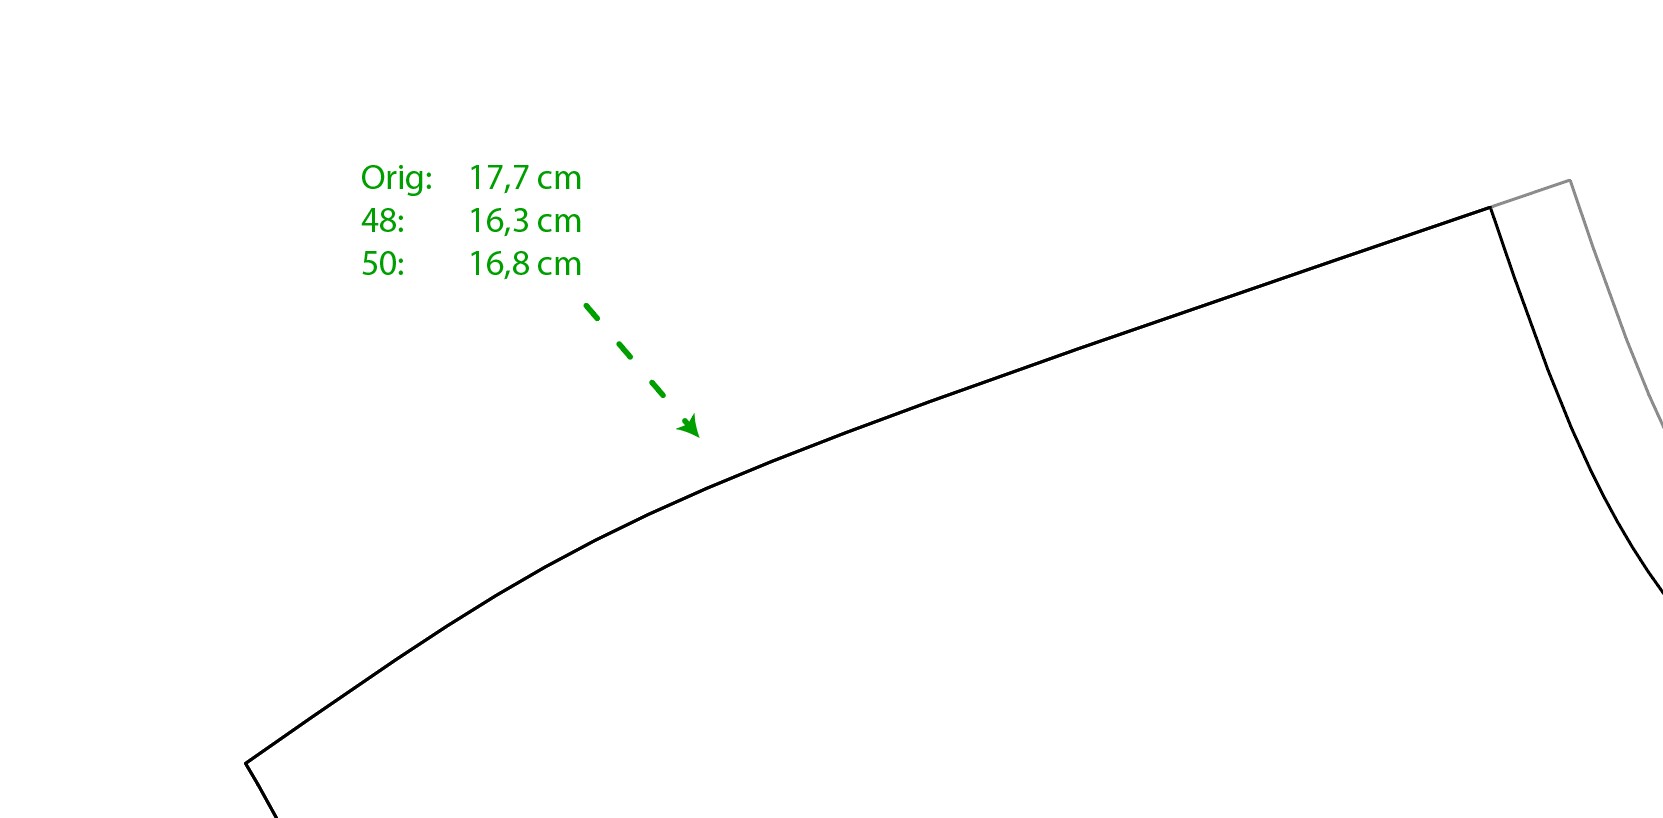
And the back side piece. Significant deviation here. Also it seems to me that this line really should be drafted differently (and the dashed line in the sample drawing in the OP has something to do with it).
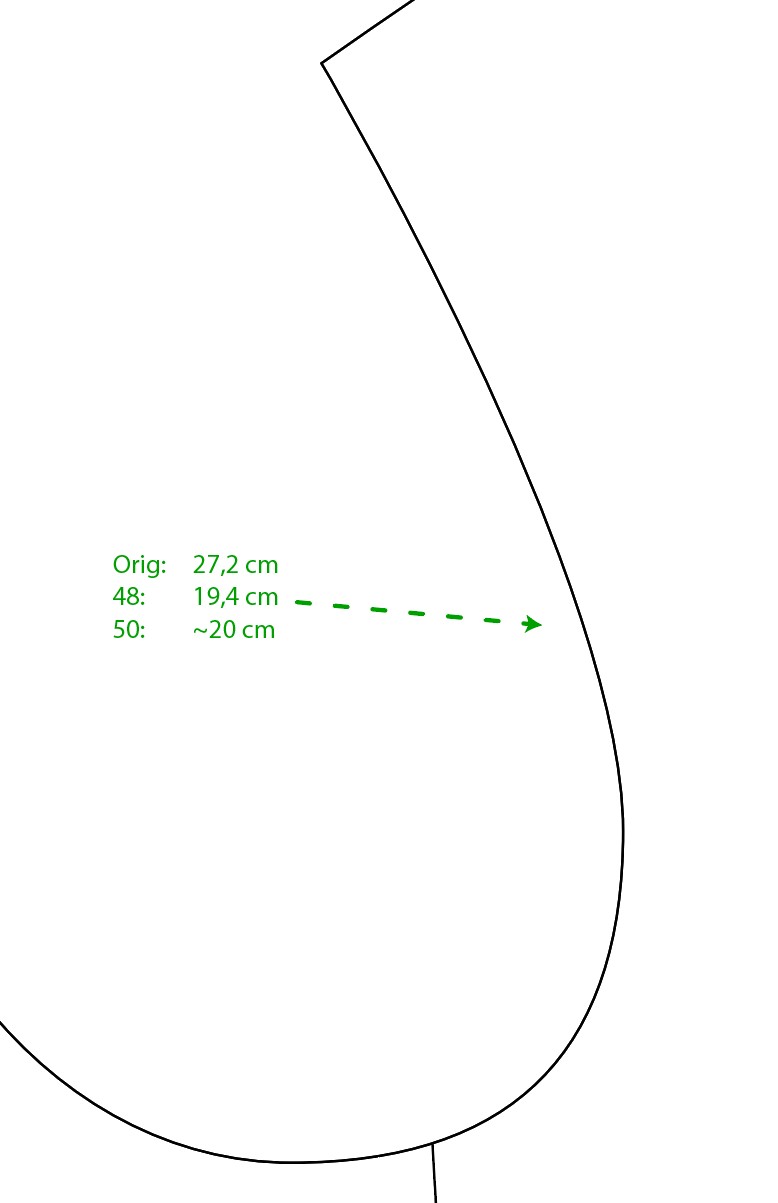
And this is where we get to the REALLY interesting part. The origanl front armhole curve is SIGNIFICANTLY longer. So much so, that it’s really hard to tell what is from stretch and wear and what is the actual, cut length. I tried pressing and steaming the armpit portion and fiddle around to get it to set, shrink and what not, but I can’t really trust it at this point. I might have to take a look at the sleeve and measure it and see if it has less warping in this part and if I could infer any reasonable numbers from it. Or just ignore it wholly. We’ll see what I come up with.

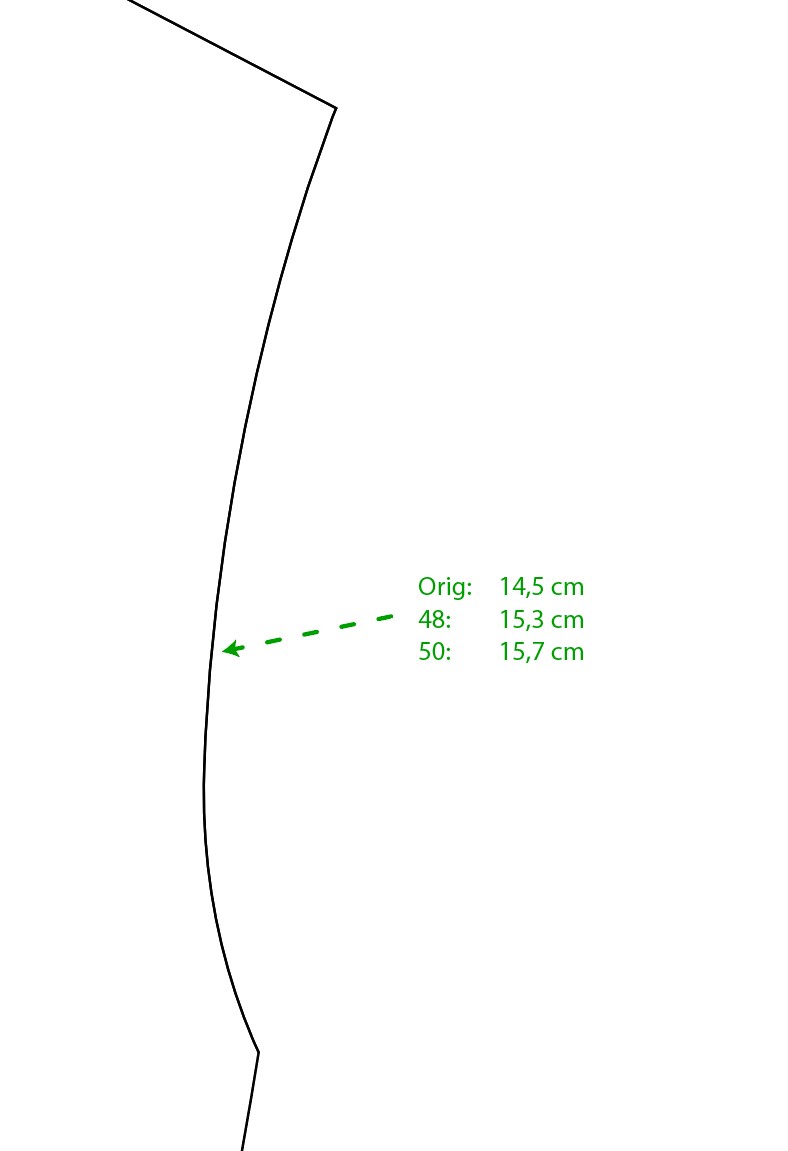
And here are the side seam measurements for the back (on the left) and front (on the right). This is another reason why I suspect that there is some sort of an error in the way I’ve drafted the bottom of the armhole curve / side panel. The 1 to 2 cm difference seems a lot. Though this is one of those cases, where the side seams in the original probably were different lengths but have settled over the years.
Can’t really tell, probably will have to trust the instructions and make them different lengths . At least they set nicely in the toile with no issues.
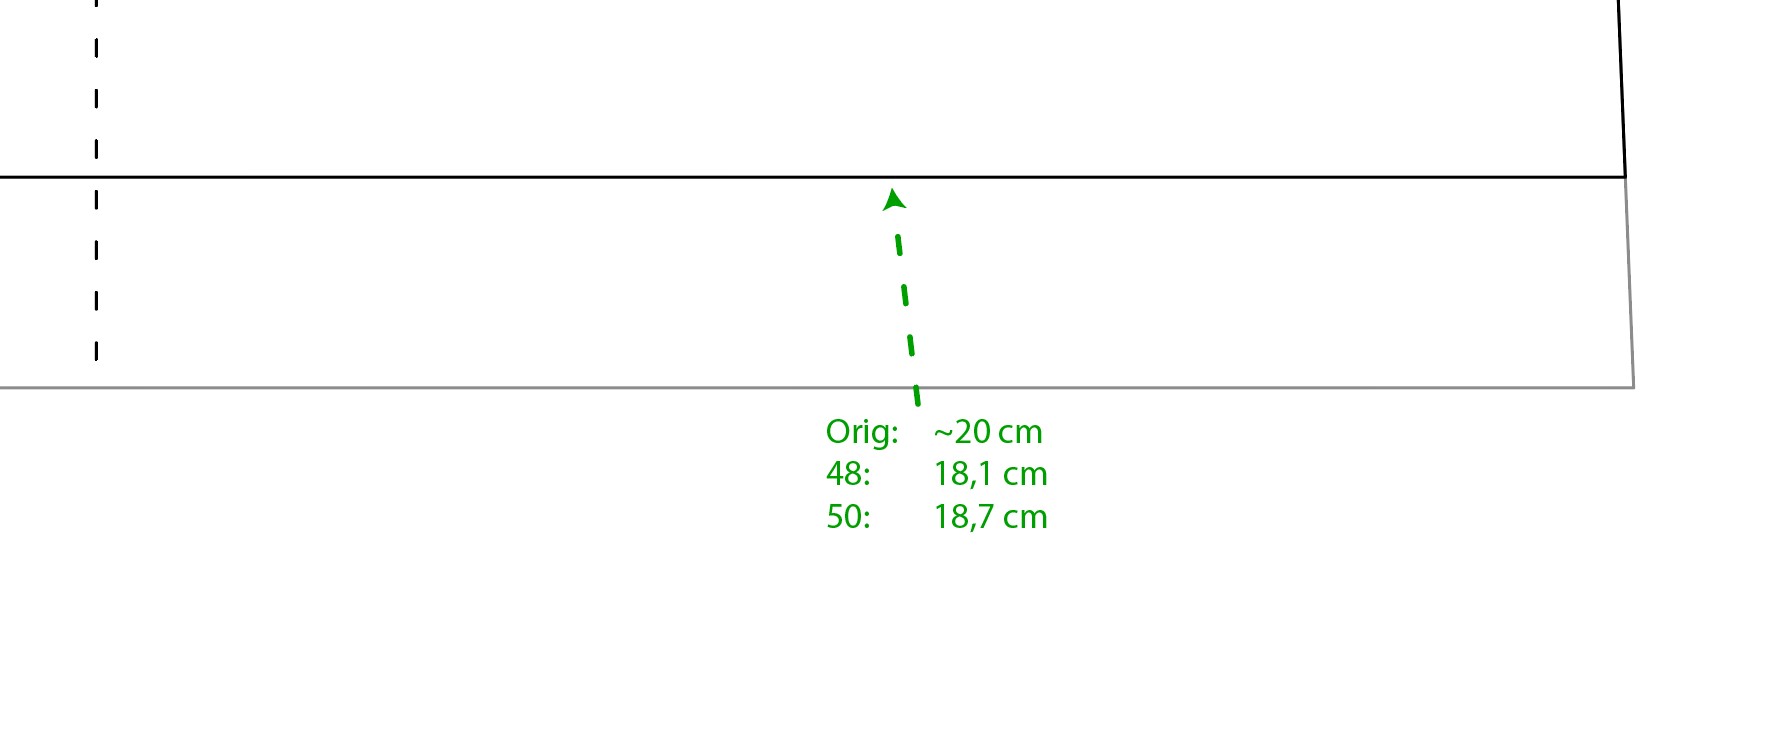
The back hem..
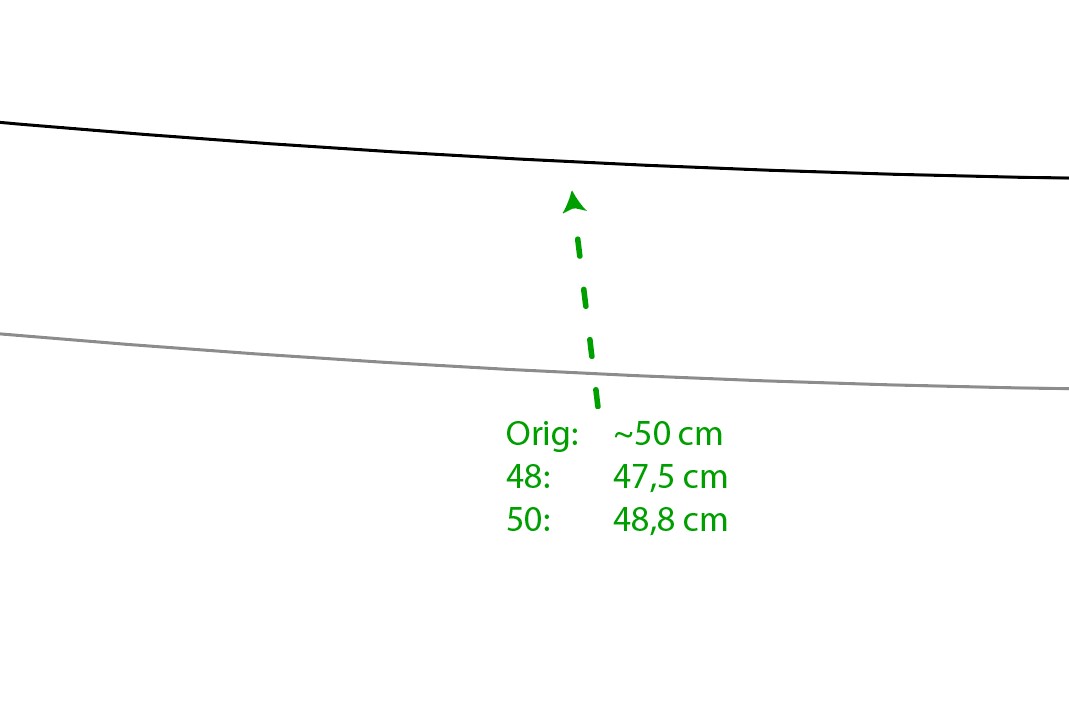
Front hem.
Here again, the back hem in the original is not straight, but curved ever so slightly, perhaps ~0,8 cm in the middle. But it’s also wobbly and the hem fold has been sewn all over the place so it might not mean anything. Same with the front, can’t really measure it accurately as the quarter liner down the front is TOO SHORT in this one and has pulled the corner in the front up by about 1 - 1,5 cm over the years.
In short, it seems to me that in the original the side seam to center front distance is a few centimeters less than in the instructions. Same goes for the back - it is probably a few centimeters wider than what the instructions say.
I suppose my next step is to make another version of this draft pattern, where I can fiddle around with the proportions of the main lines a little and see if that affects anything. I might also drop the back shoulder a little and add that to the front shoulder to see if that makes the armhole lengths closer to the measured lengths. In fact, comparing this to an unused original (a complete jacket), it seems that the shoulder seam indeed sits about 2 cm further back than in my draft and toile.
My toile wool and the production wool both come pre-shrunk from the factory and so far we haven’t had issues with shrinking. Though with my luck it might just happen here.
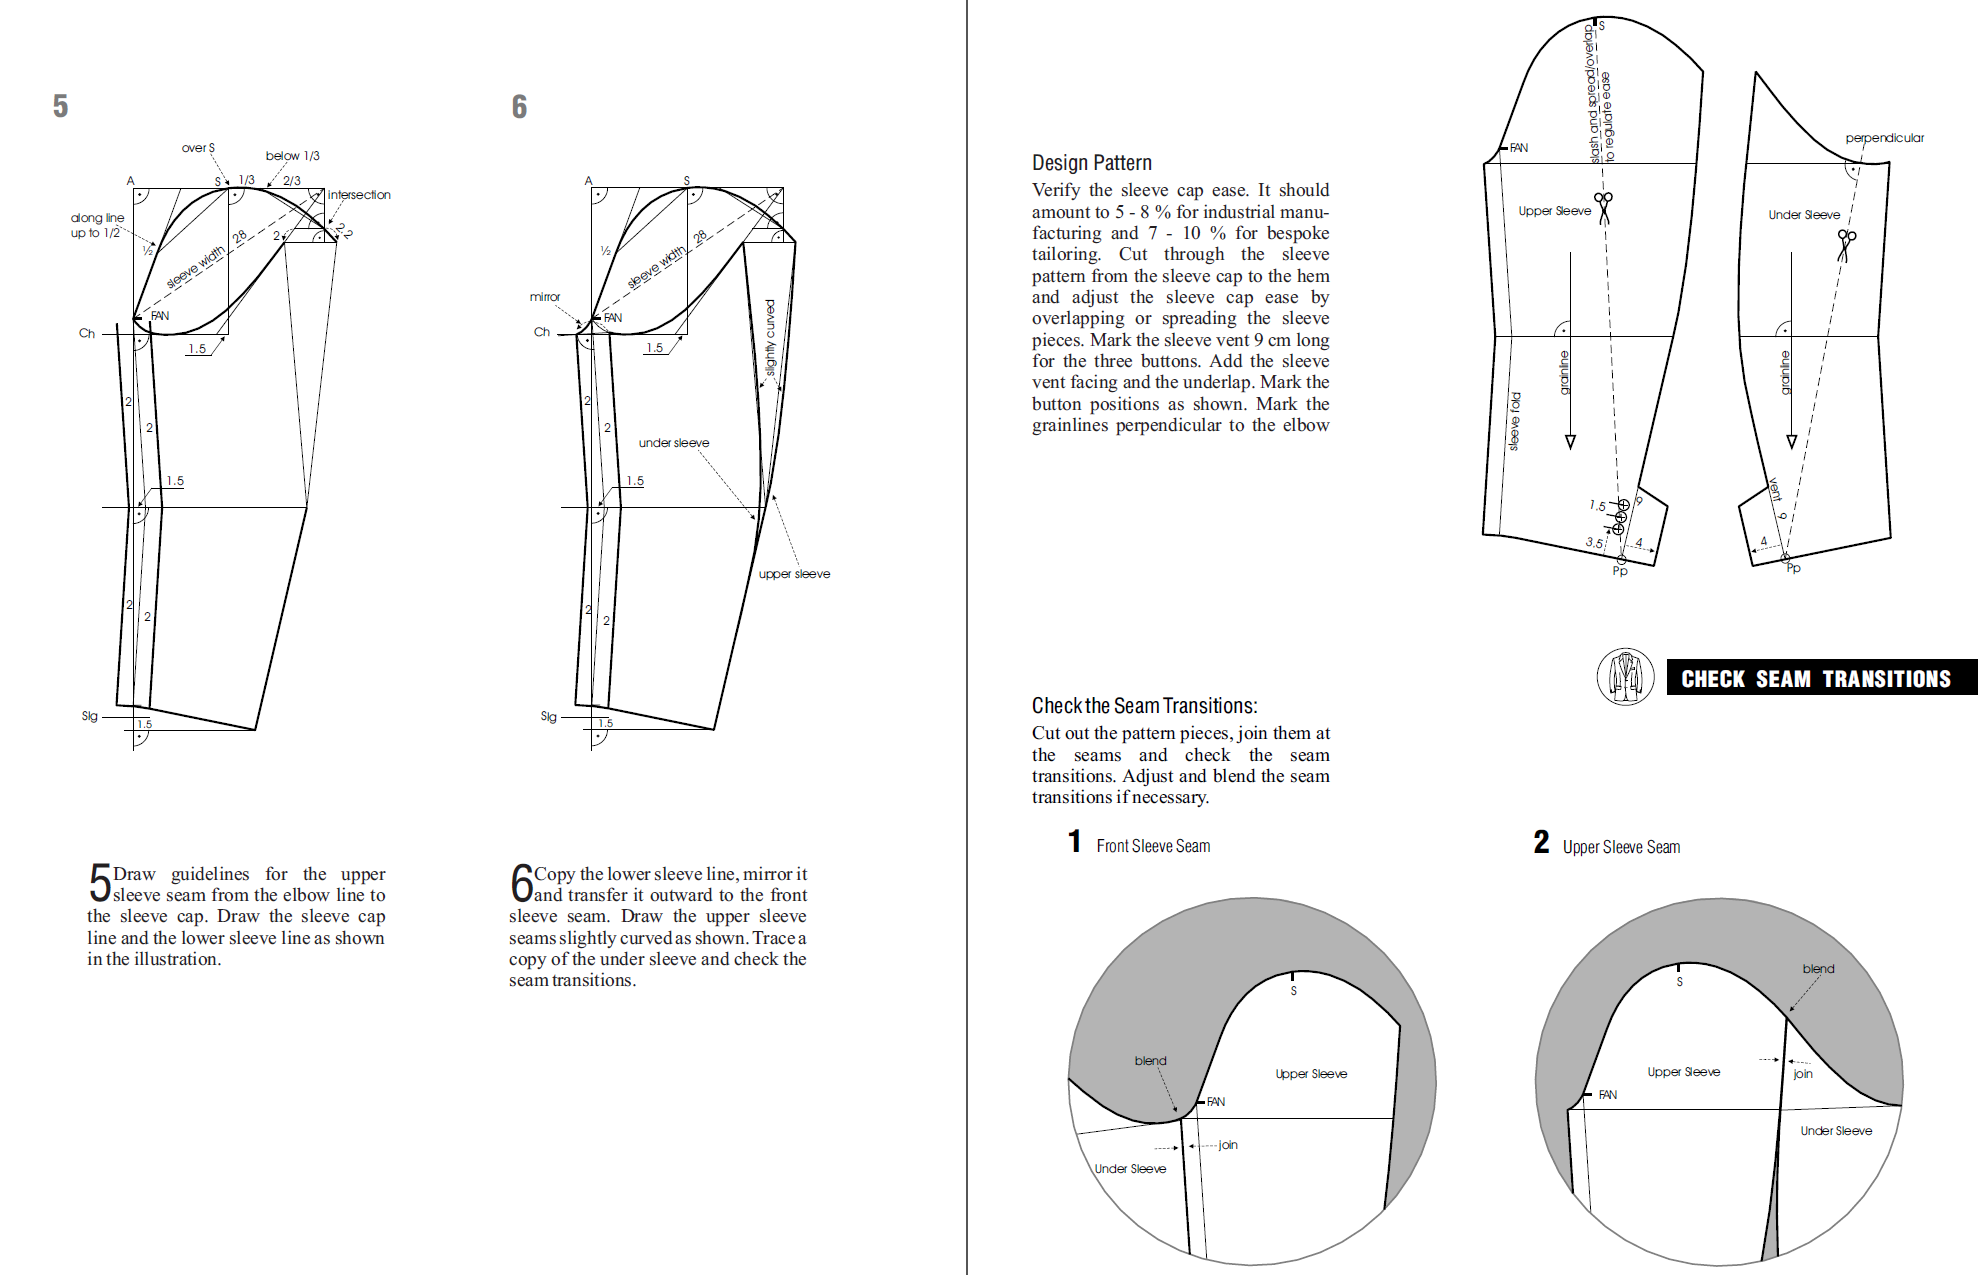
The instructions mention that the undersleeve ought to have 3 to 9 mm of ease, upper sleeve ought to have 3 mm from front seam to about halfway up, from there to shoulder seam 9 to 15 mm ease, same on the back essentially.
Now I wonder if the “1/2 the distance of the back piece” here means exactly this line from the shoulder line to the chestline, and NOT to neck to chestline that it means in the other pattern(s) of this same system. Wouldn’t be the first time the instructions talk about different things in the same way… after all, a period tailor would know the difference.
Unfortunately I won’t be able to do a lot this week anymore, outside of reading and thinking. It’s well past my lunch now, which I’ll spend with the new German book I have… and will probably spend the rest of the workday.
And next week it’s off to making some 30 different hats which’ll most likely take the whole week.
2 Likes
Yup. We would also stabilize the armhole with a 1/4" twill tape as well as a few other areas like the back neck line and the shoulder seam. This prevents the fabric from stretching such as exhibited in the orginal jacket you deconstructed.
2 Likes
Funnily enough, the original does have twill tape there - I suppose it just didn’t hold up over decades of hard use.
3 Likes
Imagine if it didn’t have the tape. ![]()
3 Likes
Would probably be just as useable information for me as it is now ![]() Can’t trust those measurements too much.
Can’t trust those measurements too much.
In any case, I did some reading of the two German books from 1938 I bought and then compared them with the drafting instructions I have AND the original samples… and the German draft is a lot closer to what the samples I have are than the actual instructions.
So I suppose I’ll take this new information into account and start forming a draft that takes some ideas from that one and see what the results are like ![]()
I am having a good time with all this now, this is all very exciting!"
2 Likes
In this case, I’d go with the German instructions to create the base pattern and then add the changes according to the sample. This way, you’ll have a pattern that will resize beautifully to almost any size.
Yes, very. It’s a very good learning curve for anyone. Thank you very much for sharing. ![]()
2 Likes
Yes! The domestic instruction is very close, but a) it’s a lot more complicated to get a right shape! b) It doesn’t work if proportions of the chest & waist change too much c) the shoulder line is different and the armhole is actually smaller by a bit.
I made a new draft based on the German system with the size values given in the original size table I have for the original instructions and… BOOM. It’s almost 1:1 with the measurements from the cut up originals I have! This is mindblowing, so far I’m more used to having to fiddle around and change this and that and generally just use too much elbow grease when following these old instructions. But the German version is simpler, more scaleable and far more easy to understand (what value changes what etc.).
Now it’s time to draw some new lines and curves and see how this compares to the samples I have ![]()
As a side note, I managed to find another domestic book from late 40’s that is a further development of the system the instruction are based on… and it is such a great book too. 120 pages of explaining thigs, with a ton of sample patterns etc. It is almost too good to be true. Sadly I won’t be using it for this pattern anymore, as I’m really going to crack on based on this German one for now.
2 Likes
Right… because you’re now in Stout or Corpulent territory if the waist is larger than the chest, and as mentioned before requires a different draft.
Even a really large (waist) drop can affect a draft, where IMO you might be better off using a larger waist size to draft, then makeup the difference with more dart suppression. The standard drop for men is 6". I normally have an 8" drop, but a few years back I purchased a tuxedo for my partner’s son’s wedding, and even given the tux had a 6" drop… I had to let the pant waist out. ![]() The funny part was trying to convice the sales guy at The Men’s Shop that I could handle hemming and altering the pants.
The funny part was trying to convice the sales guy at The Men’s Shop that I could handle hemming and altering the pants. ![]()
3 Likes
Yes, ![]() from watching old Western movies & reading Louis L’Amour books, I think the German influence was strong in the 1800s USA. They brought a lot of German methods with them.
from watching old Western movies & reading Louis L’Amour books, I think the German influence was strong in the 1800s USA. They brought a lot of German methods with them.
Anyway, keep soldiering on… We’re rooting for you. ![]()
2 Likes
Yup! The German version adjusts the waist a bit differently than what I originally used, so it seems like it can handle the slightly larger waist in some of the special sizes (and the youth sizes, which have different waist-chest proportion) straight off the instructions. It only breaks when I start going absurd with the waist size vs. chest size.
So essentially 4 cm increase in waist (that the size table calls for larger sizes) → works well with the German draft. Same doesn’t work in the original instructions unfortunately.
x)
Thank you! I know I said I’d be making hats this week, but that thing has to wait - I am having too good a time with this draft now.
Today is time for finishing the basic shape, printing that out so I can physically compare the pattern to the original pieces and see if it is as similar as the measurements I took would suggest.
Then I can finally do a sleeve draft as well. Luckily this German instruction does come with a sleeve instructions on it, it’s just slightly narrower than what I need - but that’s an easy fix for me (at least, used to be…).
2 Likes
So, here’s the results of doing the German style.
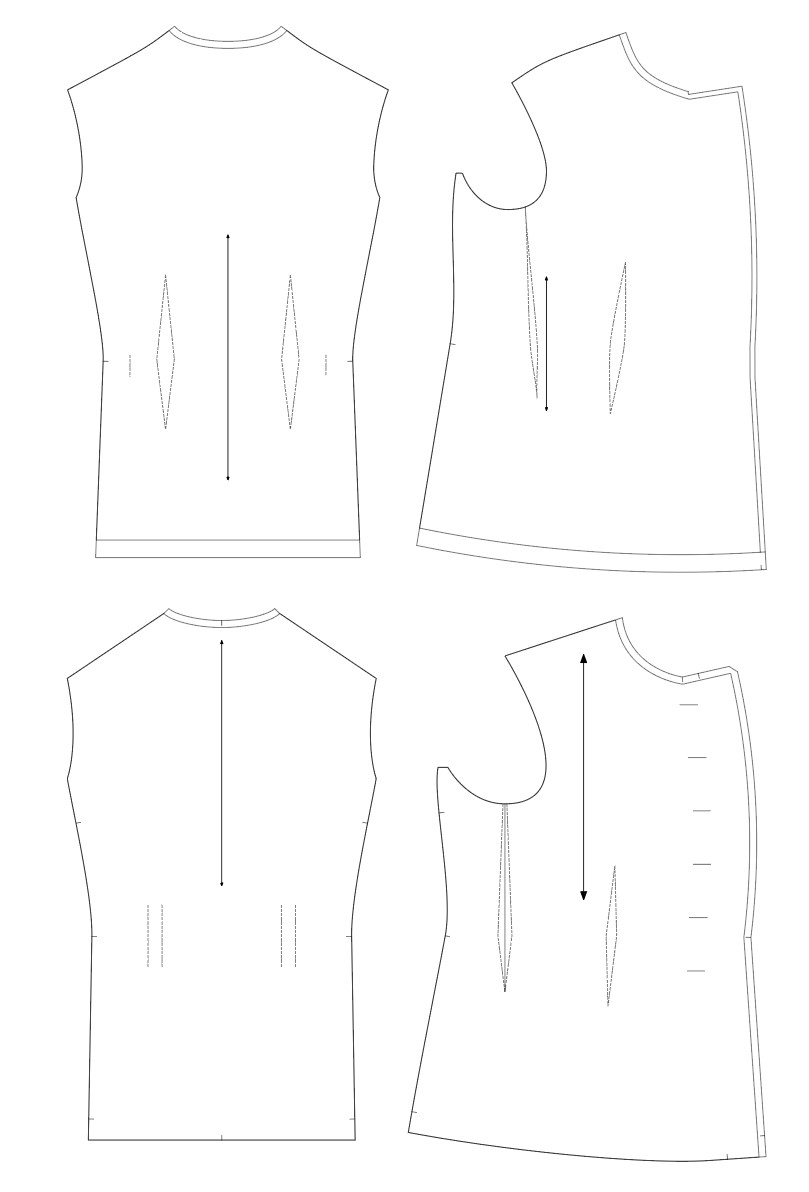
Old at the top, new on the bottom.
And here they are overlaid on top of each other; red is the old version, black the is the new one.
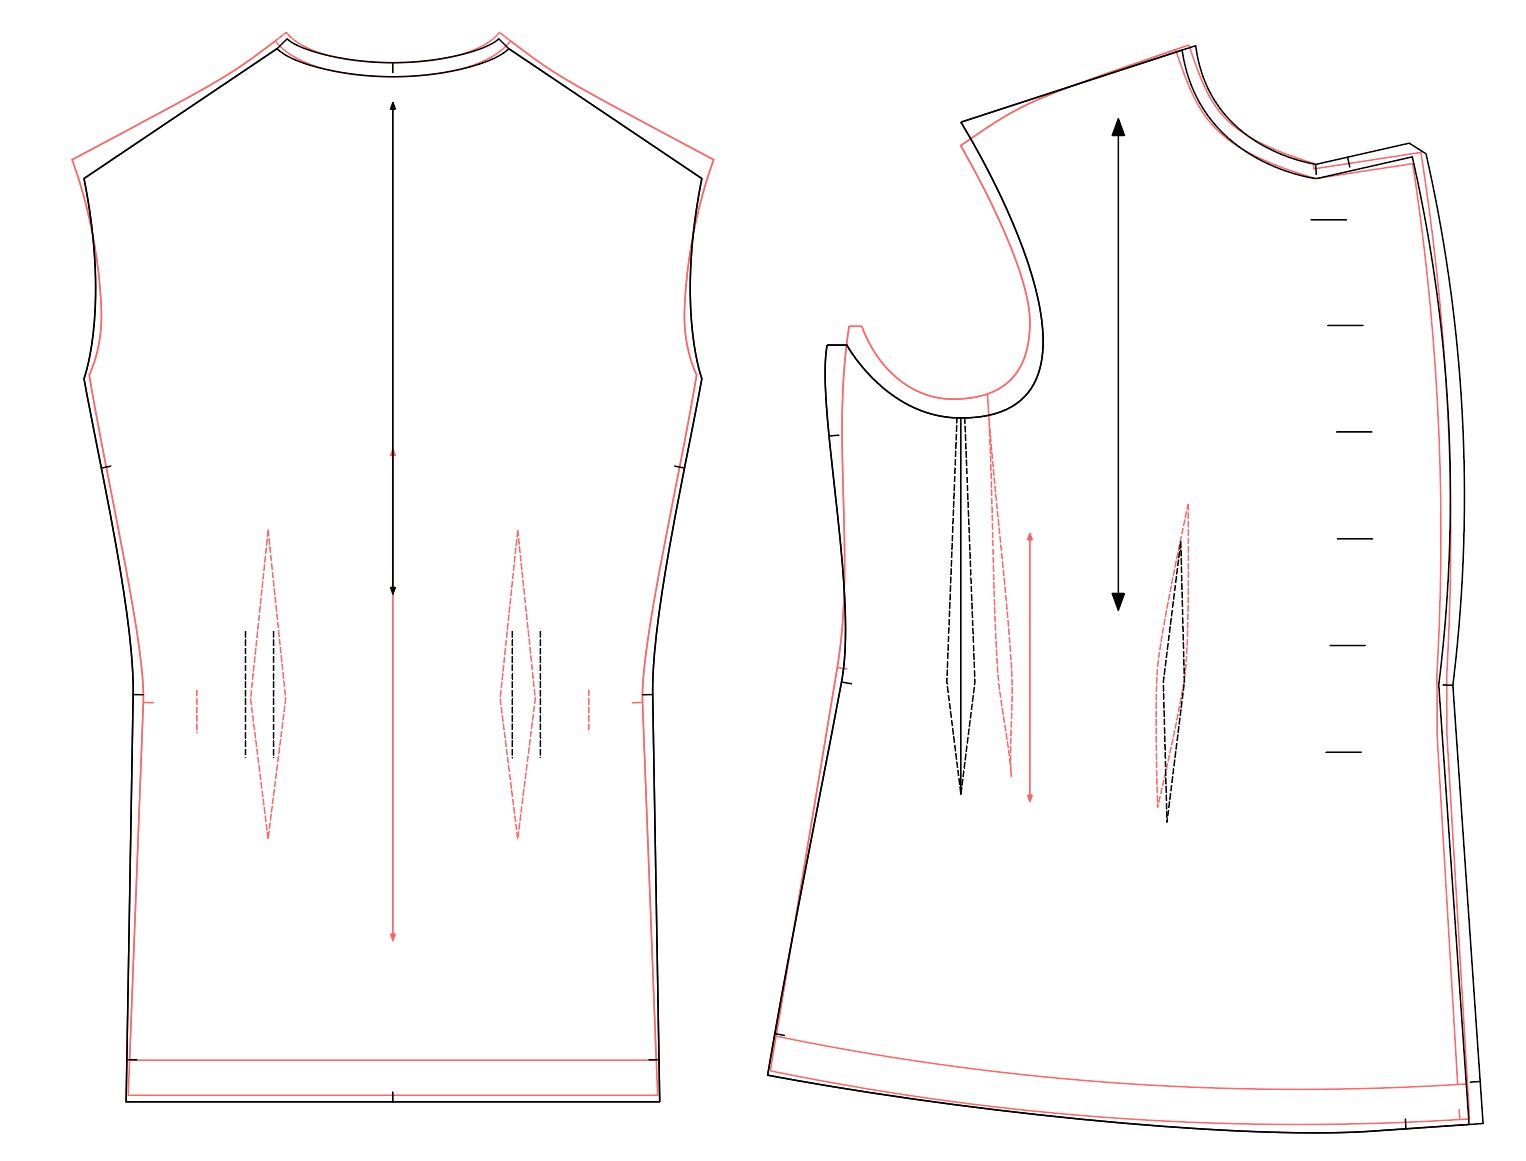
Since I smartened up a bit I realized I don’t need separate front pieces, I can just insert all the information I need on one of them.
The new pattern has a bit wider chest, and the side seam is slightly more curved. The difference seems to come from different ease amount on the chest. The curviness of the chest comes from the fact that the German pattern says wearer waist is 90 cm in this size, where as in the size table 88 cm. Calculated added ease is similar in both.
Final waist length (with darts, intakes, seam allowance taken out) is about 92,6 cm in the old one. New one has 95,7 cm.
So 4,6 cm ease in the old one, 7,7 cm in the new one compared to the user waist.
In the chest, 100 cm is the users chest in both, in the old draft you get 110,4 cm on the chest (10 cm ease), in the new one 114,9 cm. So a 15 cm ease.
What’s everyones seasoned idea about these eases and the chest curvature? I feel it curves a bit too much and there’s maybe a little bit too much ease in here, at least in the chest.
Also I am not 100% sure I managed to make the chest width calculation correctly in the new draft. Nor the waist.
This is what it says in German:
Vorderteil. Der Abstand zwischen Rücken und Vorderteil beträgt von R1 bis S 10 cm. Lege bei S die Rückenbreite vor und miß bis M die Armlochmitte, bis V den Armvortritt und bis B 1/2 Oberweite + 8 cm ab.
S is the front side seam point, R1 is the back pieve side piece point at chest height.
Armlochmitte M (Armhole center) = 1/3 chest circumference - 3 cm [100 cm / 3 - 3 cm = 30,4 cm] Armvortritt V (Arm… advance?) = Armlochmitte + 1/4 back width [30,4 cm + 6,8 cm = 37,2 cm). B → 1/2 chest circumference + 8 cm [100 cm / 2 + 8 cm = 58 cm]. Should this maybe be (100 cm + 8 cm) / 2? But at the same time, seems to be correct-ish the way I’ve calculated it…
Also the waist seems too curved in the new pattern when comparing it to the original piece; mine is 8,5 cm and the original measures at 9~9,5 cm.
The German instructions say the following of the waist measurements:
Für die Verteilung der Leibweite nach vorn ist von HÜ nach B1 1/4 Unterweite + 5 cm abzumessen.
Lege nun die Rückenbreite - 4 bei HÜ vor (Zahl 1 des Maßbandes muß links von HÜ liegen) und miß bis S1 1/4 Unterweite + 3 cm ab.
HÜ is the point straight down from Armlochmitte M; from there to the front waist is 1/4 waist circumference + 5 cm [88 cm / 4 + 5 cm = 27 cm].
S1 is the waist side seam point; calculated at 1/4 waist circumference +3 cm [88 cm / 4 + 3 = 25 cm].
Right now I’ve calculated it as (((@WaistCircumference)/4)+3)-(@BackWidth-4), angled 180 degrees. This might not be correct? I am not sure I understood correctly how the instructions mean the measurement to be taken. If I add +4 instead of +3, I get the same 9,5 cm as in the original for the distance between HÜ and S1.
I think all this is the result off me not having any formal training and I am missing something here ![]()
Both the original domestic drafting sample and the German drafting sample show the chest being far more STRAIGHT and not as curved as mine is.
1 Like
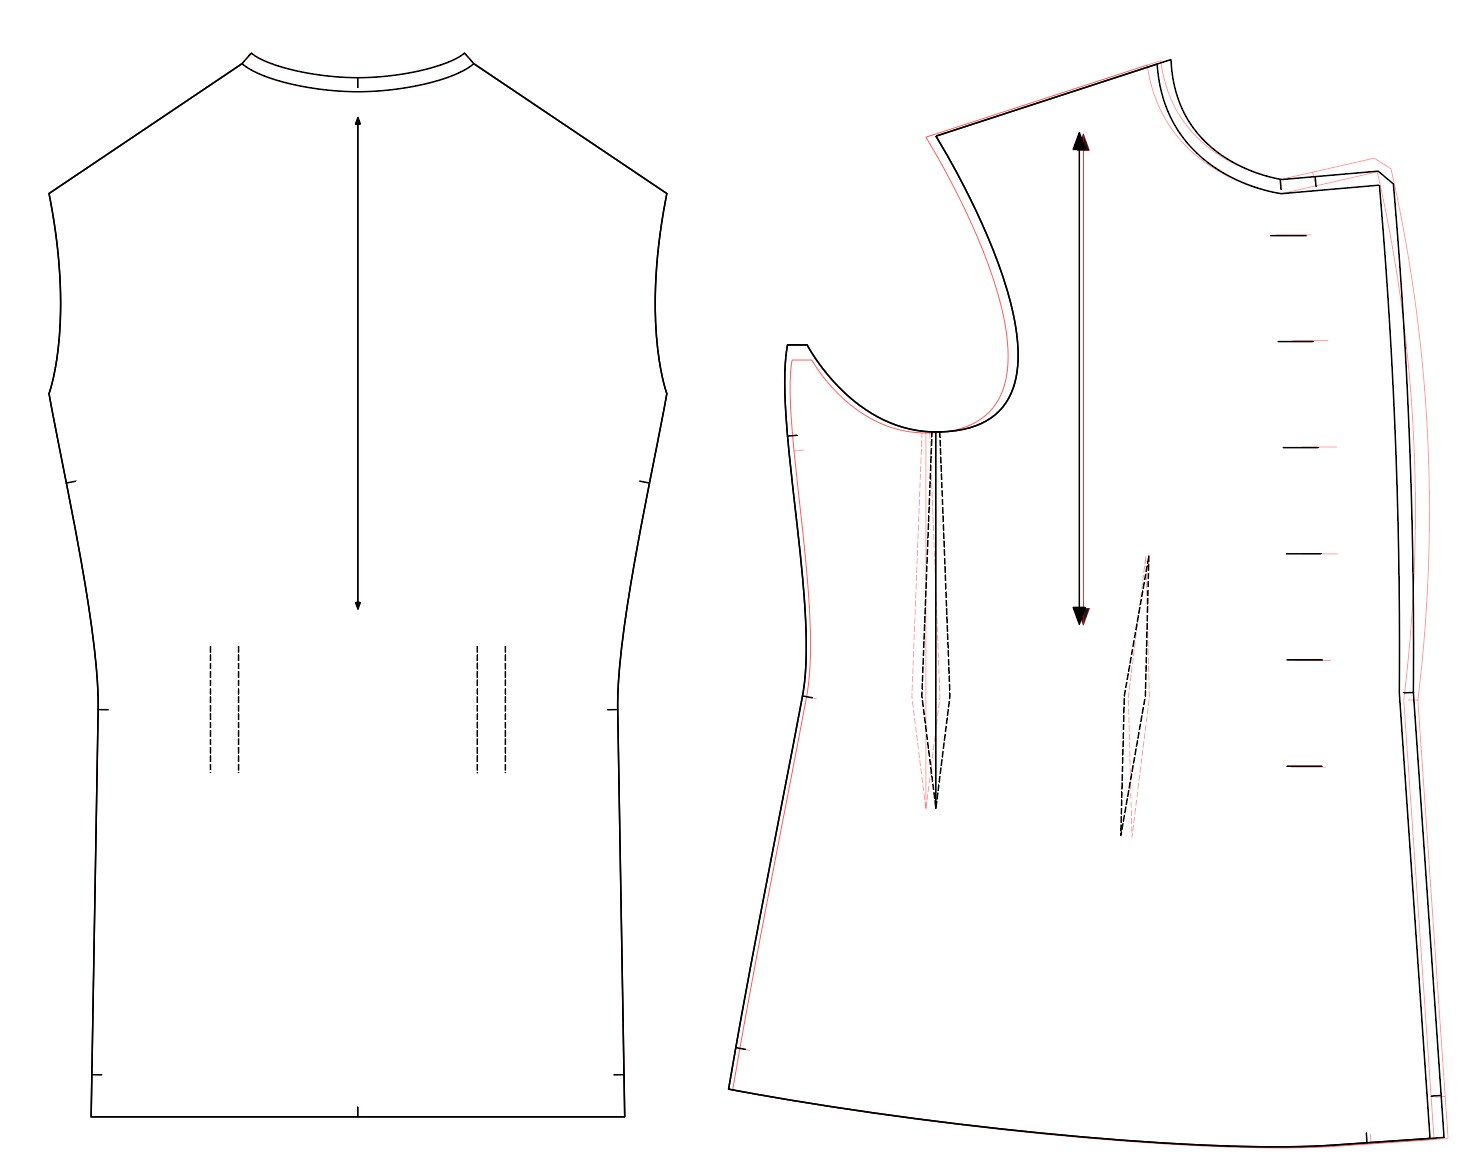
After some measuring tape mayhem, I went ahead and just shifted everything back by 1 cm from the armhole center; the chest is now much straighter. As a result, waist and chest measurements seem to agree with the original now. Also raised the side seam of the front piece by 1 cm, as measuring again (and again, and again…) seems to me that this is the true measurement here. Also makes armhole curve lengths match with the original sample much better.
Now lets hope that this doesn’t break any of the other sizes…
3 Likes
I was going to say that you should go with the sample’s measurements, rather than the books measurements because this jacket could have been made for a specific person (bespoke).
Once you have the pattern according to the specific person, then you can upload your multisize measurements and you’ll have the ability to change sizes to grade the pattern to fit a range of sizes.
1 Like
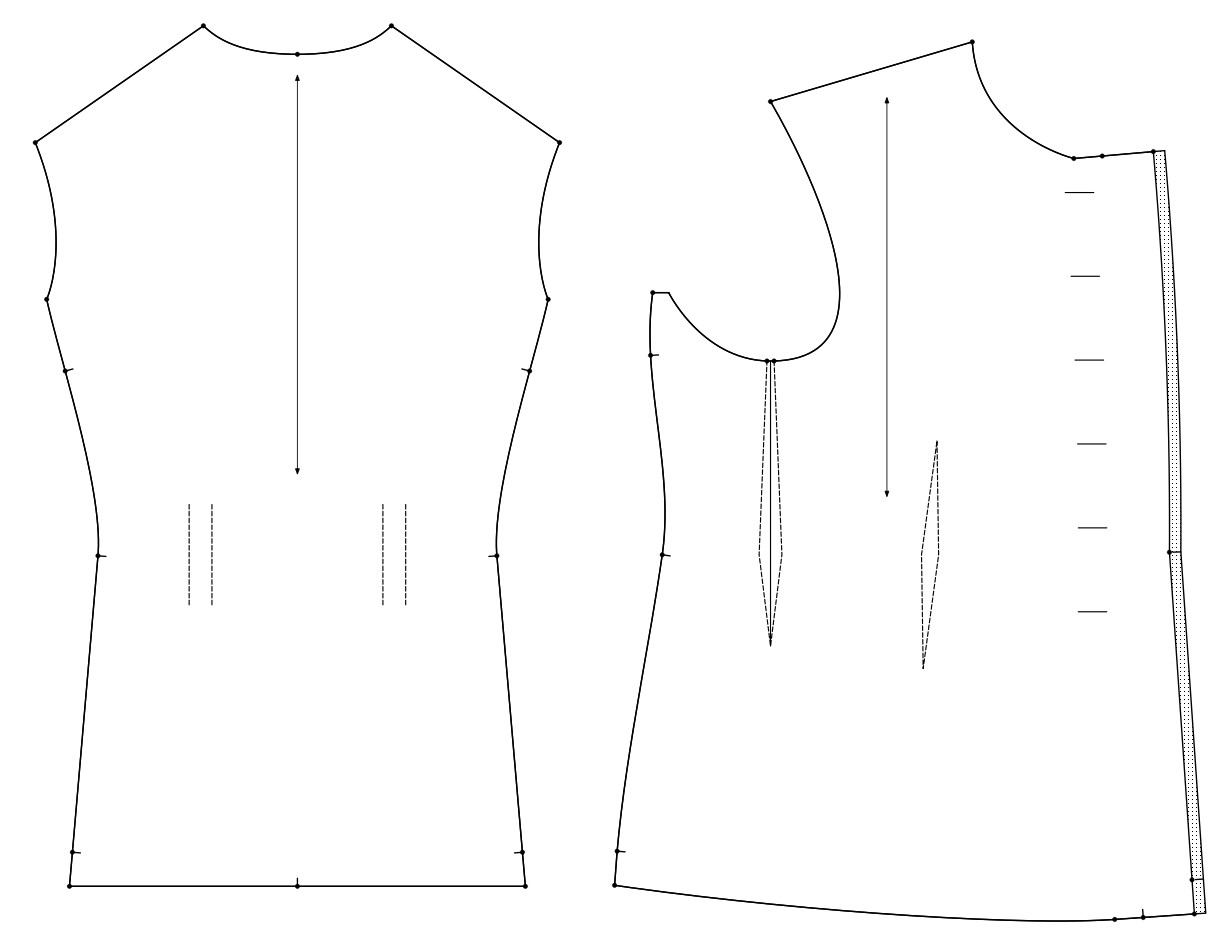
Here’s a draft that is 1:1 with the two samples I’ve got. Some deviation is apparent from stretching, and on of them the twill tape reinforcing the front was ~1,5 cm SHORTER than I suppose it was supposed to be, so it had pulled the front all crooked for 80 years. Took it out, went to town with ironing and it sit’s pretty nicely now.
Both jackets are factory made, mass production sizes.
The trouble is, that I have the measurements from the size table and then the German drafting instruction and their size table. I’ve plucked the sizes from the domestic size table and thrown them in this German draft instruction. With a bit of fiddling it seems to fit the original jackets much better than the domestic drafting instructions. Or I suppose, I understand the German system much better, as it is close to the S&M system. The measurements and proportions in this seem much more logical to me.
I suppose I could make my own proportional variation of this, once I get smart enough with the system.
—
I have sizes from 38 to 44 (with A and B lengths), which use different proportions for chest and waist - this doesn’t work with either of these patterns, as the shapes are tied to the original proportions. From 46 to 56 I have lengths A, B and C. For these this works absolutely wonderfully.
46 to 56 there’s also a “special” size called D, which is just size B but larger waist. This pattern draft doesn’t work for those either, because it goes to corpulent territory and messes up the chest line.
From 58 to 62 it’s the same issue as with D sizes - these are corpulent figures according to the size table, so doesn’t work.
I did notice however that Seamly does understand conditional measurements, so I think I can possibly maybe device a system that handles the corpulent figures measurements, if I ever need to. For now, fitting the standard 46 to 56 with 3 different lengths is enough.
Now it’s turn for the sleeves, using the German method ![]()
1 Like
Well, the German sleeve is wholly different. It’s too much of a suit sleeve, and uses back length, elbow length and sleeve length (measured from somewhere, maybe neck? Since it’s 81 cm in size 48).
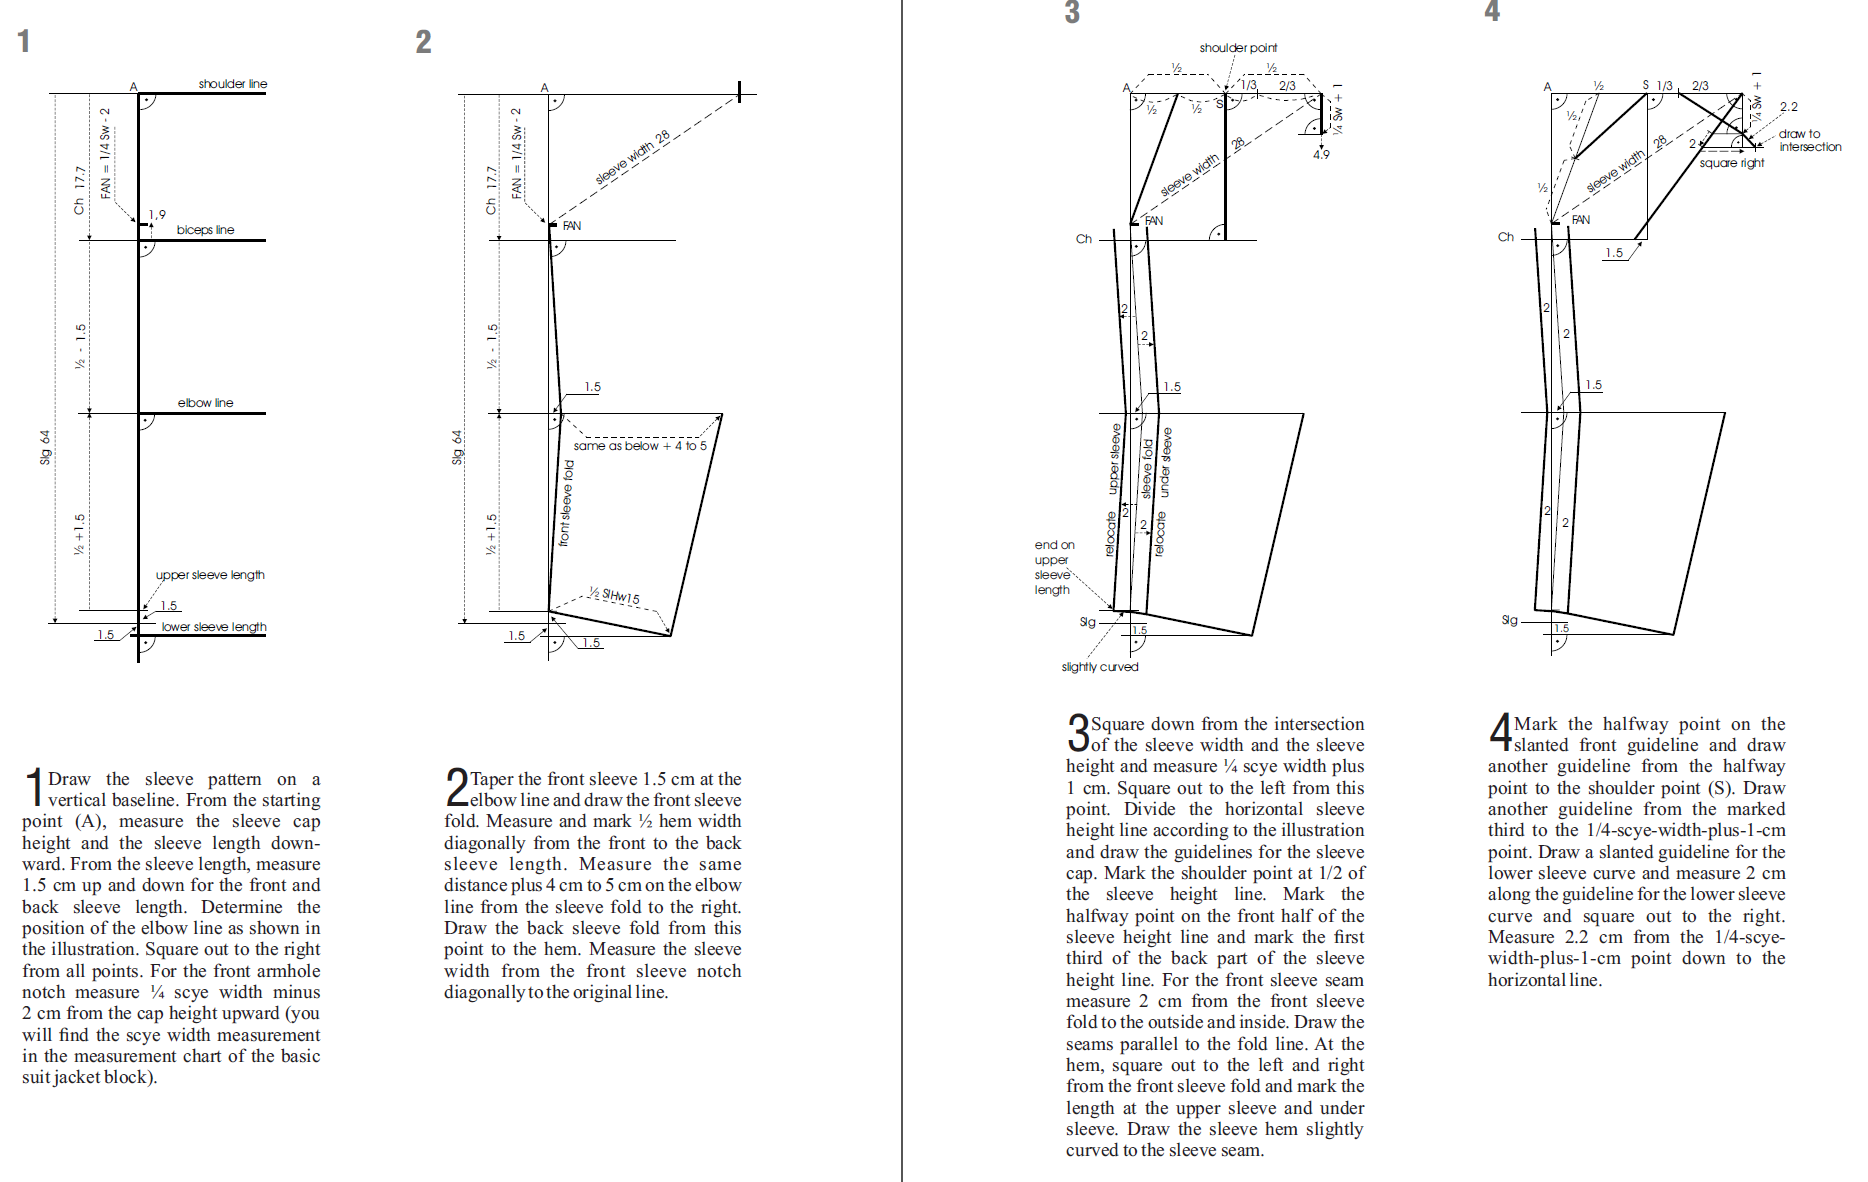
So I fell back to the domestic sleeve drafting instructions, which use the armhole circumference and proportions of it.
I drafted a test version following the instructions to a letter and and plotted it out on the plotter. Then I threw all the four sleeves on top of it to see how closely it matches. And oh boy, we’re in territory I do not understand!
So here’s a rough drawing of the sleeve shape - the red one is just an aproximation I drew based on what the physical sleeves are. The drawing on the background is “proportional sample” scaled to the length of the sleeve in the original samples.
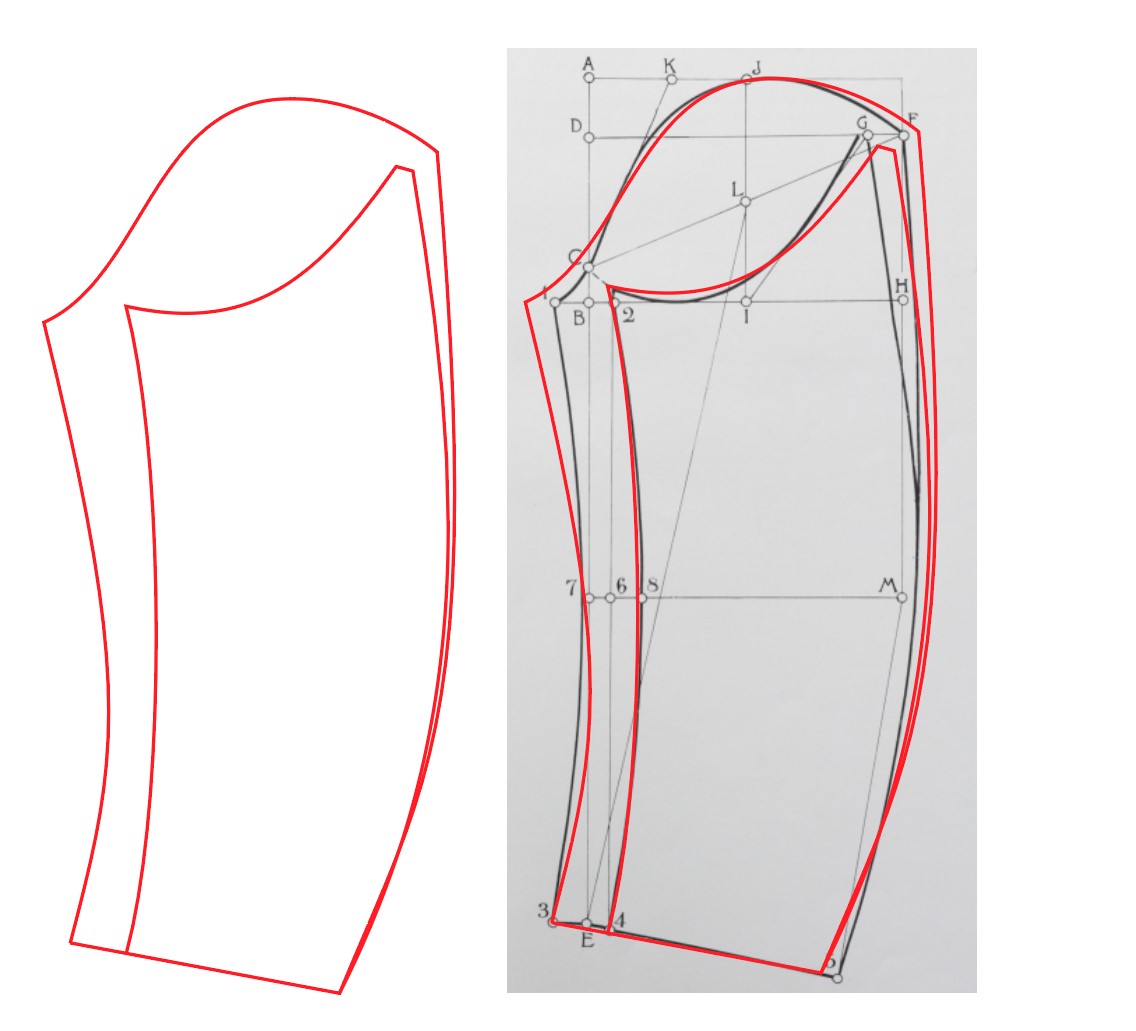
There’s something going on here that I don’t really understand. I’ve only done off-the-instruction sleeves previously, and I can’t find anything resembling this in my books or google searches. All sleeves I can find are pretty basic. This seems to be slightly narrower at the wrist and wider (and thus sleeve cap shorter) on the top.
As far as I understand, this is sort of a sports sleeve style, allowing for better movement of the arm? I also fiddled a bit with the pieces, and I think I am supposed to turn the bottom of the sleeve a bit more, as if there was an expansion there that I need to take out?
Here’s a drawing of the sleeve shape if I pinch the upper sleeve slightly. I’ve marked the pinch spot roughly with a dashed line. I’ve also aligned the front of the sleeve with the front of the sleeve on the draft, so tha the wrist length matches with the draft - the front curve matches the draft, when the lower portion is pinched/turned as such.
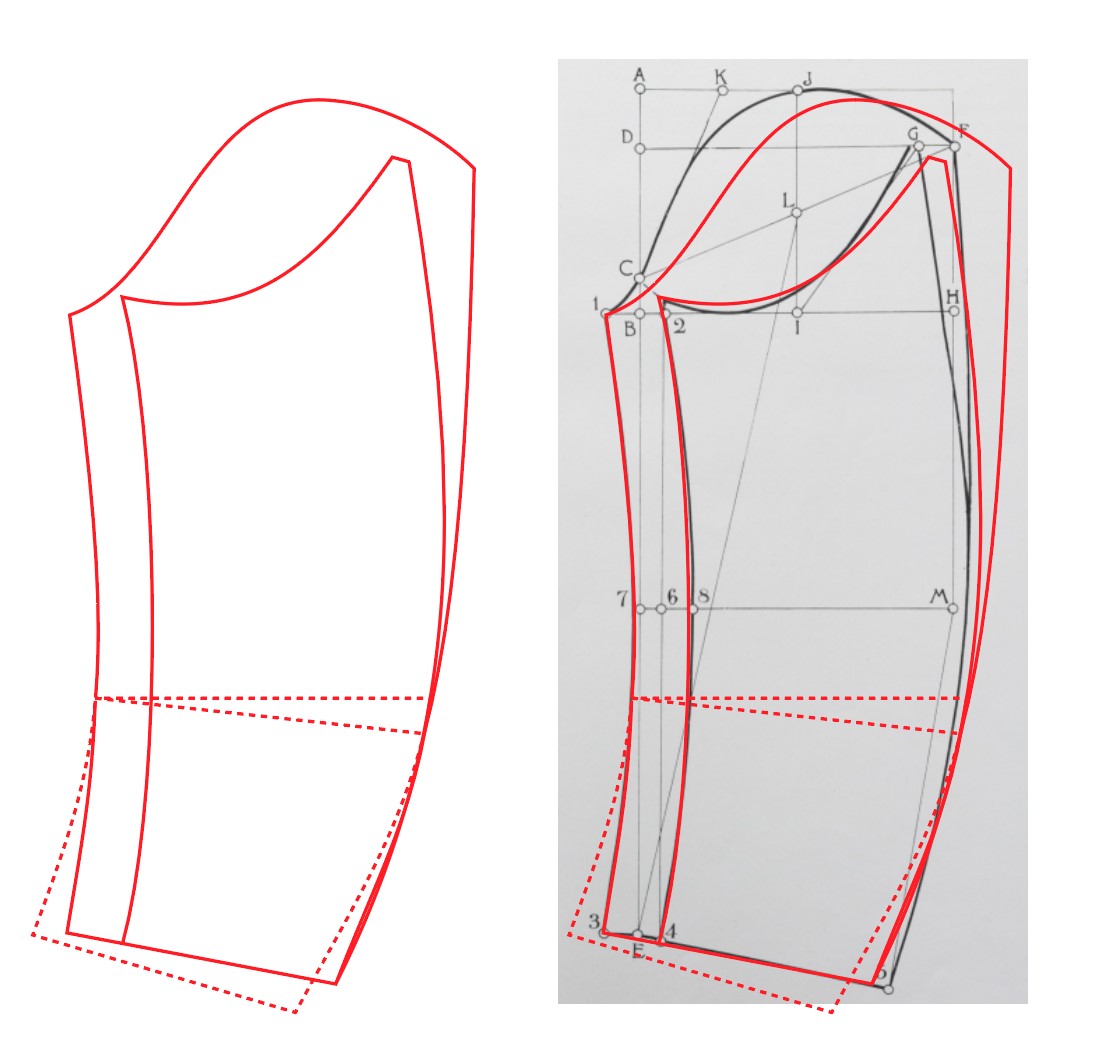
Now my question really is, I suppose… how to achieve this? I am slightly afraid of altering the proportional points.
Based on the comparison of the printed draft and the sample sleeve, the cap height is lower by about 1,5 cm, the rear seam line is somewhere between 1,5 cm and 2 cm lower, and the top sleeve is about 3 cm wider. The undersleeve seems to be drafted pretty much “as is”, apart from being wider at the top.
Just as a safeguard, here’s the original draft instructions for the sleeve:
Jacket Sleeve.
The basis is the circumference of the armhole.
Measurements:
Armhole circumference 47 cm Length 46 cm
Drafting instructions:
A - B = 1/3 of the armhole circumference B - C = 2.5 cm B - D = 1/4 of the armhole circumference C - F = 1/2 of the armhole circumference - 1 cm F - J = 1/2 (D - F) A - K = 1/2 (A - J) B - E = length measurement Line M = 1/2 (C - E) L is on the cutting line C-F-J L - E - 5 = square angle E - 5 = sleeve opening width B - 1 = 2.5 cm B - 2 = 2 cm E - 3 = 2.5 cm 7 - 6 = 2.5 cm 6 - 8 = 2 cm E - 4 = 2 cm F - G = 2.5 cm; if the under-sleeve measurement has been taken separately, then measure 2 - G according to that 6 - M = B - H
All lines are drawn according to the pattern.
The measurements on my sleeve are slightly different; armhole circumference is about 53 cm (53,2 cm) and the length is measured from the top of the sleeve cap to E as 65 cm (including seam allowance).
Alas, I reckon I have to start testing what might work.
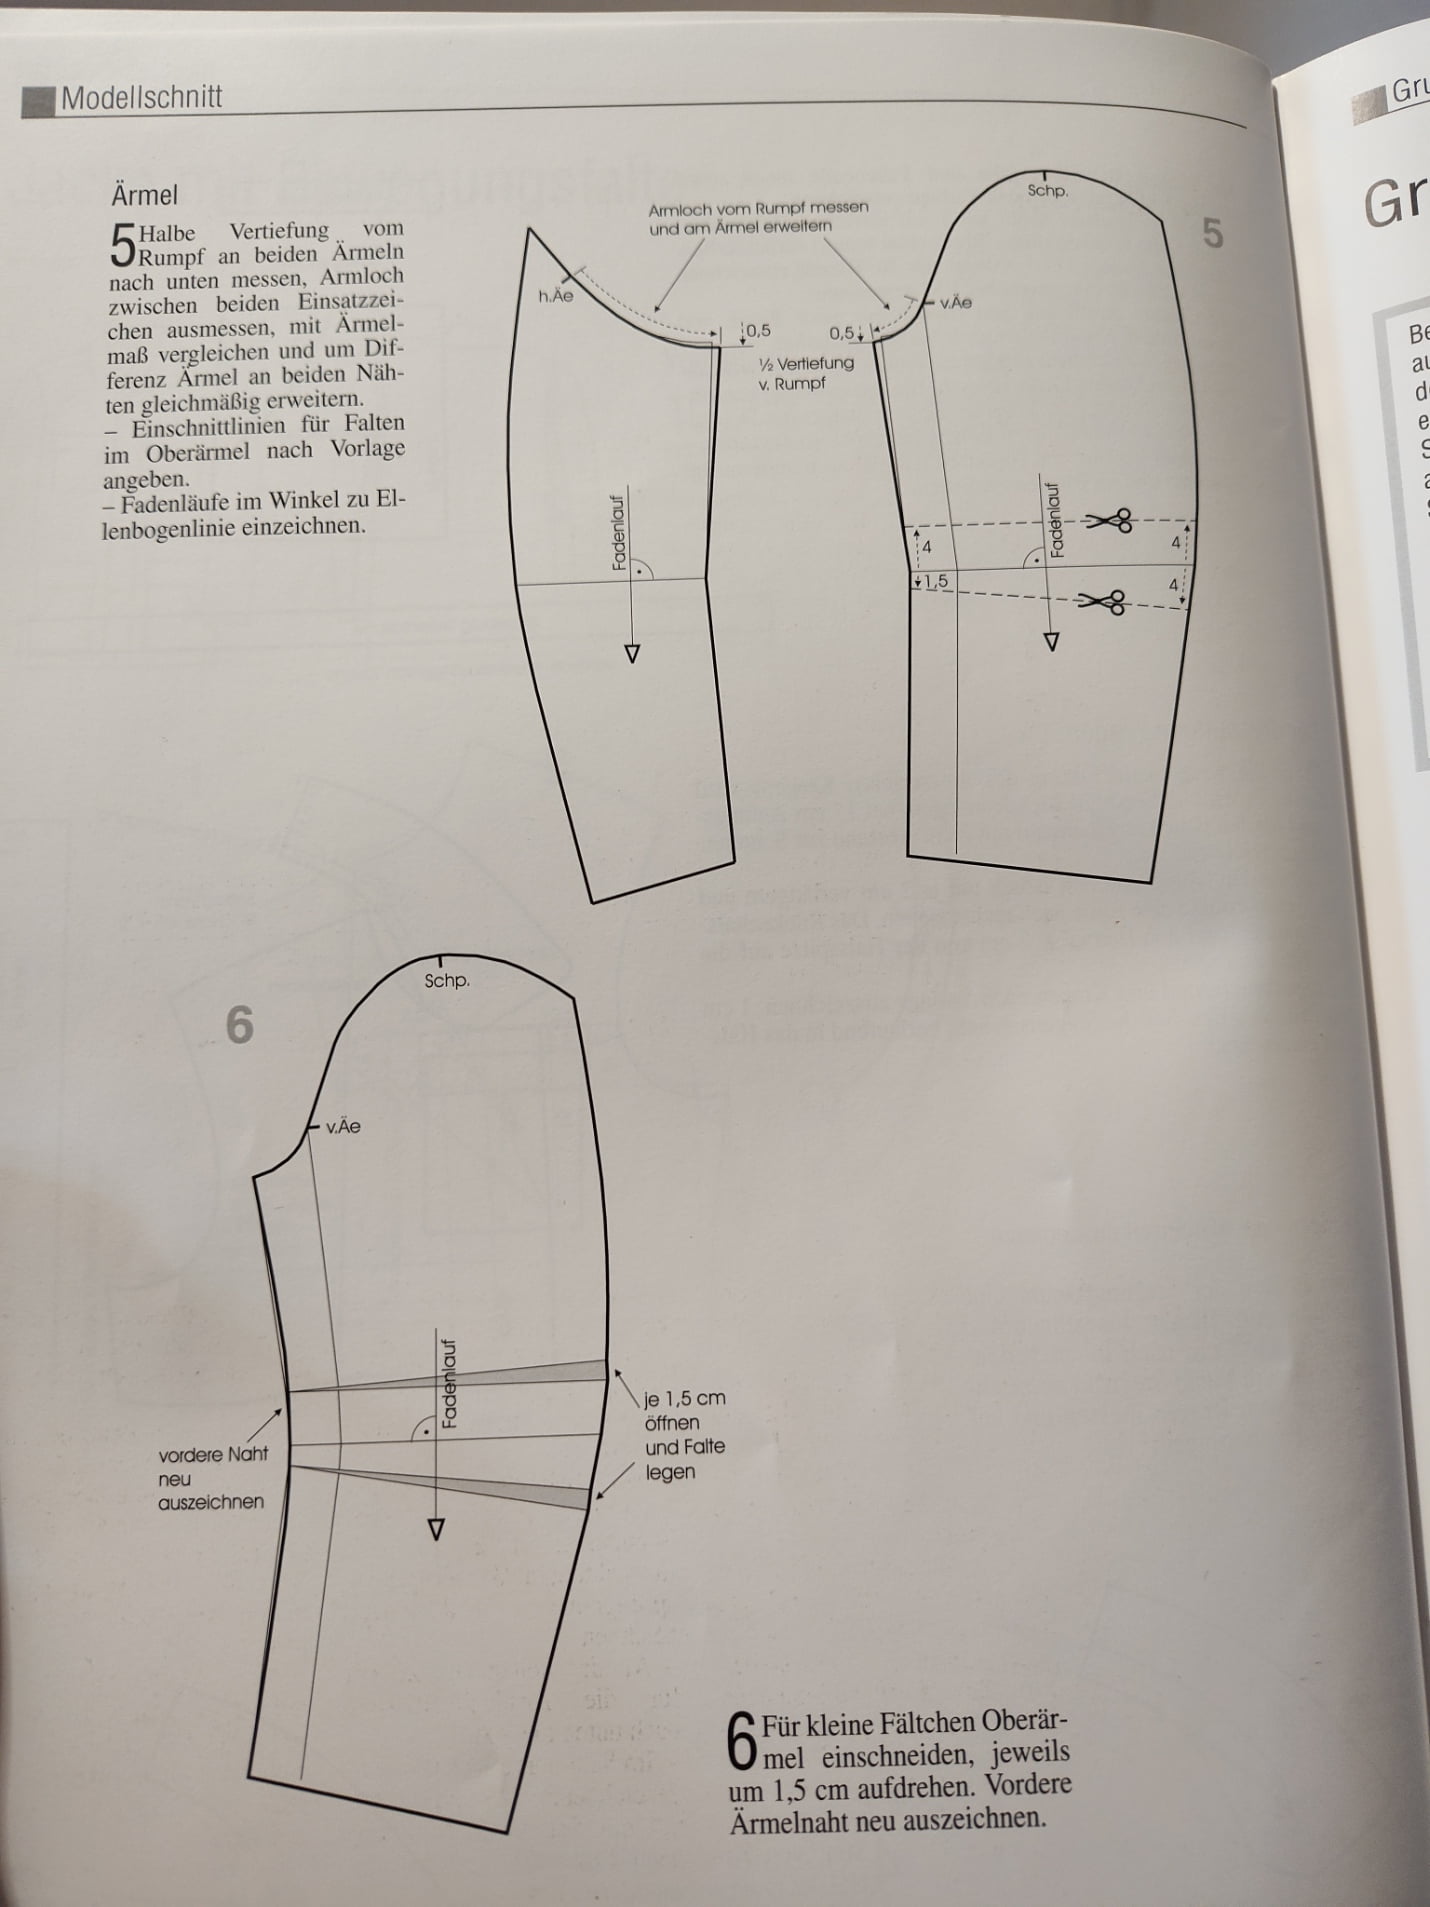
2 Likes
Are you asking about opening the sleeve at elbow? Yes, that is a completely valid thing:
Sorry if I am not more helpful, but it’s a little bit hard for me to follow your thoughts. I am not always sure what you are asking for. But a lot of the things you are asking about, yes they are true:
- different systems have different ways of measuring
- measurement were changing through time and geographical location
- there are at least two main ways how to draw a man’s sleeve, one-piece and two piece, both can than be combined or divided
- sleeve shape can be than further manipulated
- moving sleeve opening front and back
- different formulas for smaller / bigger / corpulent sizes
I think a lot of your question would be answered if you go few times reading and understanding the Mueler and Sohn book HAKA Schnitt-konstruktionen Jacken. Going through the book you will see a lot of small differences between patterns. Sadly there very little explanation about them, but by comparing the patterns you can find out what is going on. They use different body measurement for a paletot vs jacket etc.
- Sleeve 62 cm is taken from shoulder point and 82 from the collar.
- You have different ways how to measure sleeve opening width and height.
3 Likes
More about “is this what’s perhaps going on here?” kind of a question. ![]()
It does seem that the original has had this kind of a treatment done to it, perhaps a bit lower though than in that S&M sample - It seems to me to be about 1/3 way up the full length of the sleeve from the cuff, maybe about a 2 cm dart..
But the undersleeve doesn’t seem to have that? Would that be something that could be expected?
Don’t worry, I am well aware my questions and “questions” can be very rambling and lack a coherent thought.
Part of the problem is that I am doing this and other stuff at the same time at work, and then I go home and spend the evening thinking about this and drafting in general. This means that my head is a jumbled mess of thoughts, questions and answers. And I can’t keep up with what I’ve asked and what I was going to ask ![]()
I also write these comments over a period of time as something comes up and cuts my thought process…
Not a bad idea. I’ve been putting it off, because it’s only available as a physical book and my workstation is already too filled with books. Might be time to actually buy it and read it.
—
I’ll try to be better at asking the question here:
The basic sleeve from the domestic guide, that I tried to copy & paste the instructions to (but the spacing went all over the place), is a great match and a sleeve system I understand to a degree - I’ve used it before with great success, just with alterations done on paper based on fitting.
Now I want to draft a parametric pattern, that is close to what the original sample I have is. I have two jackets of the same size, that I’ve disassembled and compared their sleeves (1:1 match with each other) on top of a paper sheet, where I’ve printed the domestic, period sleeve pattern to.
So this sleeve drafting drawing:
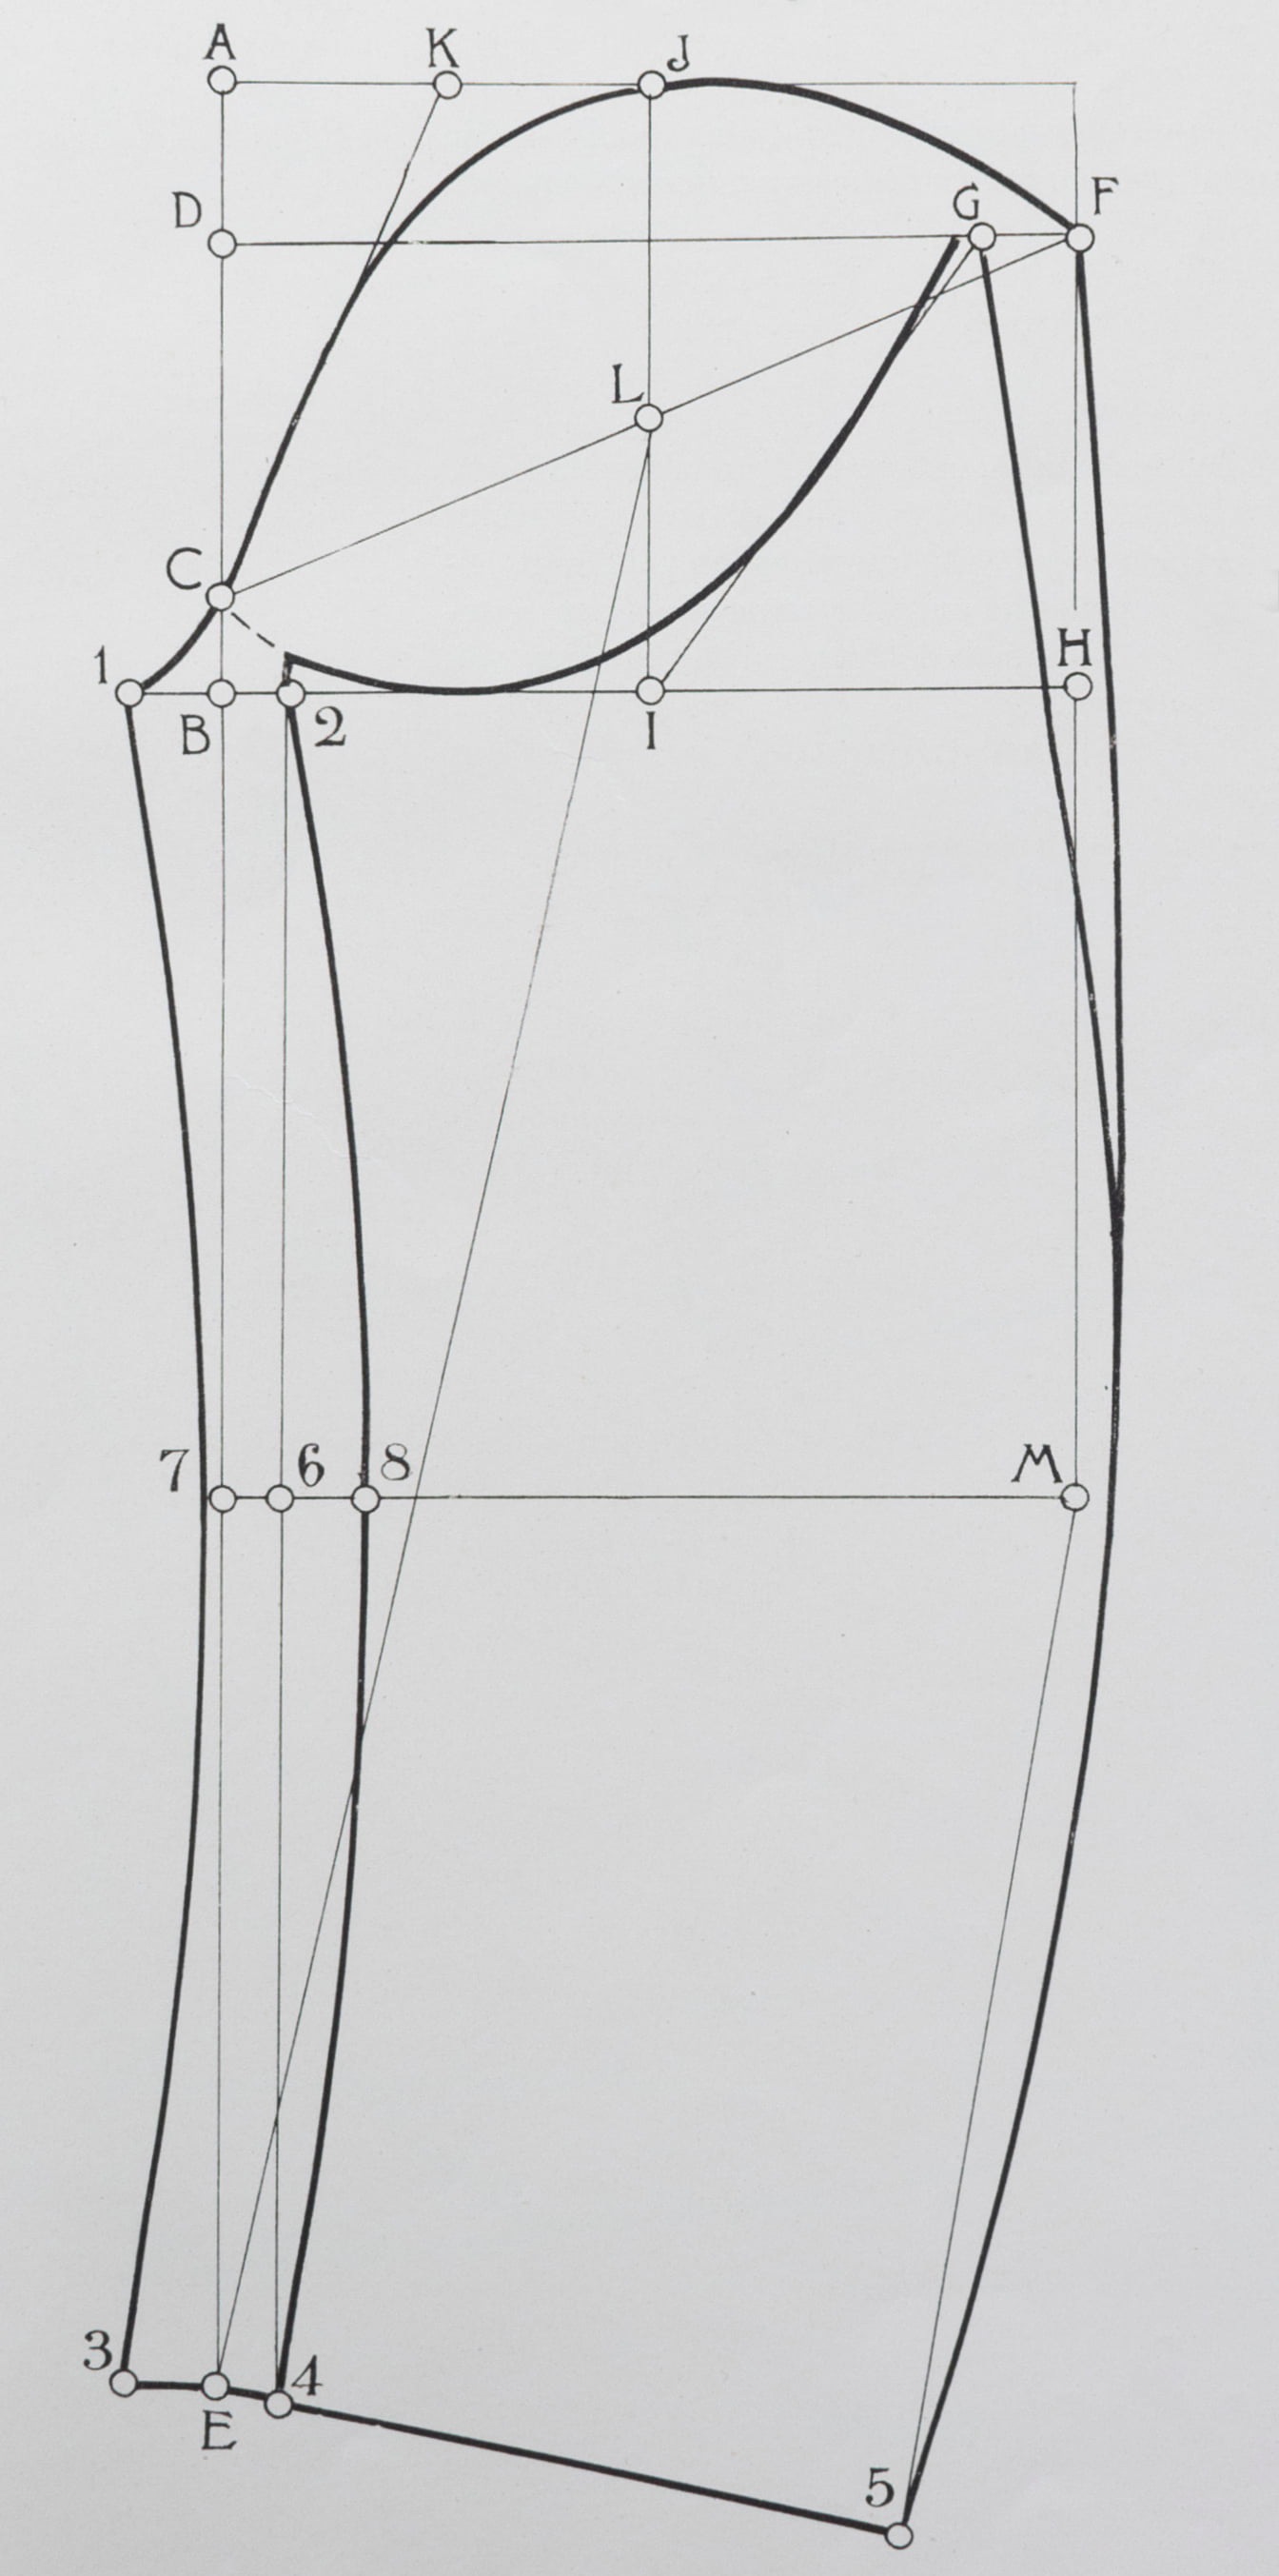
Comparing this drawing I have on my table and the physical sleeves, I noticed that there are these following differences:
a) The dart / added angle about 1/3 way up the sleeve, about 2 cm in width.
b) The back sleeve point (the F point) is about 3 cm more to the right,
c) The sleeve cap is about 1,5 cm lower (the A - B length of the same drawing
d) The F point is also lower as a result, by about 1,5 cm.
e) The G-point is maybe 2 cm more to the right and also 1,5 cm lower.
I’ll try and copy and paste the above instructions for this sleeve again, so you know what I am working with:
Jacket Sleeve.
The basis is the circumference of the armhole.
Measurements:
Armhole circumference 47 cm Length 46 cm
Drafting instructions:
A - B = 1/3 of the armhole circumference
B - C = 2.5 cm
B - D = 1/4 of the armhole circumference
C - F = 1/2 of the armhole circumference - 1 cm
F - J = 1/2 (D - F)
A - K = 1/2 (A - J)
B - E = length measurement
Line M = 1/2 (C - E)
L is on the cutting line C-F-J
L - E - 5 = square angle
E - 5 = sleeve opening width
B - 1 = 2.5 cm
B - 2 = 2 cm
E - 3 = 2.5 cm
7 - 6 = 2.5 cm
6 - 8 = 2 cm
E - 4 = 2 cm
F - G = 2.5 cm; if the under-sleeve measurement has been taken separately, then measure 2 - G according to that
6 - M = B - H
All lines are drawn according to the pattern.
So this is the instructions I am trying to make parametric, that would work with all the regular sizes I need to make and that would match the original physical sleeves I have.
So I am now trying to figure out a way to do that, while keeping these sleeves proportionally working between all the sizes. I could just use the original instructions and then just ± numbers to that to get it to match the sample sleeves.
I am worried however that just doing simply that makes the sleeve correct only in the size I am making, not in all the sizes.
So for example, the instructions call for C - F to be 1/2 armhole length minus 1 centimeter.
My armhole is 53 cm, so the calculation would be 53 / 2 - 1 cm. Result is 25,5 cm.
However, in the physical sleeve this distance is 30 cm. Would the correct parameter then be "“C - F = 1/2 armhole length plus 4 centimeters”? I don’t have other sleeves in different size unfortunately to measure and compare.
So I am not sure if this is the correct logic to use, or if I have to use some other method of changing the proportions.
2 Likes
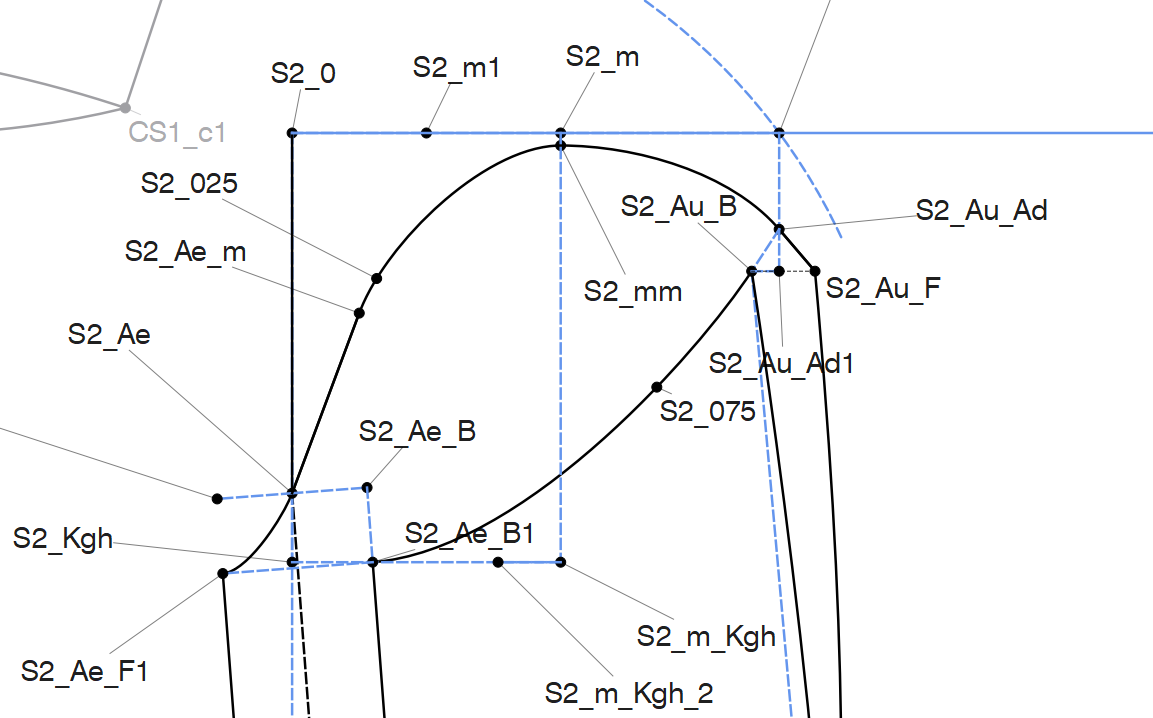
This is from one of the M&S books, things are a little bit more parametric aka derived from few measurements.
this is still a sleeve that has to be adapted to the armhole size: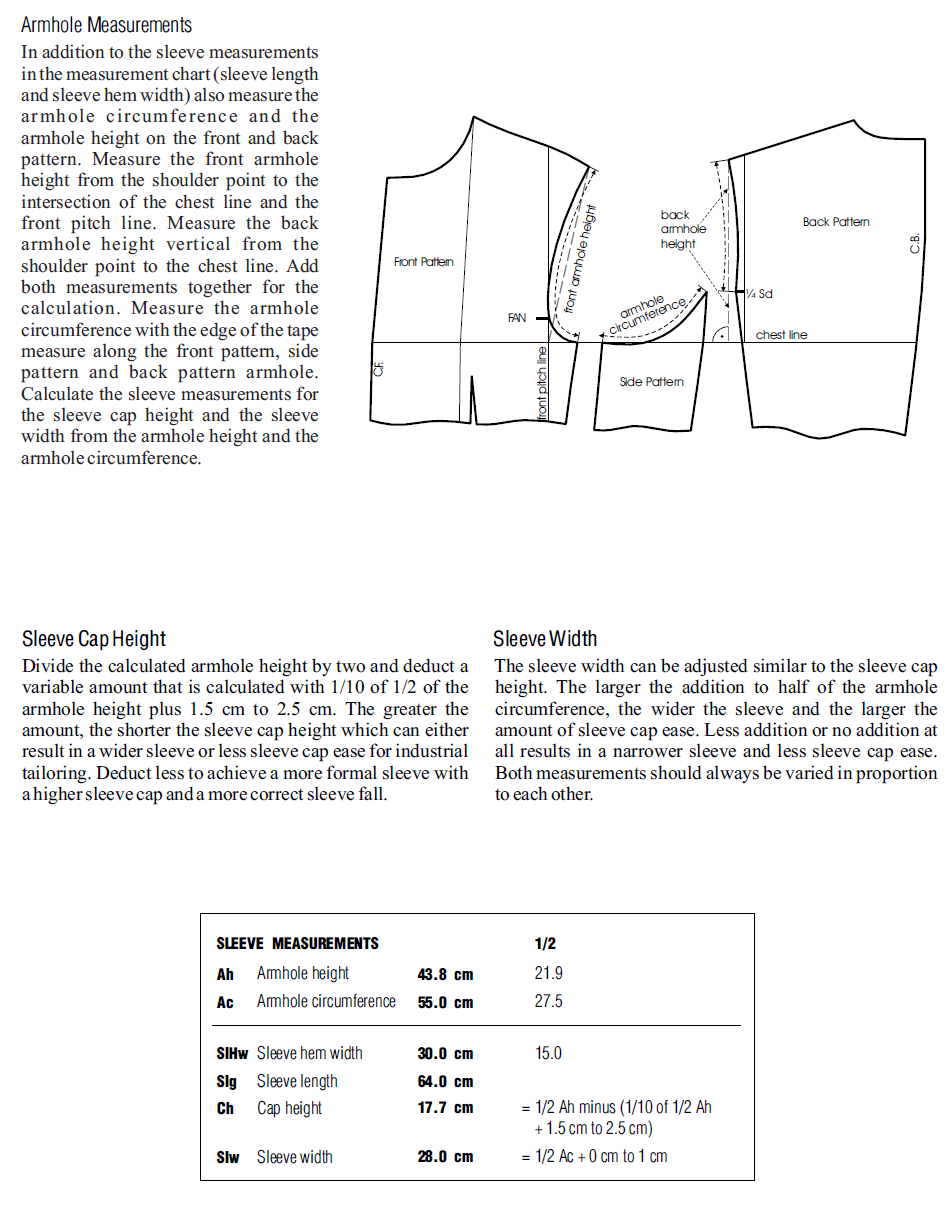
so it’s not the “most parametric one” but there are still some connections. And yes, you can push the sleeve cap down, but you need to be consistent with the sleeve cap ease.
Here I can manipulate sleeve cap height with a variable that defines distance between S2_m and S2_mm and the “width of the sleeve” - that’s the blue dotted circle defining the back sleeve point at the same time.
3 Likes