Ah, yes, this is the sleeve in the Fundamentals - Menswear.
I’ll see what I can come up with. It looks like it’s getting late and I may have to leave work soon, and next week I really have to finally finish some other things before I can get back to this… so my results may have to wait a week or a two to see, if I can get anything similar to work.
I might give the M&S sleeve a shot as well, I’ve drafted them before with some success as well.
Ended up having to sew nearly 60 hats over the past month - a big production coming. Also other assorted small business things.
But I’ve been back at this since Tuesday. The little break has done good, as I’ve been dreaming and thinking about the sleeves quite a bit over that time and I reckon I have something that might actually work right now.
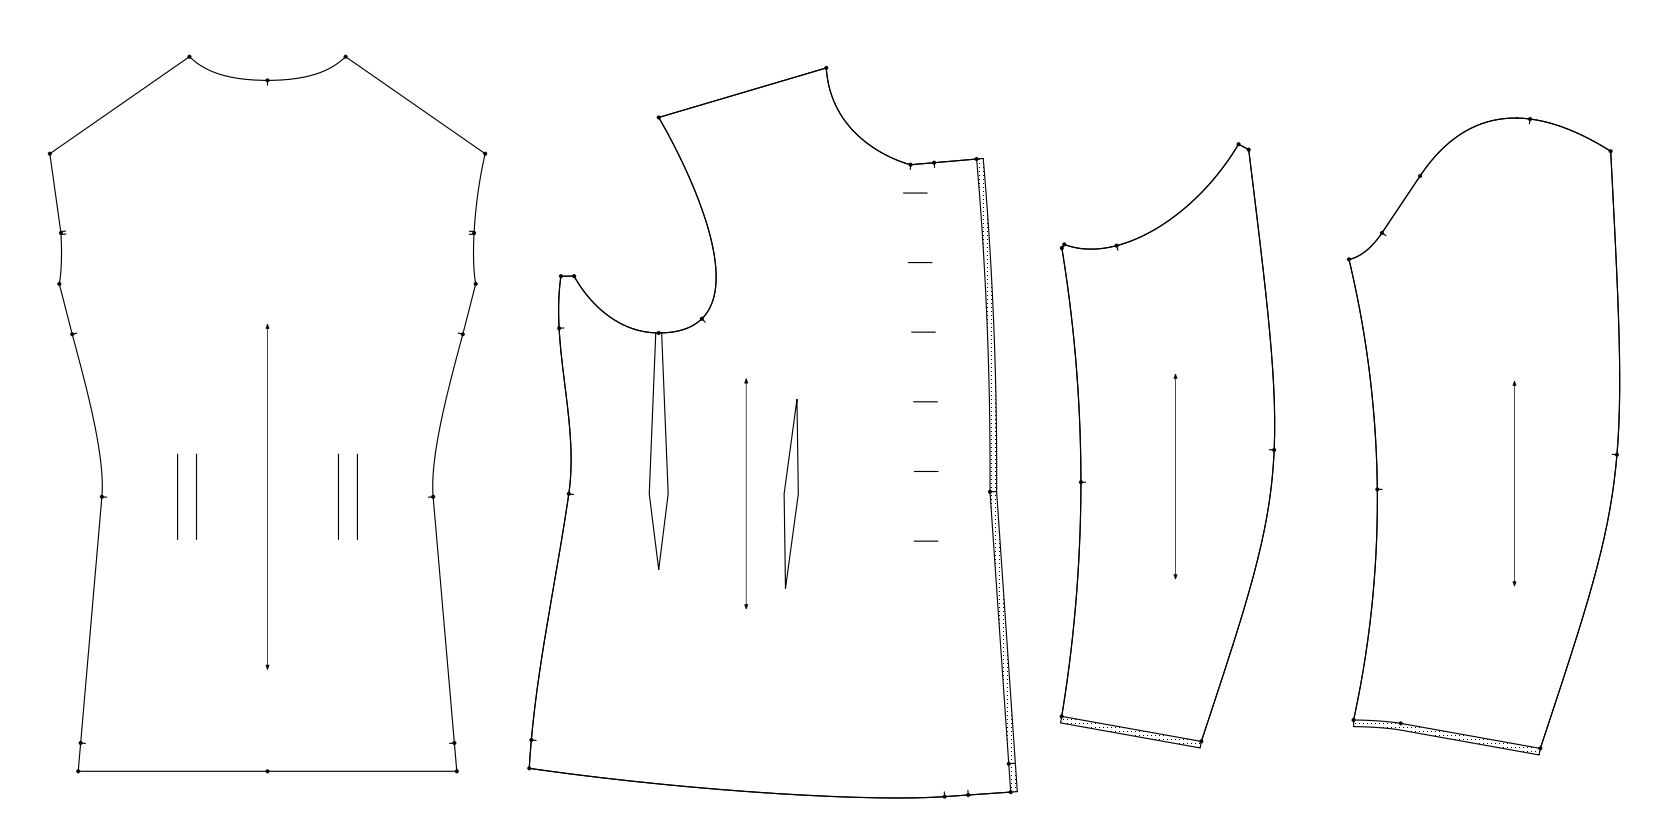
This is where I am currently with the jacket and the sleeves. It’s finally time to print out a test pattern and see if all the parts fit together as they are supposed to. I’ll be making this in the size 50 for now, as I have those 2 original jackets of the same pattern and size. I can then easily compare them to each other.
So far the pieces from the ones I’ve taken apart match almost 1:1 with these drafts, excluding some possible stretching etc. from all the use they’ve seen.
Once I’ve printed these out, made the toile for size 50… and if it looks good, I’ll make one in my own size (or my coworkers size) to see if it fits an actual person with these parametric rules. I hope so, so I can finally move onto the collar and adding details to the jacket!
There’s few things I’m still contemplating here. Right now I’ve simply added potential changes to the draft as seam allowance - In the front piece I’ll probably just add that extra ~1 cm to the pattern itself.
The sleeves with the added 1 cm are a bit of a question mark. The drafting instructions say that this is the FINAL length of the sleeve, but in the original sleeves I had to open up the bottom fold to have them match in length. This may be the intentional, or the sleeves were just made shorter for some reason. But that’ll clear up once we get to make the toile in correct size for us at workshop and we can see how it sits.
Some doubts about the shoulder seam notch on the upper sleeve as well… the ease amounts and instructions suggest it’s somewhere around there, but it feels awfully far back when just looking at it right now. Sadly none of the originals have notches cut for the shoulder seam point, so by now after all the ironing and steaming I’ve completely lost where they originally were attached to! But that’ll most likely sort itself out once I’ve got the toile done.
Yes, when one gets busy with something else, things tend to settle in the brain and new ideas come and methods sort of settle in. I can spend quite some time mulling over something and trying different things before I find a solution.
Anyway, I’m looking forward to seeing how the 2 test patterns compare to the Seamly pattern.
Since we were a rental shop or we were making costumes for other theatre productions… we always added extra seam allowance to allow for letting the garment out. Instead of the normal 1/2" seams, we usualy made the center back, side seams, and inner sleeve seams 1". I would l aso add 1" to the length of the sleeve and pant length. If we were making jackets for someone else we always let them hem the sleeves or finish off a placket.
There was one job we did for a Cruise Line show that would have a large turn over in actors, and rather than making a bunch of different sizes the designer wanted 3" seam allowces! Which presented a lot of construction issues as we could not clip seam allowances as it would defeat the purpose of having all that extra allowance.
Oh absolutely, the Jacket_Final_v6_final_ABSOLUTELYFINAL_v2_revisionv7.svg will include extra seam allowance for sure, exactly for these reasons
What I was after there in hindsight probably not clear and once again results of me just being confusing to others and forgetting to mention things.
The drafting instructions mention that the chest extends “7 cm out when finished”; my black line is the 7cm finished measurement, the added seam allowance in the chest is for the seam allowance for the placket (? … or whatever the piece of fabric on the revese side is called, with reinforcing hessian material and button reinforcing tape inside is called).
On the sleeves I added 1 cm for the fold, as the sleeve hem is turned by 1,5 cm but has no seam allowance. One of the jackets has a raw edge there, the other one has a folded sleeve hem seam. So I added some for the fold, as I try to avoid raw edges, even though the wool material is quite ok with just raw edges.
Ah… a button extension. Which I always hated cutting with multiple layers of jackets with an extension on the fold… because after cutting I’d have to go back and remove the extension from the left front pieces. And yes… I’ve made the mistake of cutting the extra off the wrong side.
A placket generally refers to a short button opening like on skirts, shirt sleeves, polo shirt front neck opening… where the fabric is slit, and a placket is the seperate pieces that are sewen on to overlap for the buttonholes & buttons.
We use to buy stock from movies that would come up for sale after the movie was done shooting… one such buy was a bunch of "redcoat’ extras from some movie. They were made of heavy Melton wool, no linings, where everything was just raw cut. Since they were used as extras in long camera shots there was no need to spend time sewing all the linings etc. We also had a lot of highly distressed costumes from “The Gangs of New York”.
Yeah, I feel the pain. Been there a few times too…. x)
I have no idea what a button extension is called in my language… it seems it might be the same word as for the placket. Explains my confusion, I suspect.
Yeah, with how thick my wool is, I might have to leave as many edges raw as I can, just to reduce the bulk in the seams. I went ahead and compared the original jackets and the one with folded seams/hems has somewhat thinner material. So that might be the reason why one is left raw. Might as well do that too.
I also sew my first toile earlier today and I must say, it went perfect. I don’t think I’ve ever made a jacket that went together that well before. All the markings lined up, everything was smooth going. Even though it’s a bit small for me, I still managed to put it on and all things considered, it fit nice and well on me.
Few things need a bit of adjusting; the shoulder seam notch on the upper sleeve is slightly too far back like I assumed. But only by perhaps 5 mm or so - not a huge issue. Other small adjustments were made to the shape as well, but it’s looking really good.
Now it’s time to make another toile in another size so I can see if my parametres work properly. If they do, then I can start adding details like the pockets and the sleeve cuff vents.
Adjustments done; made toile in 3 different sizes and this thing is a breeze to put together.
I made slight adjustments to the side seam and how the waist is shaped. Results is a slightly better and smoother fit.
Now it’s on to adding the collar, pockets, sleeve vent and first look at how the liner is done. Liner is interesting, as it seems to not have any ease or shaping to it. It’s a quarter lining, and seems to be the exact shape of the outer layer. I assumed there would be some ease added to it, but I suppose not. We’ll see once I get there!
I had to make an extra layer called “Trash” though, as I had to replace some lines and they were too troublesome to delete, so I just moved them out of sight and made new lines and new relations to them.
Unfortunately the more you build on a given tool the harder it is to delete… i.e. the more tools you have to delete to be able to delete that tool. That’s why I say don’t worry about it, and just hide the junk. Learn from it, and make the next pattern better.
Do you use the History to place objects at a location where the original object was used?
For instance, if you want a point (A101) at position 10 in the history list and 10 is the original position of the existing point (A9), then you can place the point at position 11 and then check through the other objects looking for lines that are connected to A9 & edit these to A101, check the pattern pieces for A9 & add A101, edit the pattern piece to include A101 and delete A9 from the pattern piece (I normally start here). Once you have the lines & pattern pieces cleared, then you can try to delete the point & if you can’t then you’ll need to check the formulas, etc.. Often, the formulas will be corrected when you edit the line to A101.
No! I didn’t know this was possible! I have to make use of this in the next draft, right now I can’t be bothered to start fidling with all that x)
I’ve absolutely learnt a lot about how this program works, and some “good” practices for the next project. This one is already much cleaner than some of my earlier attempts. One day, one day…
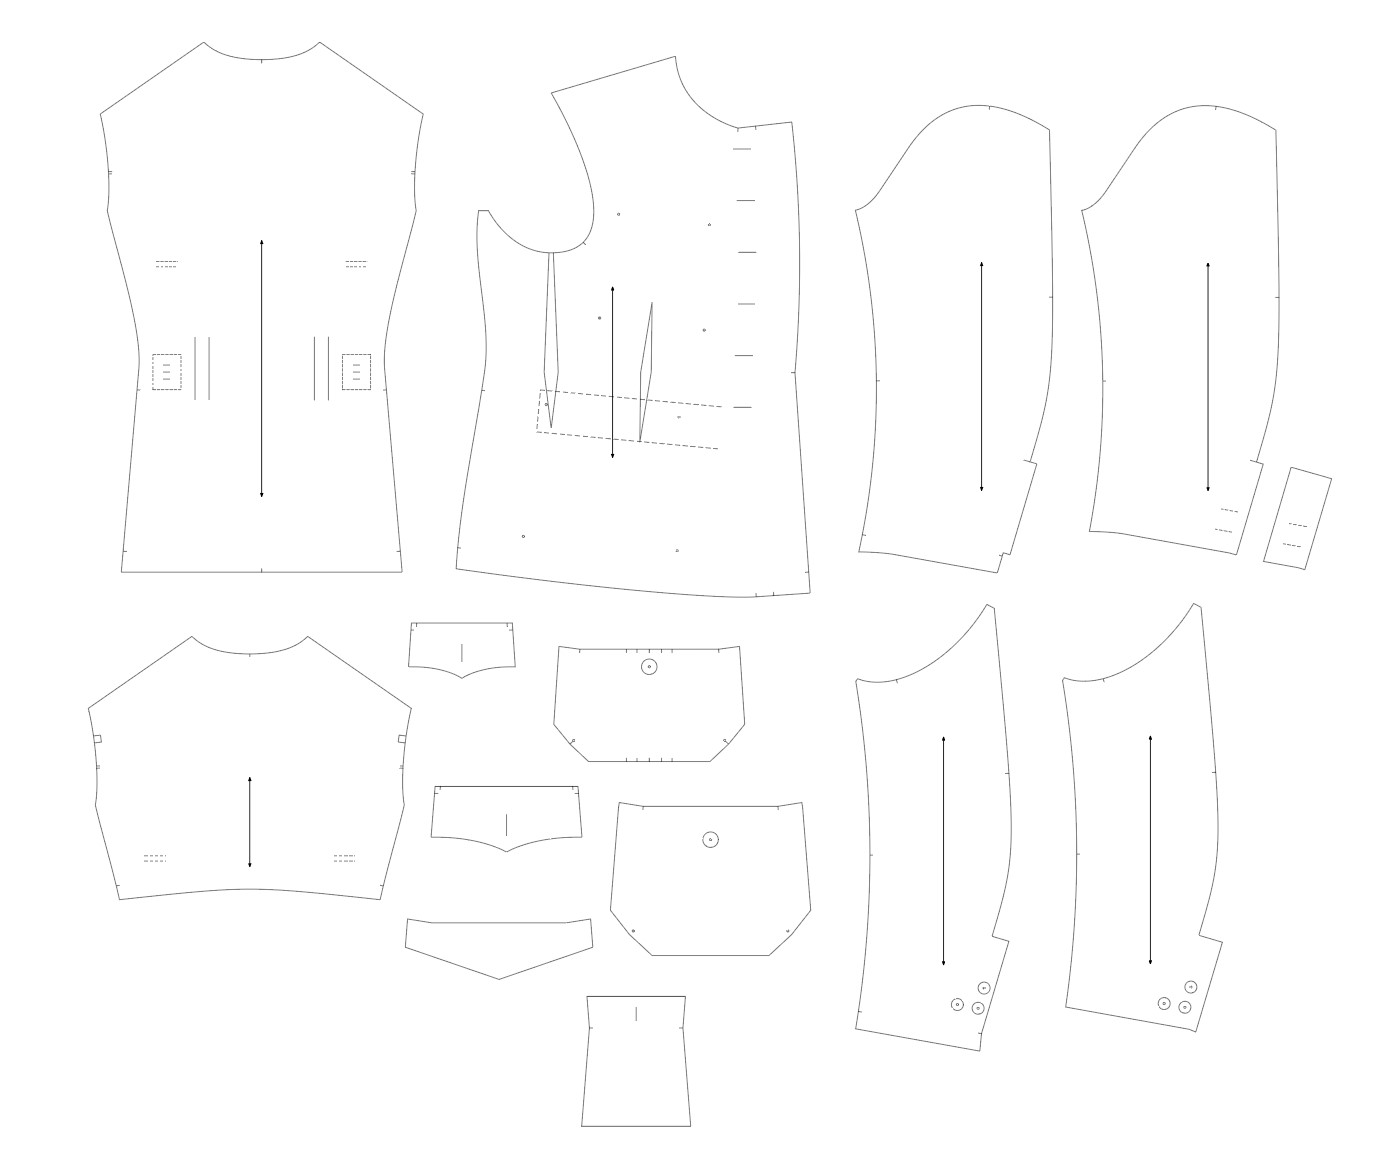
Todays progress so far. Managed to add some details and placement markings for the chest and back, get the liners for the sleeves and the back drafted out as well as the huge pain in the ass of getting the external pockets sit right with right measurements on them.
We’ll see how these work in the final toile… I suspect I may need to omit some of the markings and/or add more.
Tomorrow it’s finally time to start tackling the chest liner, button extension, reinforcements for various parts in there as well as the internal suspender… if I have time, I’ll draft the first version of the collar as well.
For the chest liner I have to learn how to use the “Unite two pieces” tool and see if it allows me to make the liner, as the darts are omitted on it.
Hopefully after all that I can finally print this one out to start checking the assembly order… might have to add myself some markings to remember to add the twill tape and places and all that fun stuff.
Anyways, nearing the end of the journey, hopefully in a week or two this thing is done and I can finally start delivering the jackets for the customer. Luckily I’ve got plenty of t ime left…
The main thing to remember is to not unify any pieces which have an Internal Path. I can’t remember what the other things are at the moment, I generally avoid it like the plague, because it can have a similar effect on patterns!
It’s mainly the internal paths right now. I can’t remember which piece… 1st or 2nd, but when the union is created copies of the ipath nodes are not created for the one piece, and they disappear from the orginal piece. Deleting such ipaths from the union will then delete the modeling nodes leaving the orignal piece with referencing nodes that no longer exist leading to the pattern crashing.
Well, I made a union piece to test if some measurements are working or not, deleted the parts and now if I delete the points I used for the union…. the software crashes.
I suspect I could delete those lines from the save file code, relating to the union…
Alright, well I guess I’ll make them as separate pieces and just unite them in Illustrator. I have to run the file through Illustrator anyways to prep it for my plotter.
As a side note, deleting the union tool code from the save file made this work again, thankfully.
@Lieckio - I always do the union piece inside the drafting using the move or the mirror tool. Then I can make a complete pattern piece from the objects in draft mode and add internal paths and notches as I please. If I want, I can always hide the extra pieces in a Union group